Bring your Sitecore XC deployments from the Stone Age to the future – How to deploy server specific environments fully automated
This time I would like to share some thoughts on a topic every developer will be faced, at least if the topic CI and CD comes up and you would like to completely automate that process for your
This time I would like to share some thoughts on a topic every developer will be faced, at least if the topic CI and CD comes up and you would like to completely automate that process for your Sitecore XC instance as hopefully most of you are already doing with your Sitecore XP implementations. For that I would like to describe first of all the general process of how to deploy an instance of commerce engine. After that, I will point out the limitations of that OOTB process and what problems now come up. In the end will will describe the newly introduced approach of solving that problem and show the results of that implementation.
How to deploy a commerce engine
Let’s first have a look at the topic of how the commerce engine is deployed in general, to understand later on, what we have to change in that process to realize server specific automated deployments.
From what we learned from the Sitecore documentation is, that in general there are 3 different ways to deploy commerce engine
- Visual Studio Publish
- Command Line Tool
- Inside a build environment
Visual Studio Publish: To deploy your commerce engine via VS publish, just open the commerce engine solution. Then right click on the Sitecore.Commerce.Engine and click Publish (Veröffentlichen). In the new screen you can now switch various kinds of publish methods.
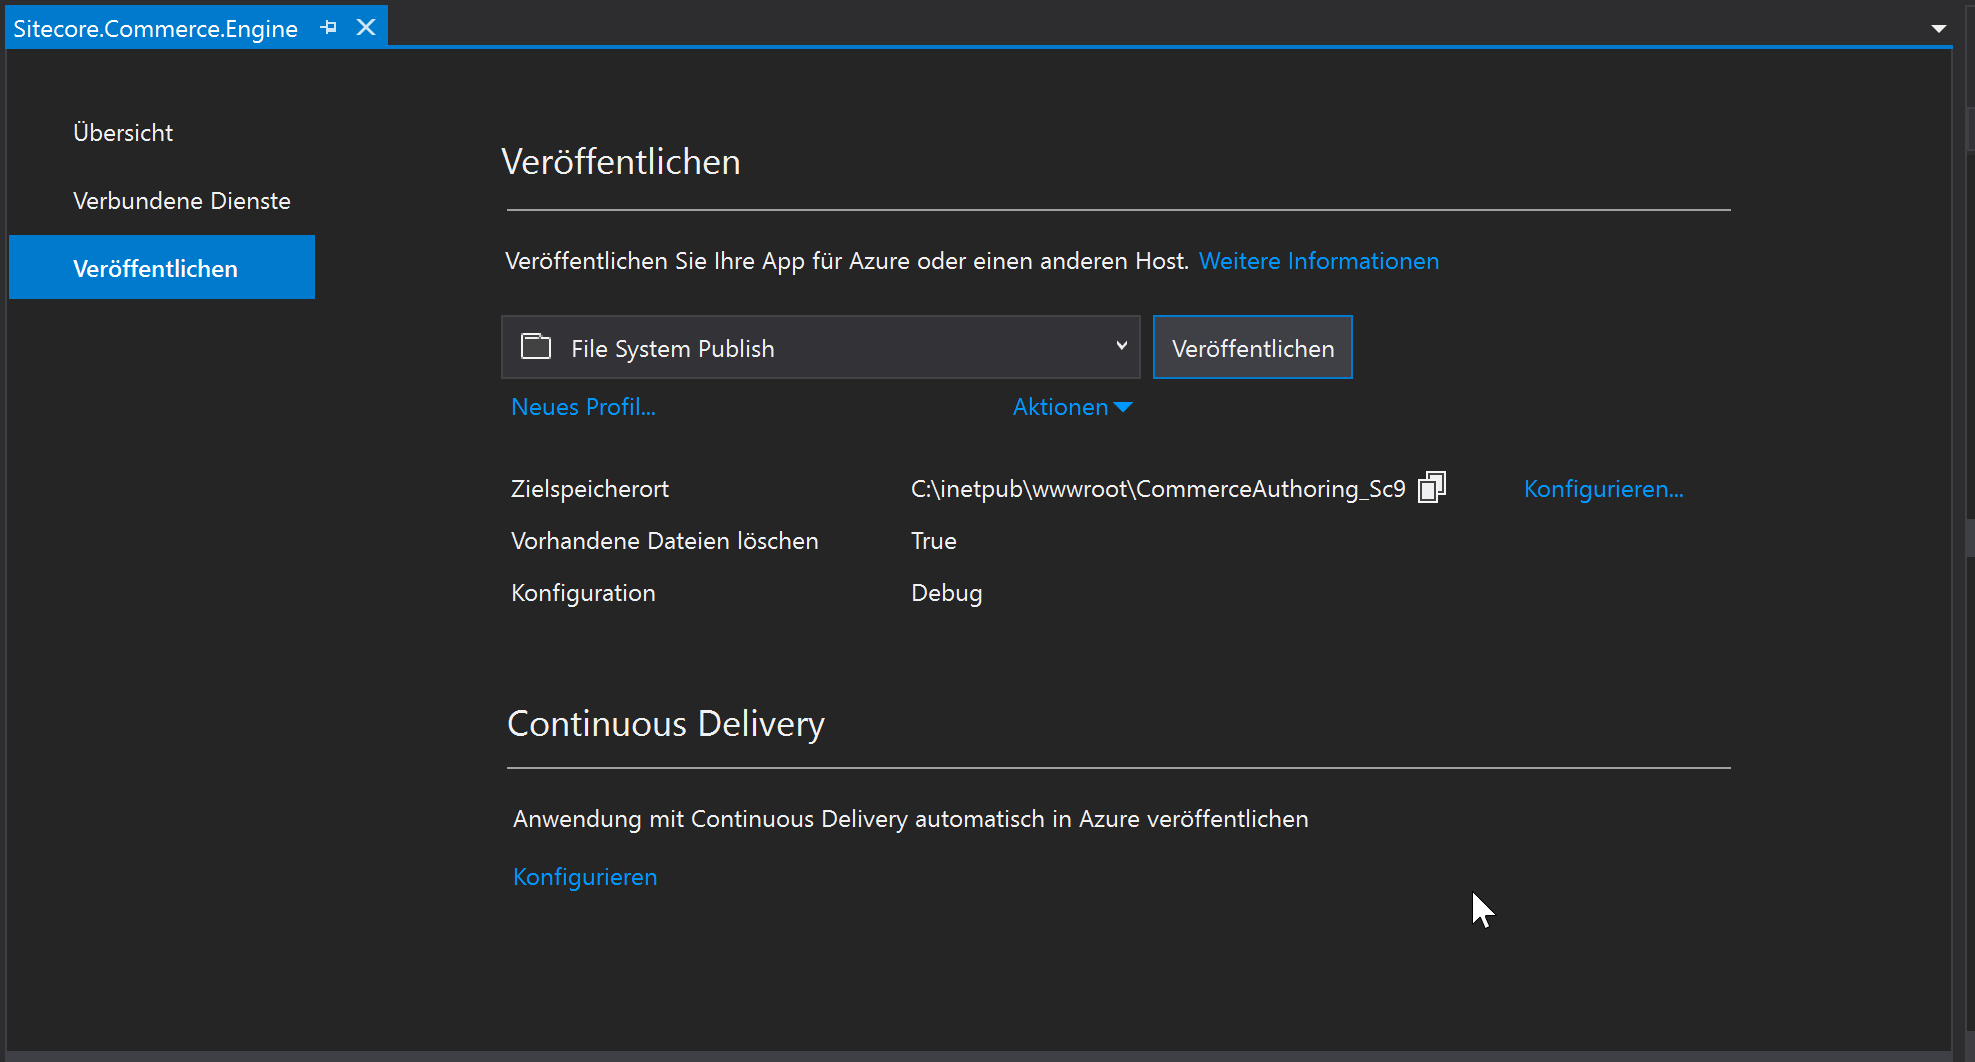
If you open that screen with the OOTB commerce engine SDK the filesystem publish method is already setup initially.
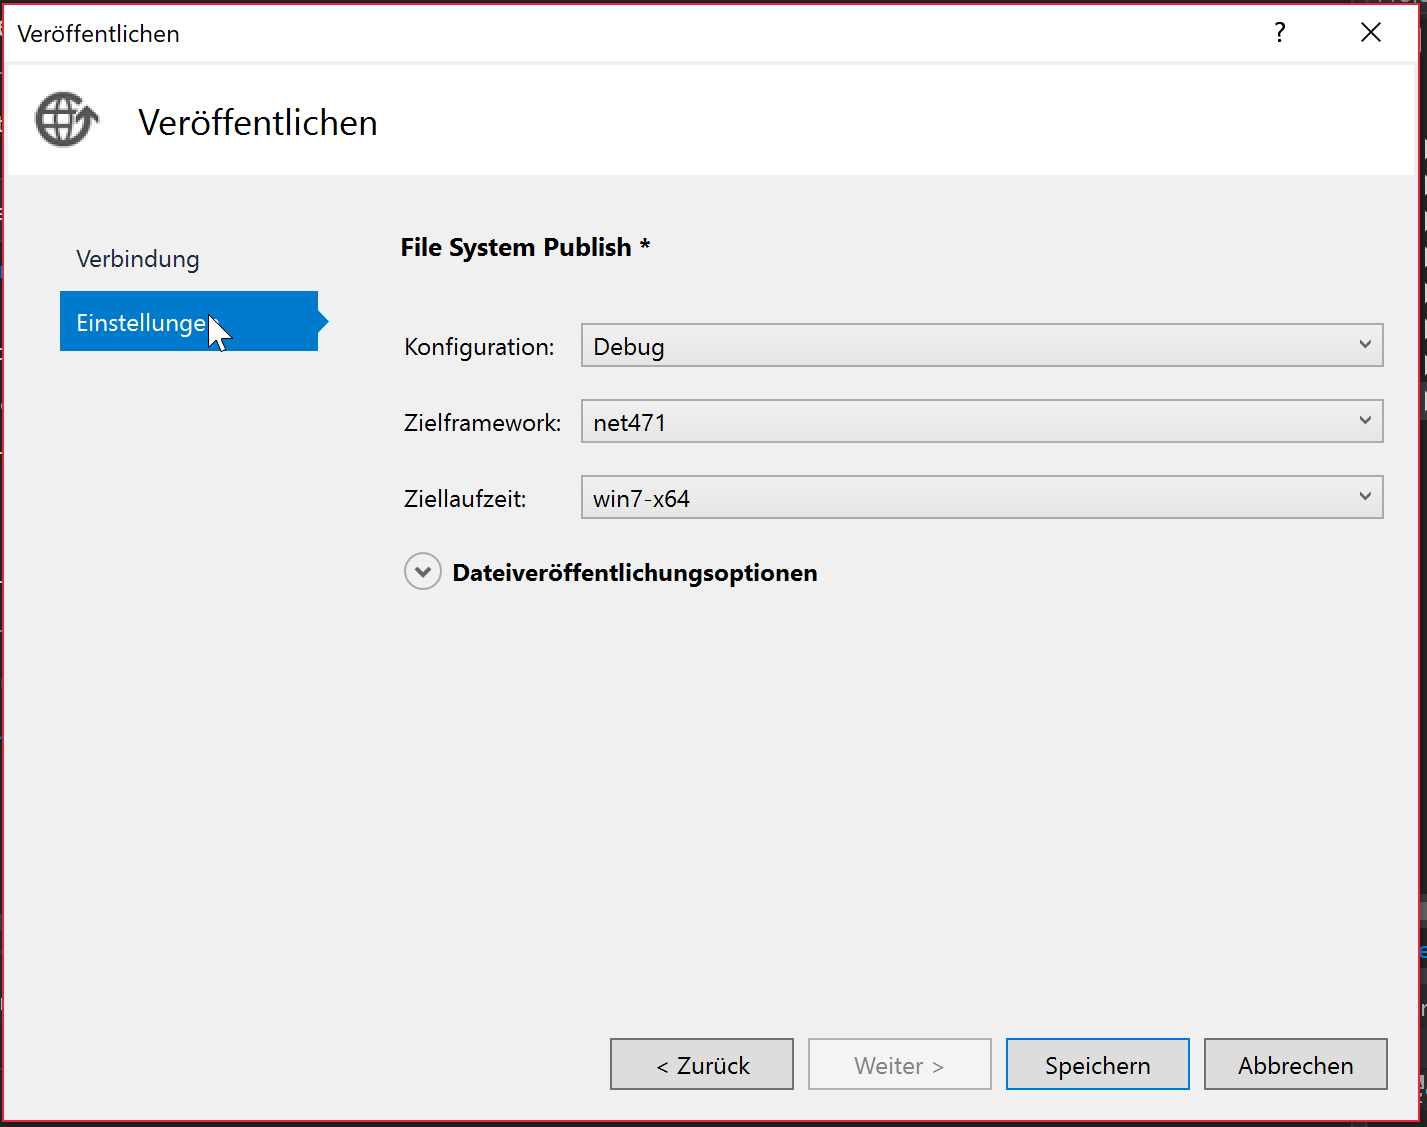
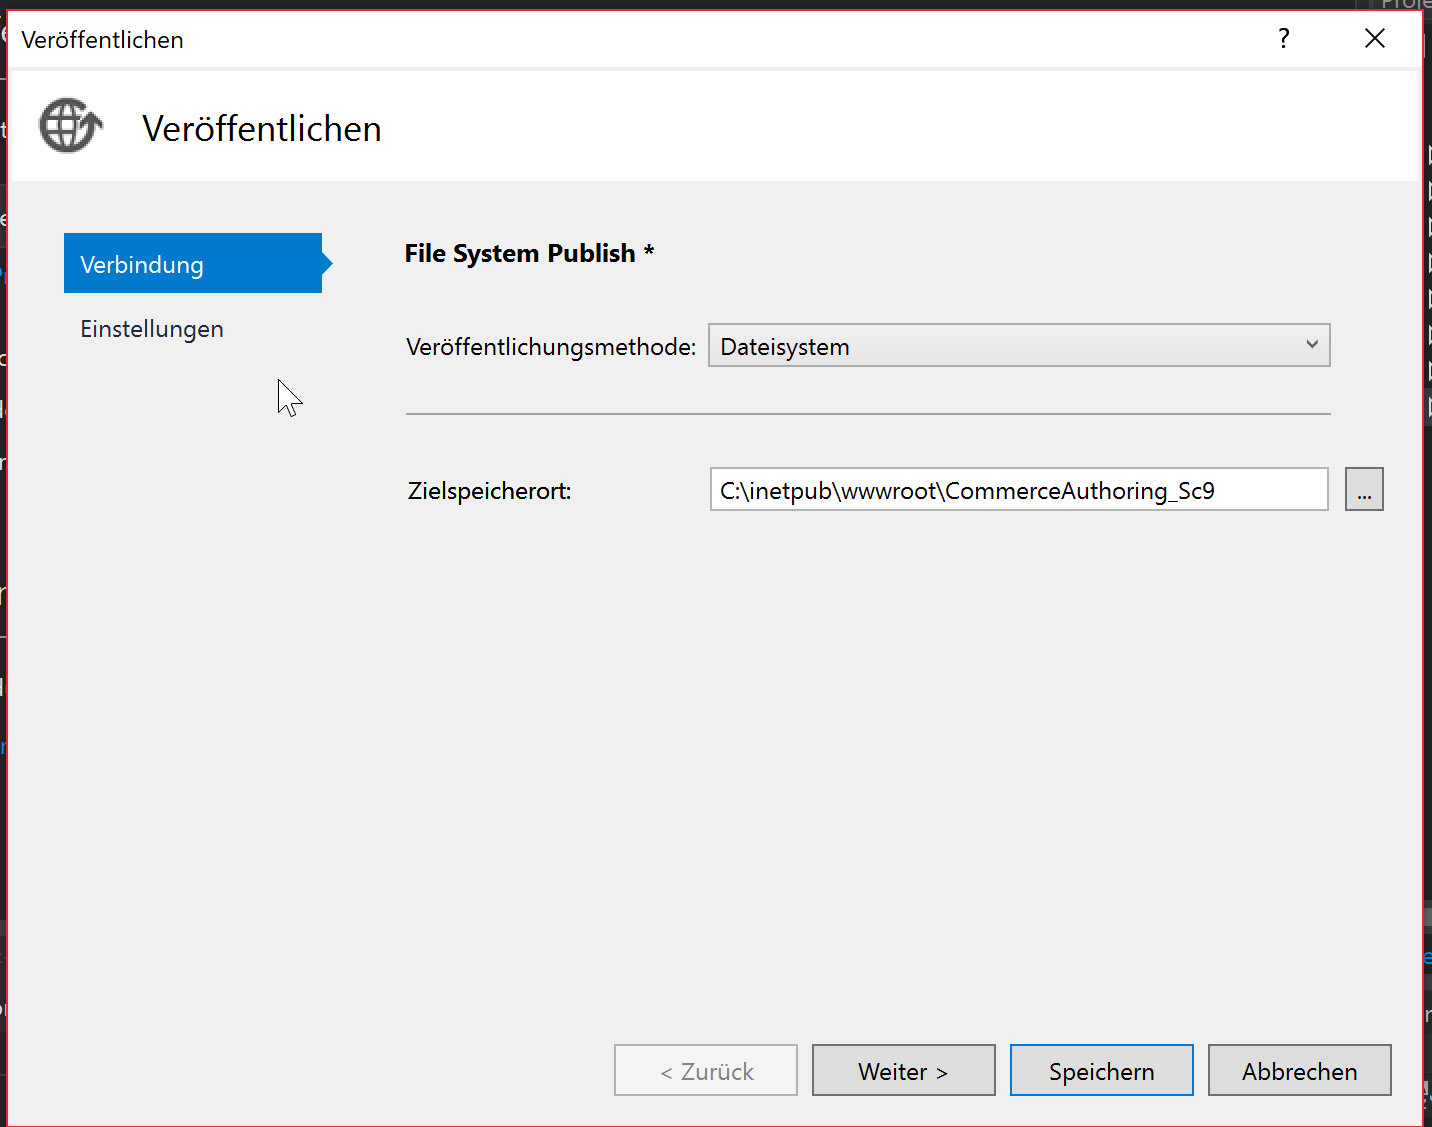
Just double check if the target path of the publishment is correctly and fits for your engine. After you finished that, just save the settings and execute the publishment.
Command Line Tool: The second way of how to publish a commerce engine is, via command line tool e.g. cmd tool. To do that, just navigate to the root of your commerce engine solution and execute dotnet publish command there with proper parameters.

dotnet publish {SOLUTION NAME} -f {FRAMEWORK} -c {BUILD CONFIGURATION} -o {PATH TO PUBLISH} -r {RUNTIME}
If you do not set the proper parameters for your environment the result of the publish might work, but if you try to use that engine and work with that, you will most likely get some IIS server error telling you the engine started but stopped again.
You can also either way choose the output path as any folder and copy the output manually to the proper location, or directly give the right path of your engine.
Note: To publish commerce engine to your IIS instance, make sure the current engine is not in use by either way reset or stop IIS for the time of the publish or copy process.
Inside a build environment: This way I will not describe in detail, cause it is highly dependent on your specific build environment. Depending on the environment you will most probably have different board tools of how to deploy a .NET Core application properly.
What are the problems now?
If we are working locally and just want to publish our instance for development reasons to our local IIS everything is totally fine so far and everything is working as expected. But of course we do not only want to deploy our code to the development engine locally, but also to some other servers like testing or productive environment.
And at that point we know already from our Sitecore XP solution, that there are various settings or configs, which are dependent to the specific environment. Examples for such files are connectionstrings.config, datafolder.config, transformations of the web.config and so on. Of course also Sitecore XC has configuration files. These files are called environments. If you want to learn more about environments, I recommend to first read that blog post of me, where I described environments in detail, what they are, how they are structured and how to adapt them.
Of course also in Sitecore XC we will also reach the point, where we need server specific settings, like in Sitecore XP. Scenarios of such settings could be endpoints of interfaces, which differ from local, to testing, to productive servers or just credentials or accounts to database.
In various projects I was able to see, how others deal with that kind problem. The overall result was, that some developer all the time deploys commerce engine manually by doing for example the steps described below
- opening Visual Studio
- building the solution
- removing all the configs (for now)
- zipping the output package
- copying that package to the target server
- unzipping that package
- replacing all the files with the output package
- manually go into each environment compare that environment with the one of the deployment package and edit that file piece by piece
You see, that such a deployment consists of many manual, time consuming and error-prone single steps. If you just do one little mistake in one of these steps, deployment will most probably fail. Results could lead from harsh server errors to hidden errors in implementations, which are found by chance. afterwards.
The aim of course should be to completely automate such a process to rule out human errors and minimize deployment time. In the next chapter I will introduce an approach of how to overcome all these issues by having easy maintainable server specific environment json files with .NET Core.
Approach of solving that problem
Of course I can imagine there are various ways, of how to overcome such problems within Sitecore Commerce Engine. In this article I just concentrqte on an a very generic and plugin like approach. The approach I will describe in detail now consists of various small changes and adaptions made in the solution at various places
- Creation of new ASPNETCORE_ENVIRONMENT specific environment files
- Creation of new plugin to handle the new environments on bootstrap command
- Transformations of web.config to set ASPNETCORE_ENVIRONMENT
Together all these changes now make it able to use your own CI / CD systems to deploy the commerce engine fully automated.
Creation of new environment files
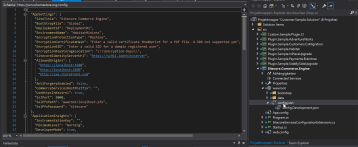
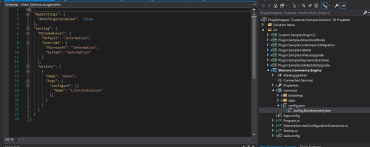
Let’s start with the creation of new environment files under “\wwwroot\data\Environments”. For demonstration reason I used PlugIn.AdventureWorks.CommerceAuthoring-1.0.0.json and created a new file called PlugIn.AdventureWorks.CommerceAuthoring-1.0.0.UAT-CM.json. You see the that the new file just has an extension shortly before the end. In VS the files look like this
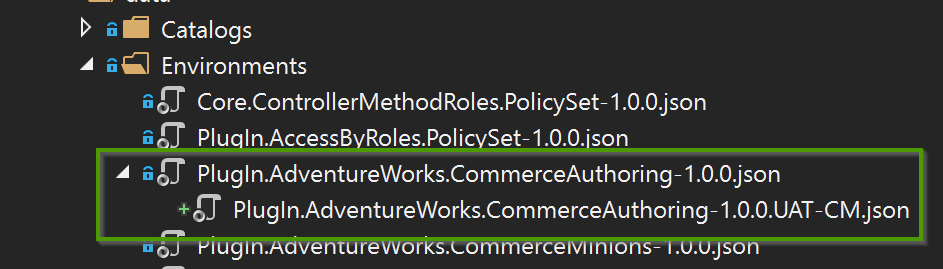
You can see, that VS directly and automatically recognizes the new file as “sub file” of the original one. This mechanism behind that relies on standard .NET Core environment handling. The extension “UAT-CM” is just a new .NET CORE environment I created for later usage. Maybe you already know such files with namings like
- Development
- Stating
- Production
These mechanism are also already used by the commerce engine for example when dealing with config.json and the development variant of that file. This file is handled by OOTB .NET Core mechanisms like mentioned above.
From what I saw there, I got inspired to also use such an approach for our Sitecore XC environment json files. There this standard .NET Core behavior is not applied, cause these files are loaded and evaluated not by .NET Core, but by a dedicated plugin within commerce engine. This plugin just loads all the json files within /wwwroot/data/environments/ and processes them, with no differentiation of .NET Core environments. But that should not stop me ^^. Within the next sub chapters you will see the changes made to the plugin, so that all these pieces of functionalities work for our environment files.
Of course the naming of the .NET Core environments is completely up to you. I decided for now to use the following notations for historical and Sitecore reasons, where you have a local development machine a scaled Sitecore environment for testing called UAT (User Acceptance Testing) and a scaled Sitecore environment for production called PROD.
- Development (Local deployment)
- UAT-CM (Content Management commerce service of UAT)
- UAT-CD (Content Delivery commerce service of UAT)
- UAT-MINION (Minions commerce service of UAT)
- PROD-CM (Content Management commerce service of PROD)
- PROD-CD (Content Delivery commerce service of PROD)
- PROD-MINION (Minions commerce service of PROD)
Now that we know, how we create and name our new environments, so that they are applied later on correctly, we will have a look at the content of these files.
I decided to offer two different ways of how the content can be added to these files
- as full replacement
- as merge / overwrite
Full replacement Mode: To create a new environment, which uses that mode, you just have to create the new environment file based on the original environment file, with all the given settings. Within the new file you now just have to change all the settings, which you would like to change for the specific environment. The rest stays as it is. The way Sitecore later on bootstraps the new environment is now, that it just, based on the given .NET CORE environment loads the new environment specific environment file, instead of the original one. Therefore the new environment specific files always need ALL the settings like the original one, nevertheless they are the same or not. For that file I guess you don’t need an example, cause it completely looks the same, except that the values are different at some places.
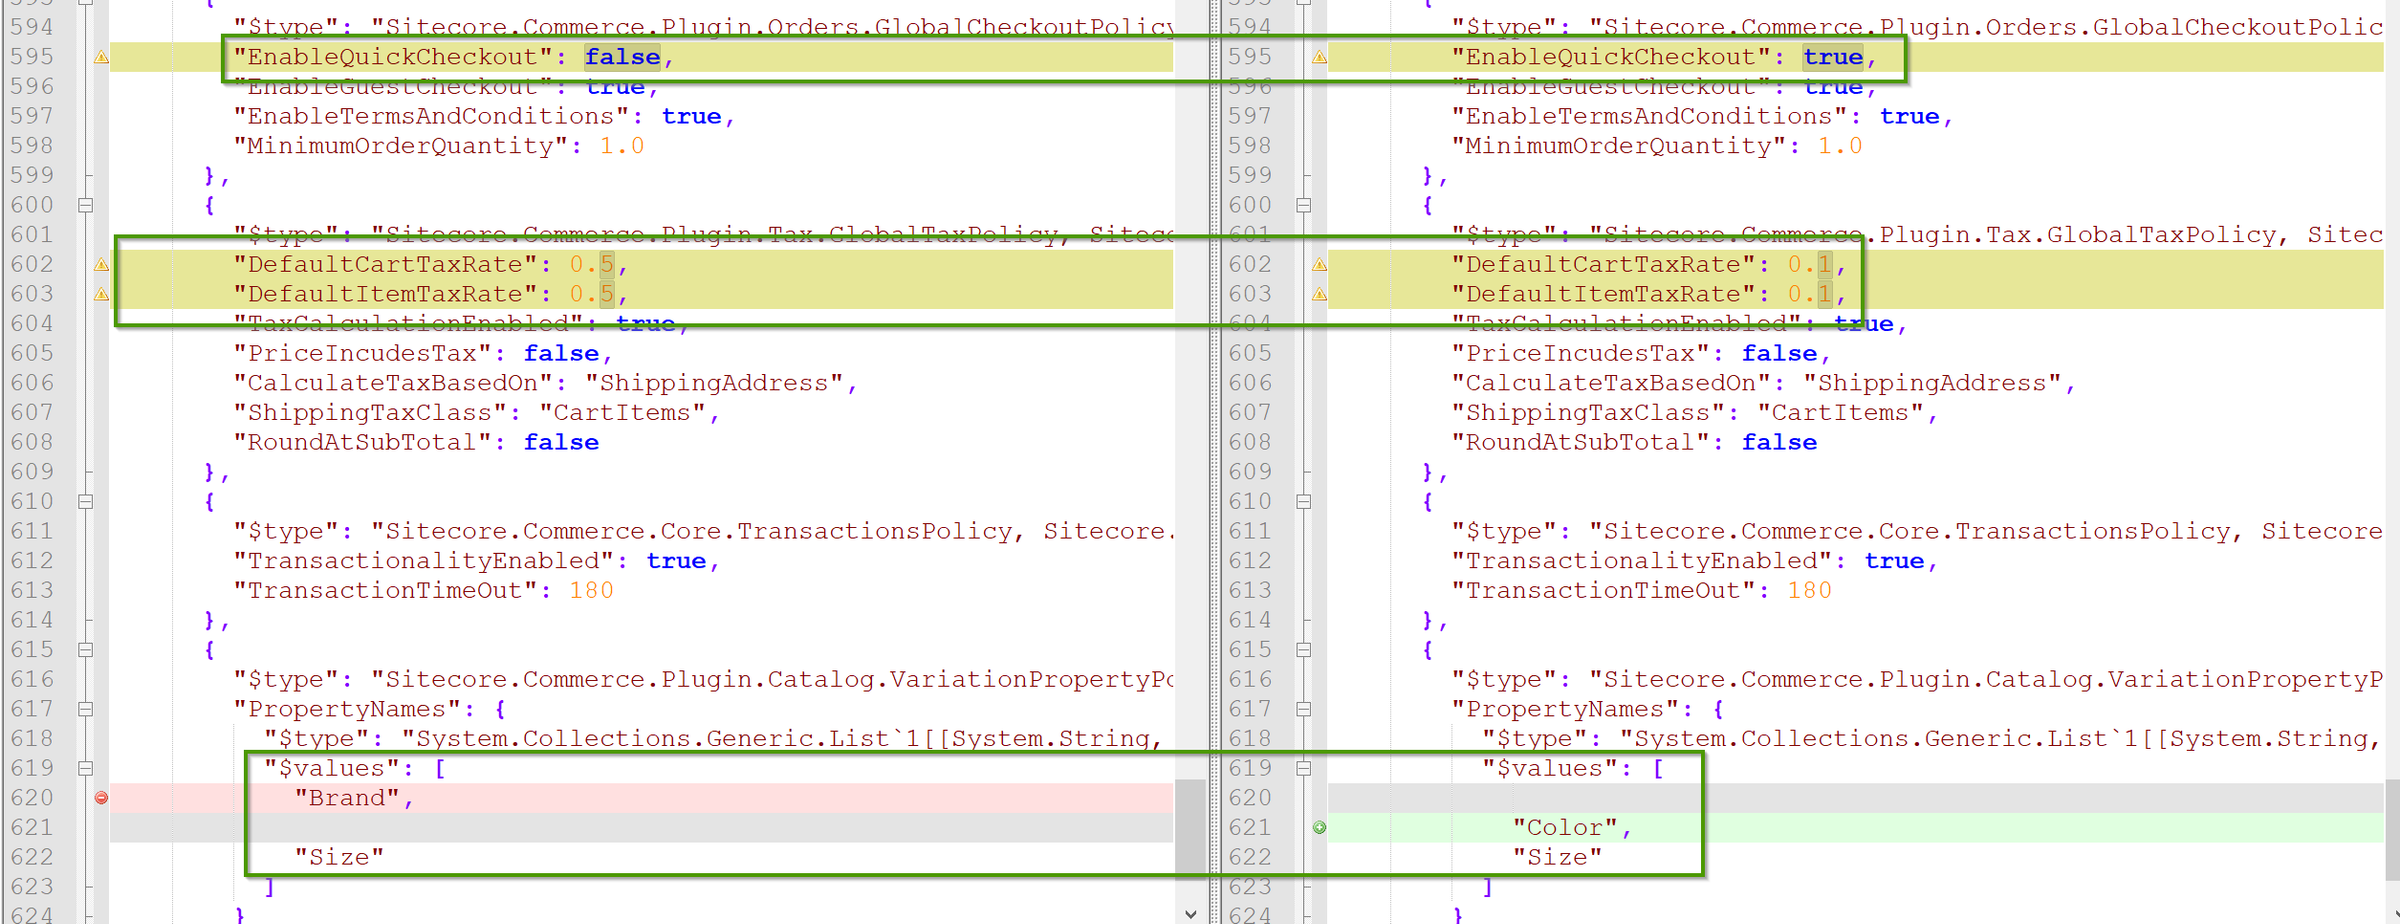
Overwrite / Merge Mode: To create a new environment, which uses that mode, you just have to create the new environment file with only the entries, which have been changed. This means, the file consists only the json structure of the entries, which should be overwritten or for arrays merged. Let’s have a look at an example of that file in comparison to the original one.
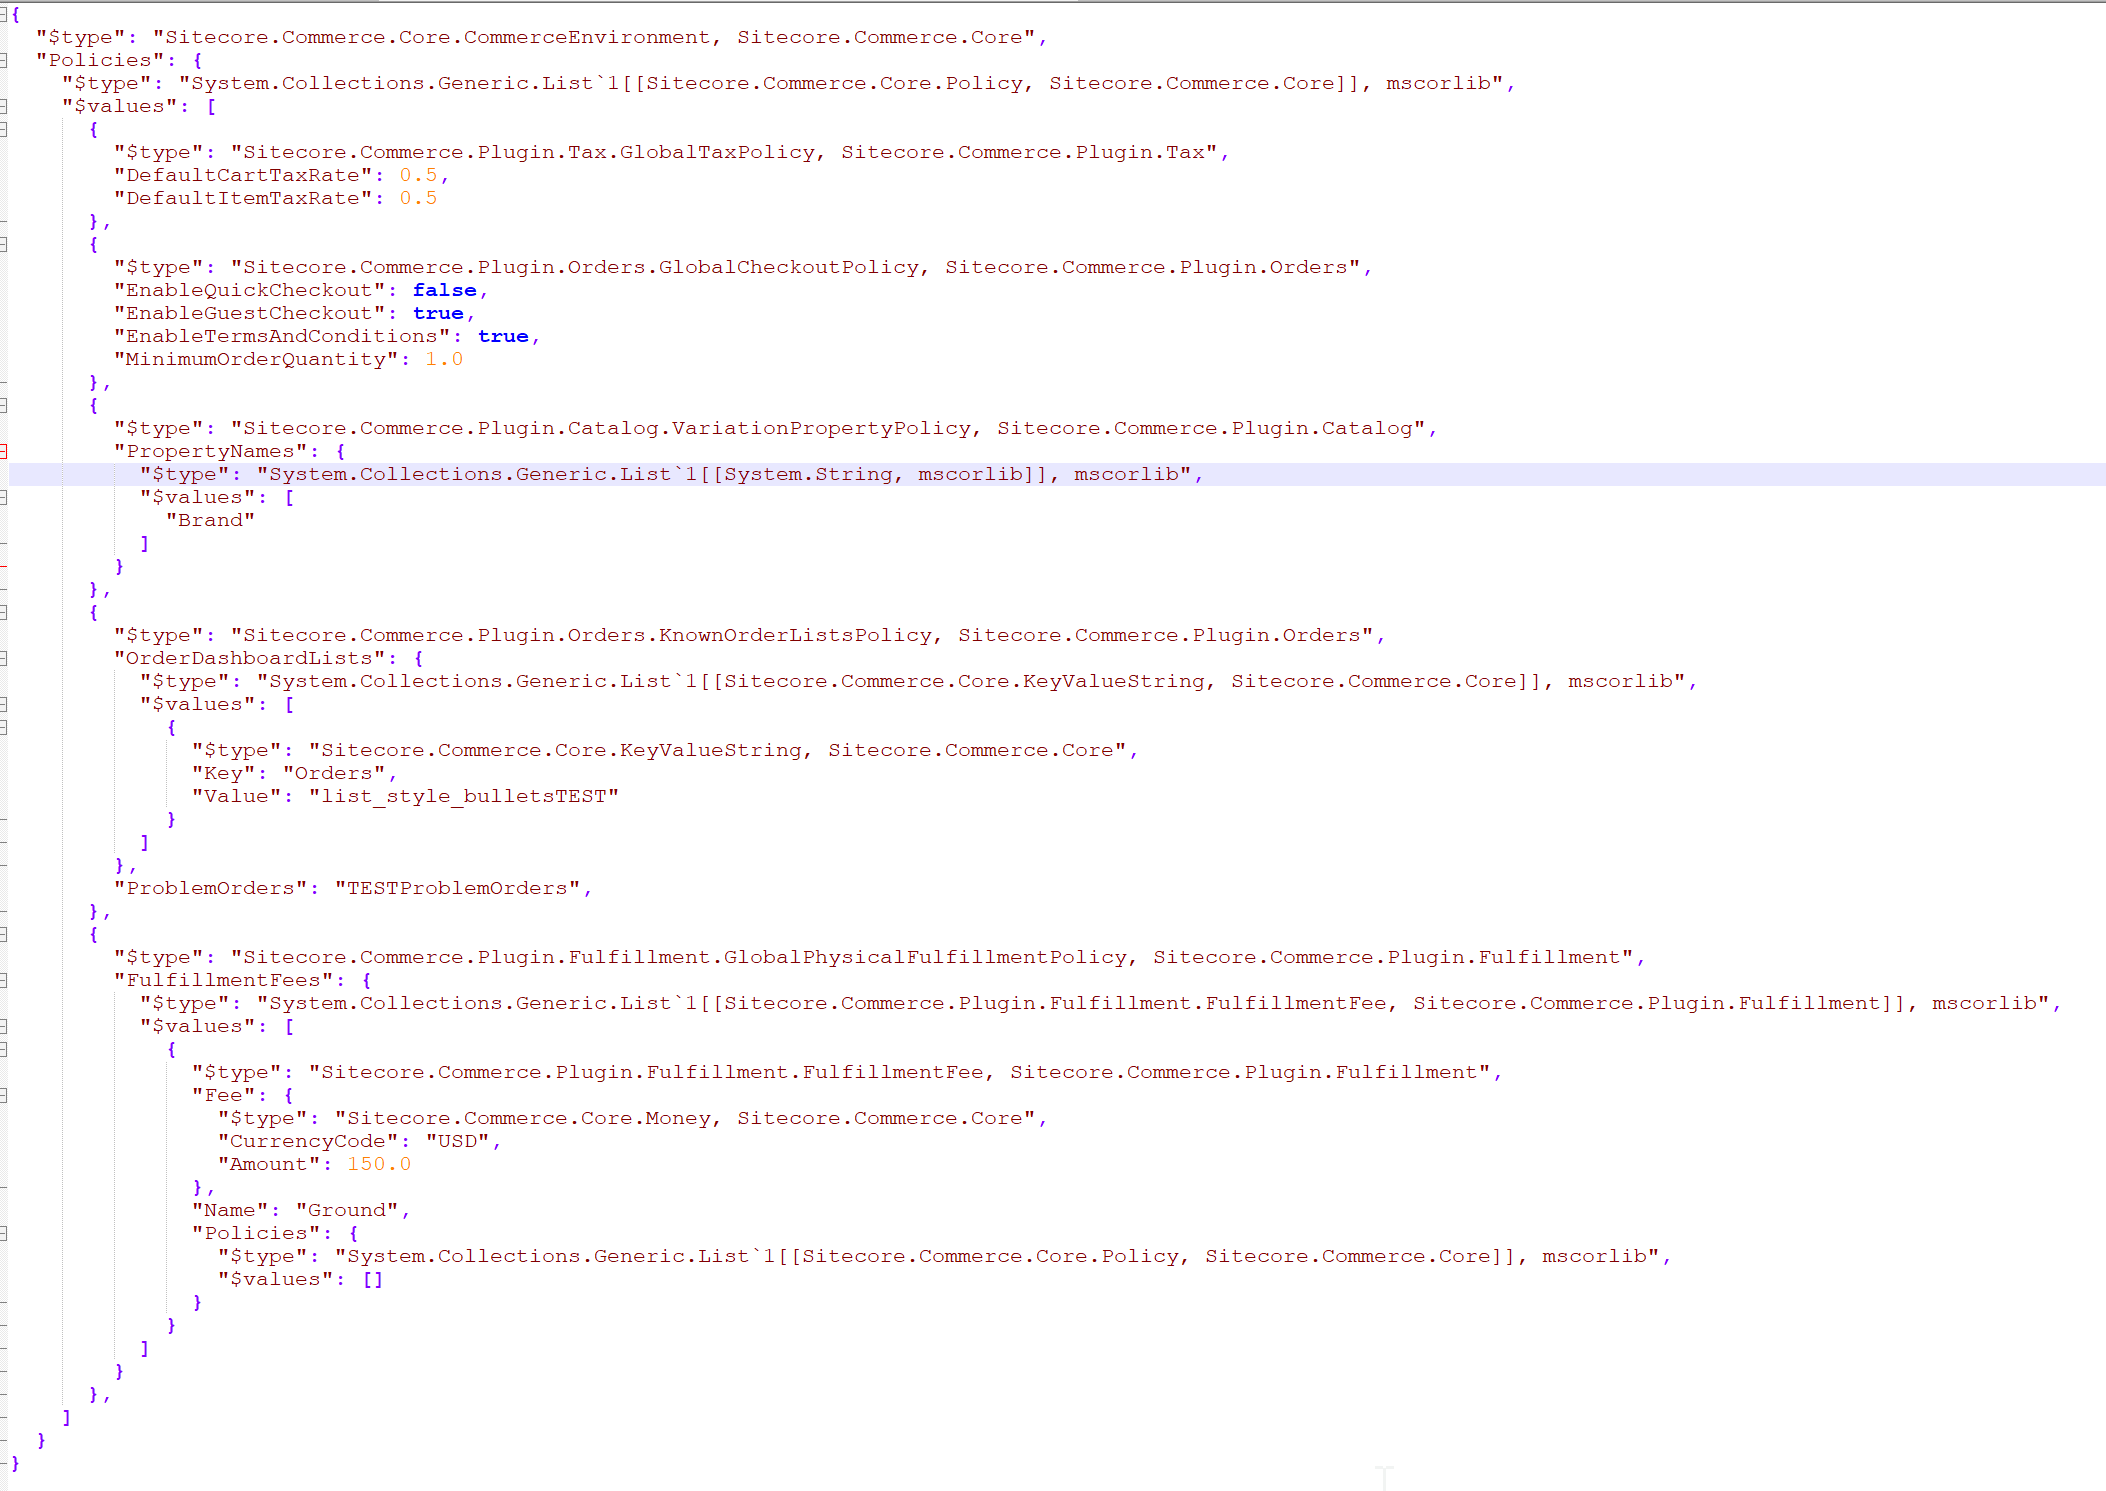
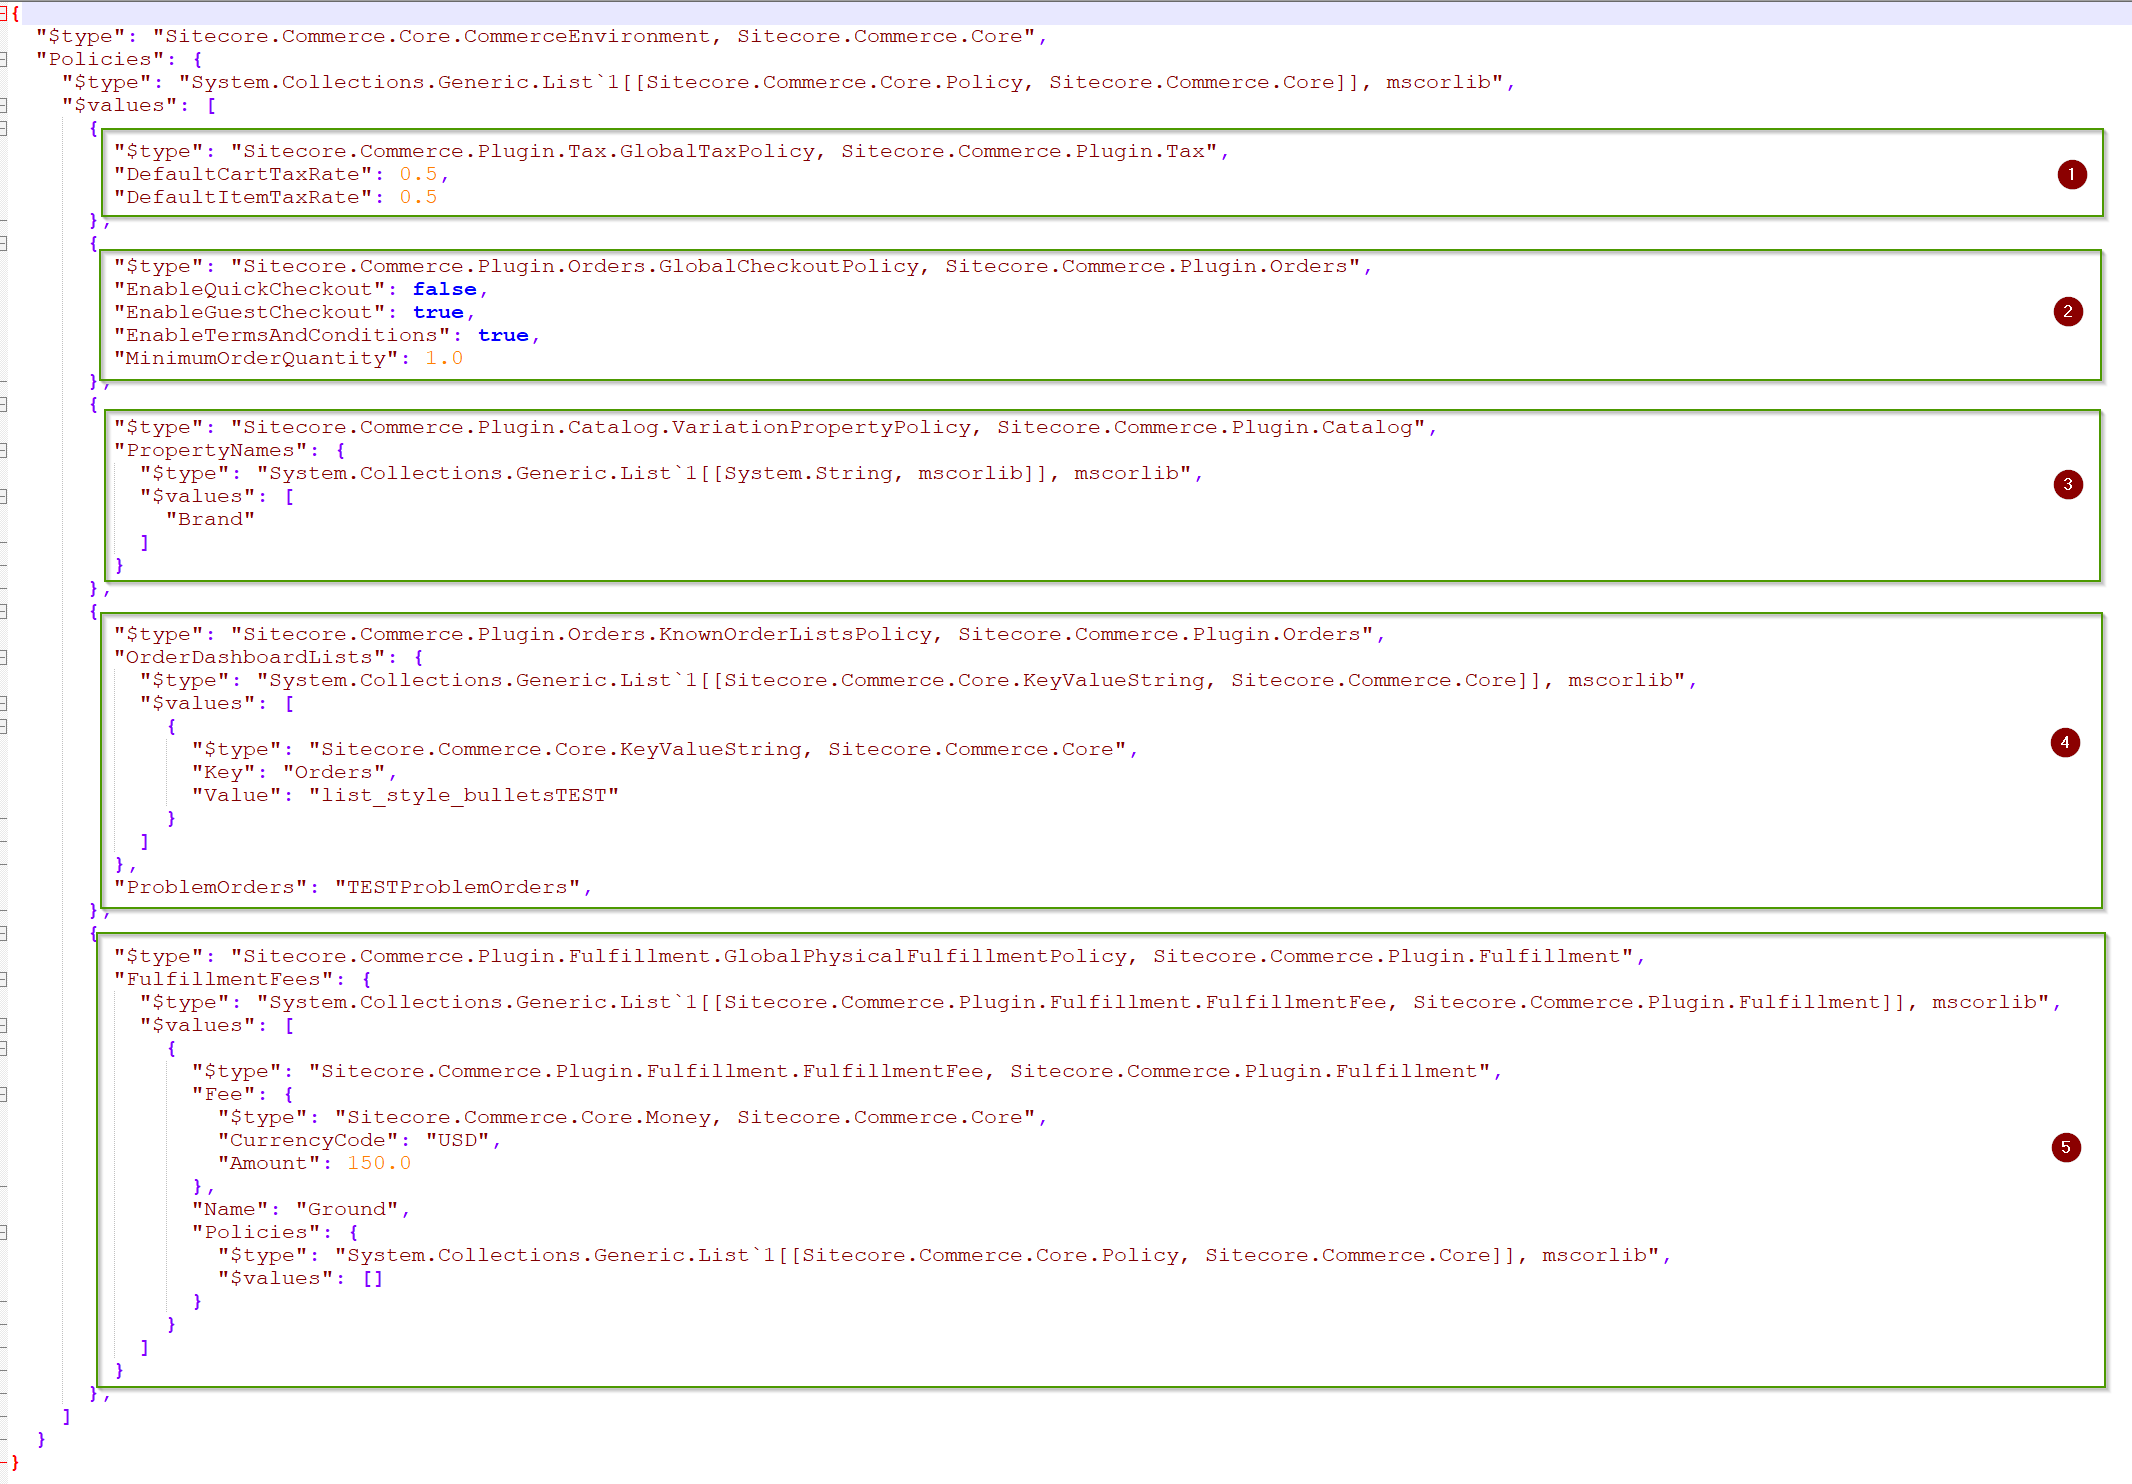
Above you can the the complete content of the new PlugIn.AdventureWorks.CommerceAuthoring-1.0.0.UAT-CM.json file. You can directly see, that it is much shorter than the original one. In this
Note: The only important thing you have to obey is, that the structure of the json file should be the same, from the element to change to the root element of the json.
For this demonstration I decided to just change the following settings
-
Sitecore.Commerce.Plugin.Tax.GlobalTaxPolicy,
- DefaultCartTaxRate from 0.1 to 0.5
- DefaultItemTaxRate from 0.1 to 0.5
-
Sitecore.Commerce.Plugin.Orders.GlobalCheckoutPolicy
- EnableQuickCheckout from true to false
-
Sitecore.Commerce.Plugin.Catalog.VariationPropertyPolicy
- Values from [Color, Size] to [Brand]
-
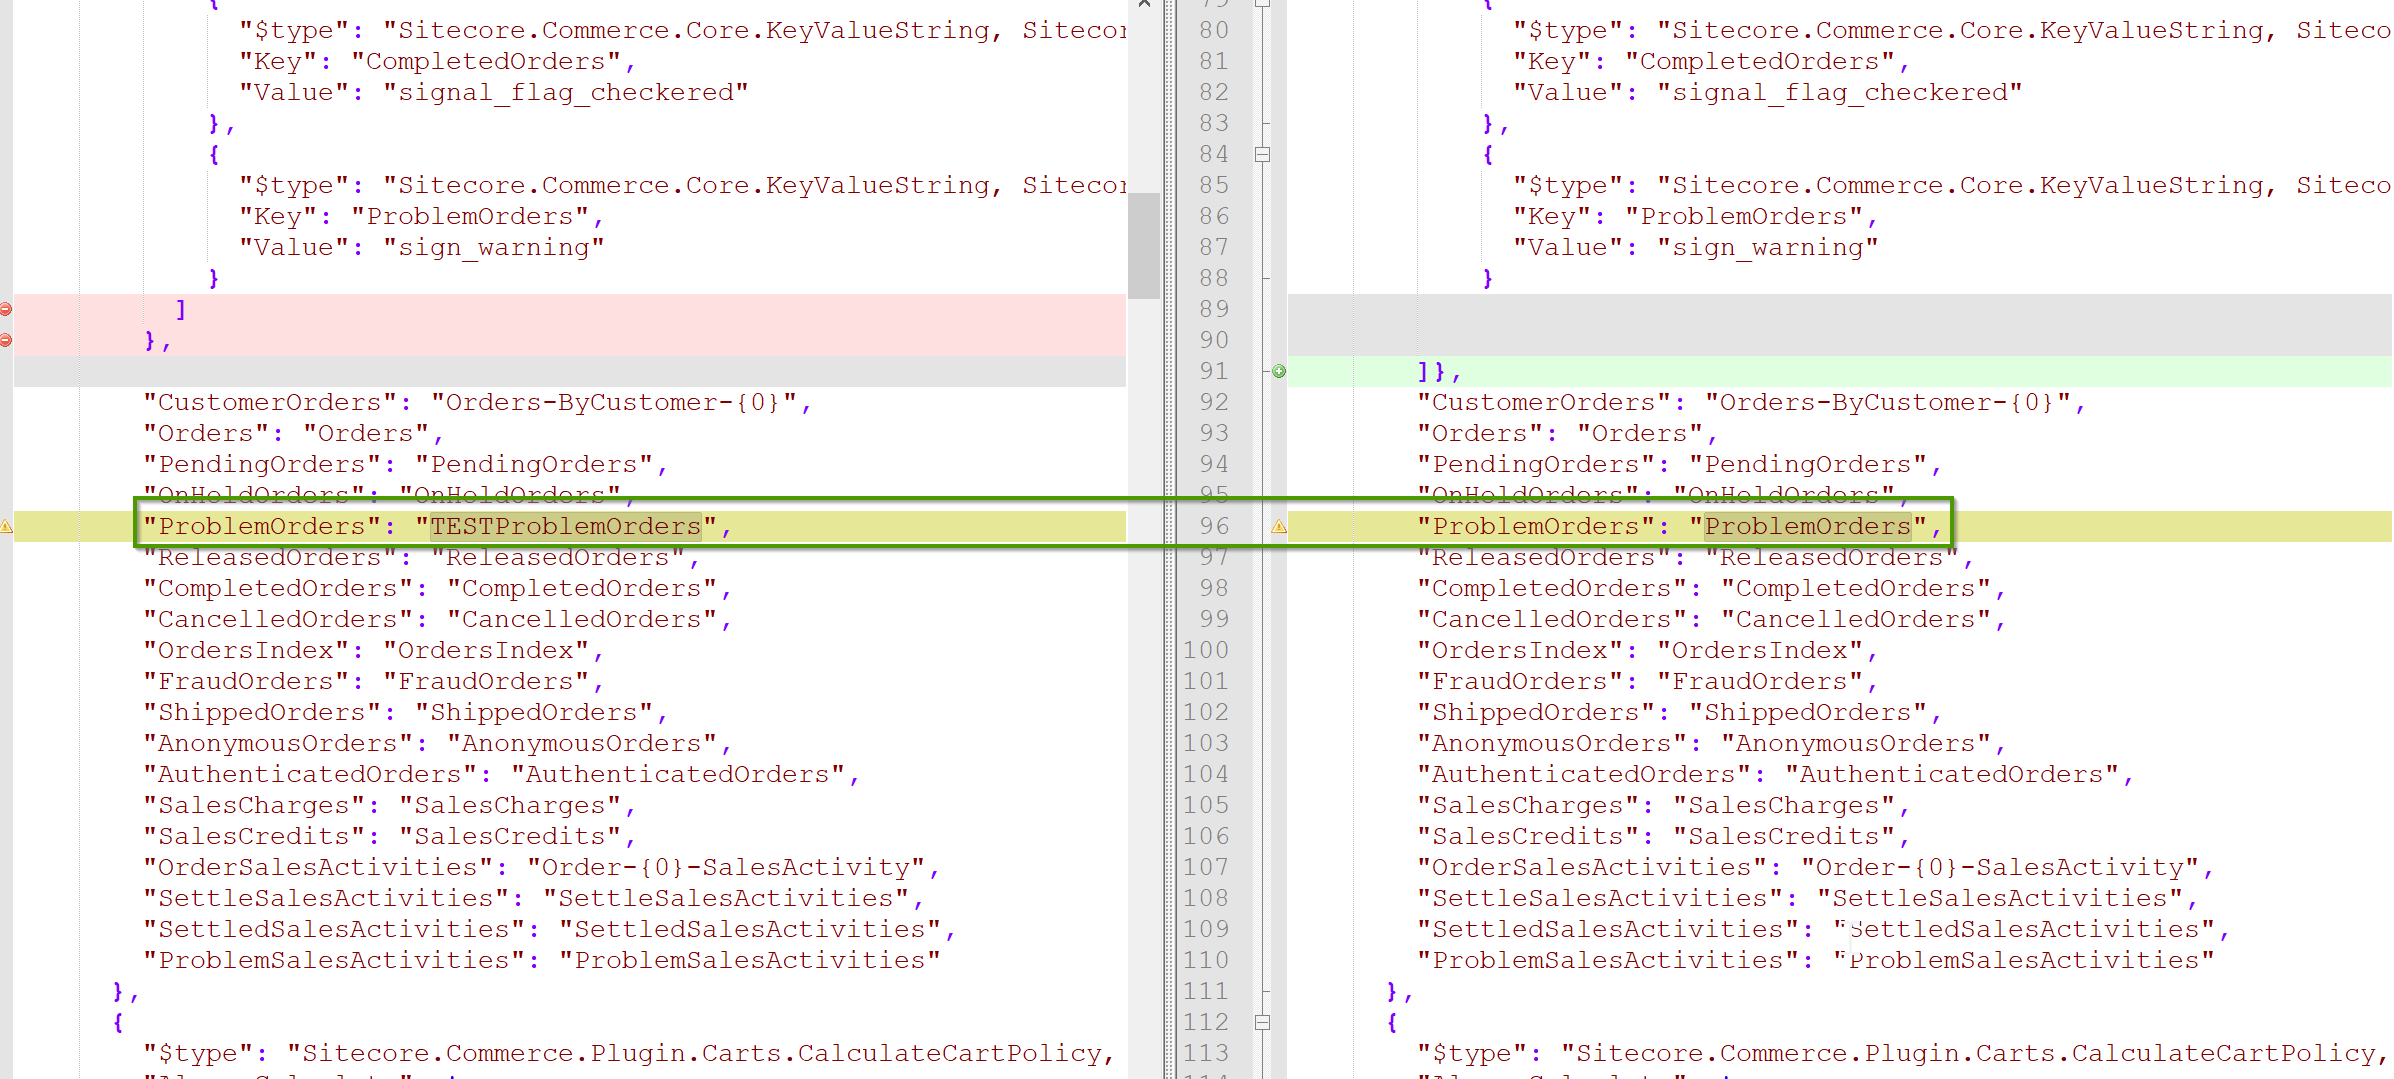
Sitecore.Commerce.Plugin.Orders.KnownOrderListsPolicy
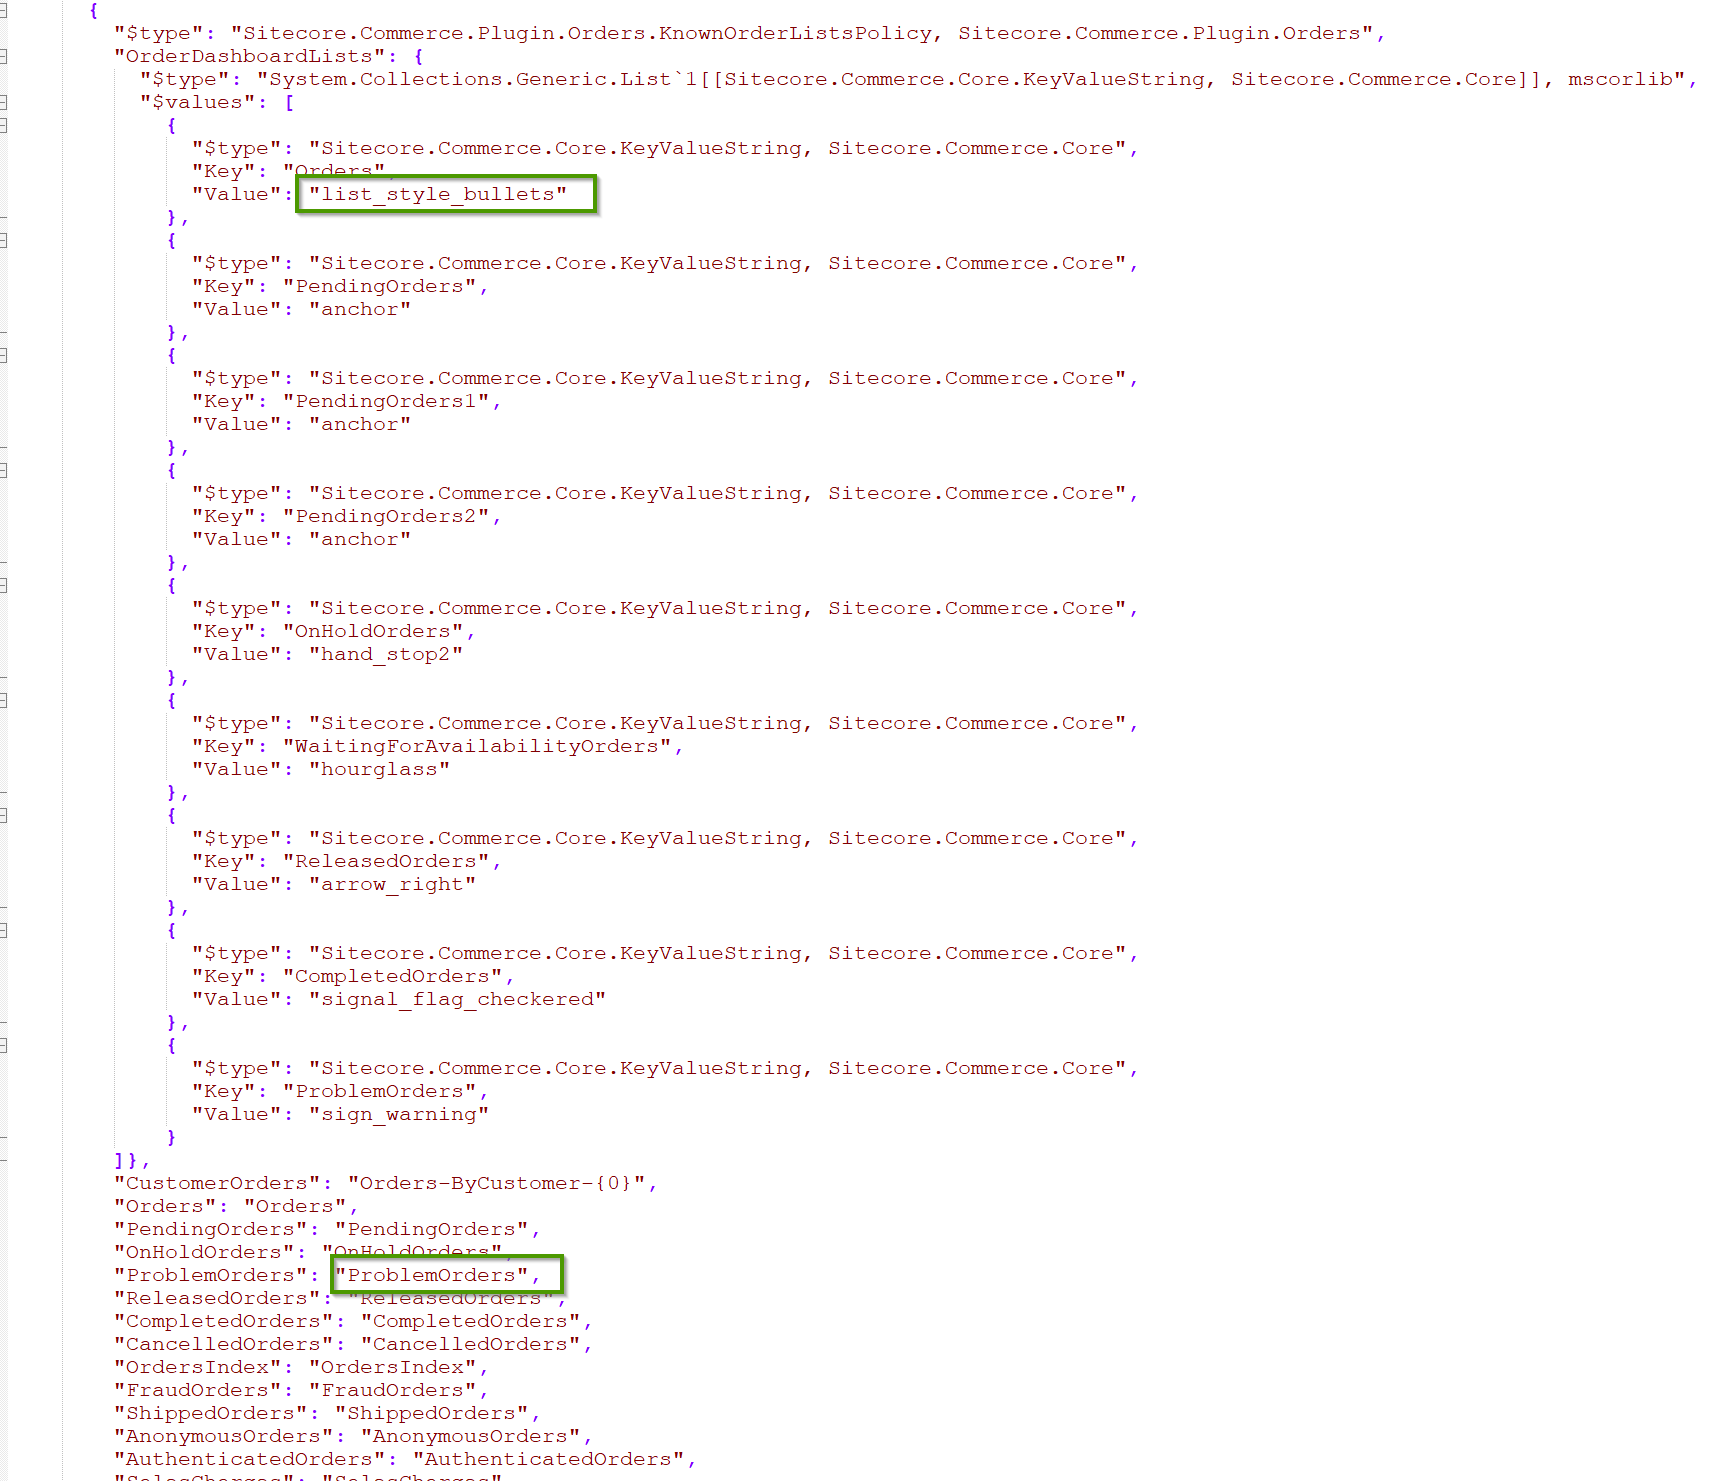
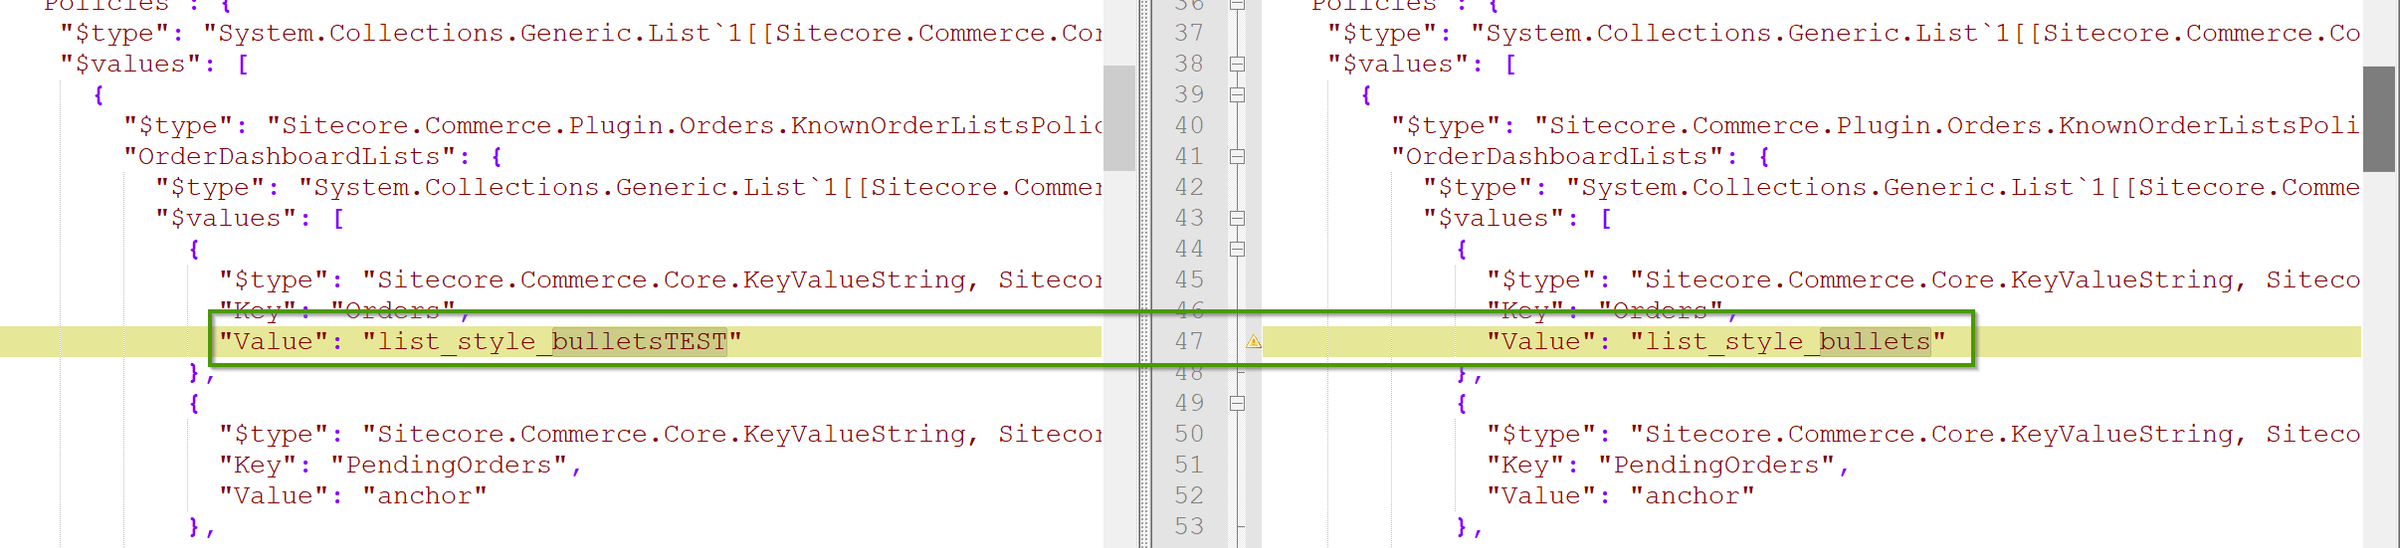
- Key Orders from list_style_bullets to list_style_bulletsTEST
- ProblemOrders from ProblemOrders to TESTProblemOrders
-
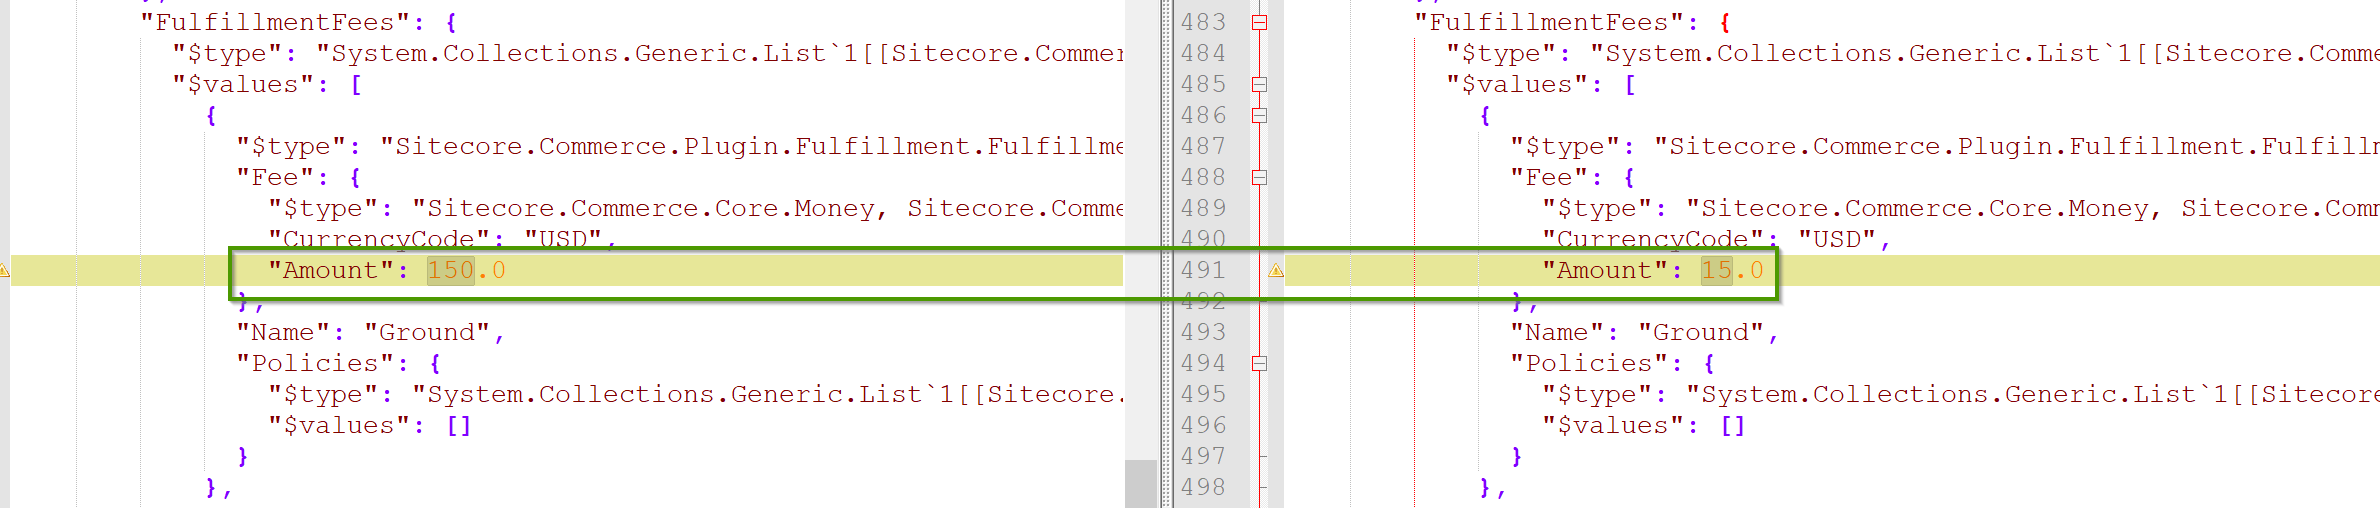
Sitecore.Commerce.Plugin.Fulfillment.GlobalPhysicalFulfillmentPolicy
- Fee for Ground from 15 USD to 150 USD
In the following screenshots you can see, the specific settings of the origin file

Creation of new plugin
Now let’s have a closer look into the newly created plugin to process the environments correctly. I started by investigating where the bootstrap commands ends up in commerce engine and found the following IBootstrapPipeline

Next I used dotPeek to investigate the BootStrapImportJsonBlock to see how Sitecore’s OOTB implementation imports all the environment files.
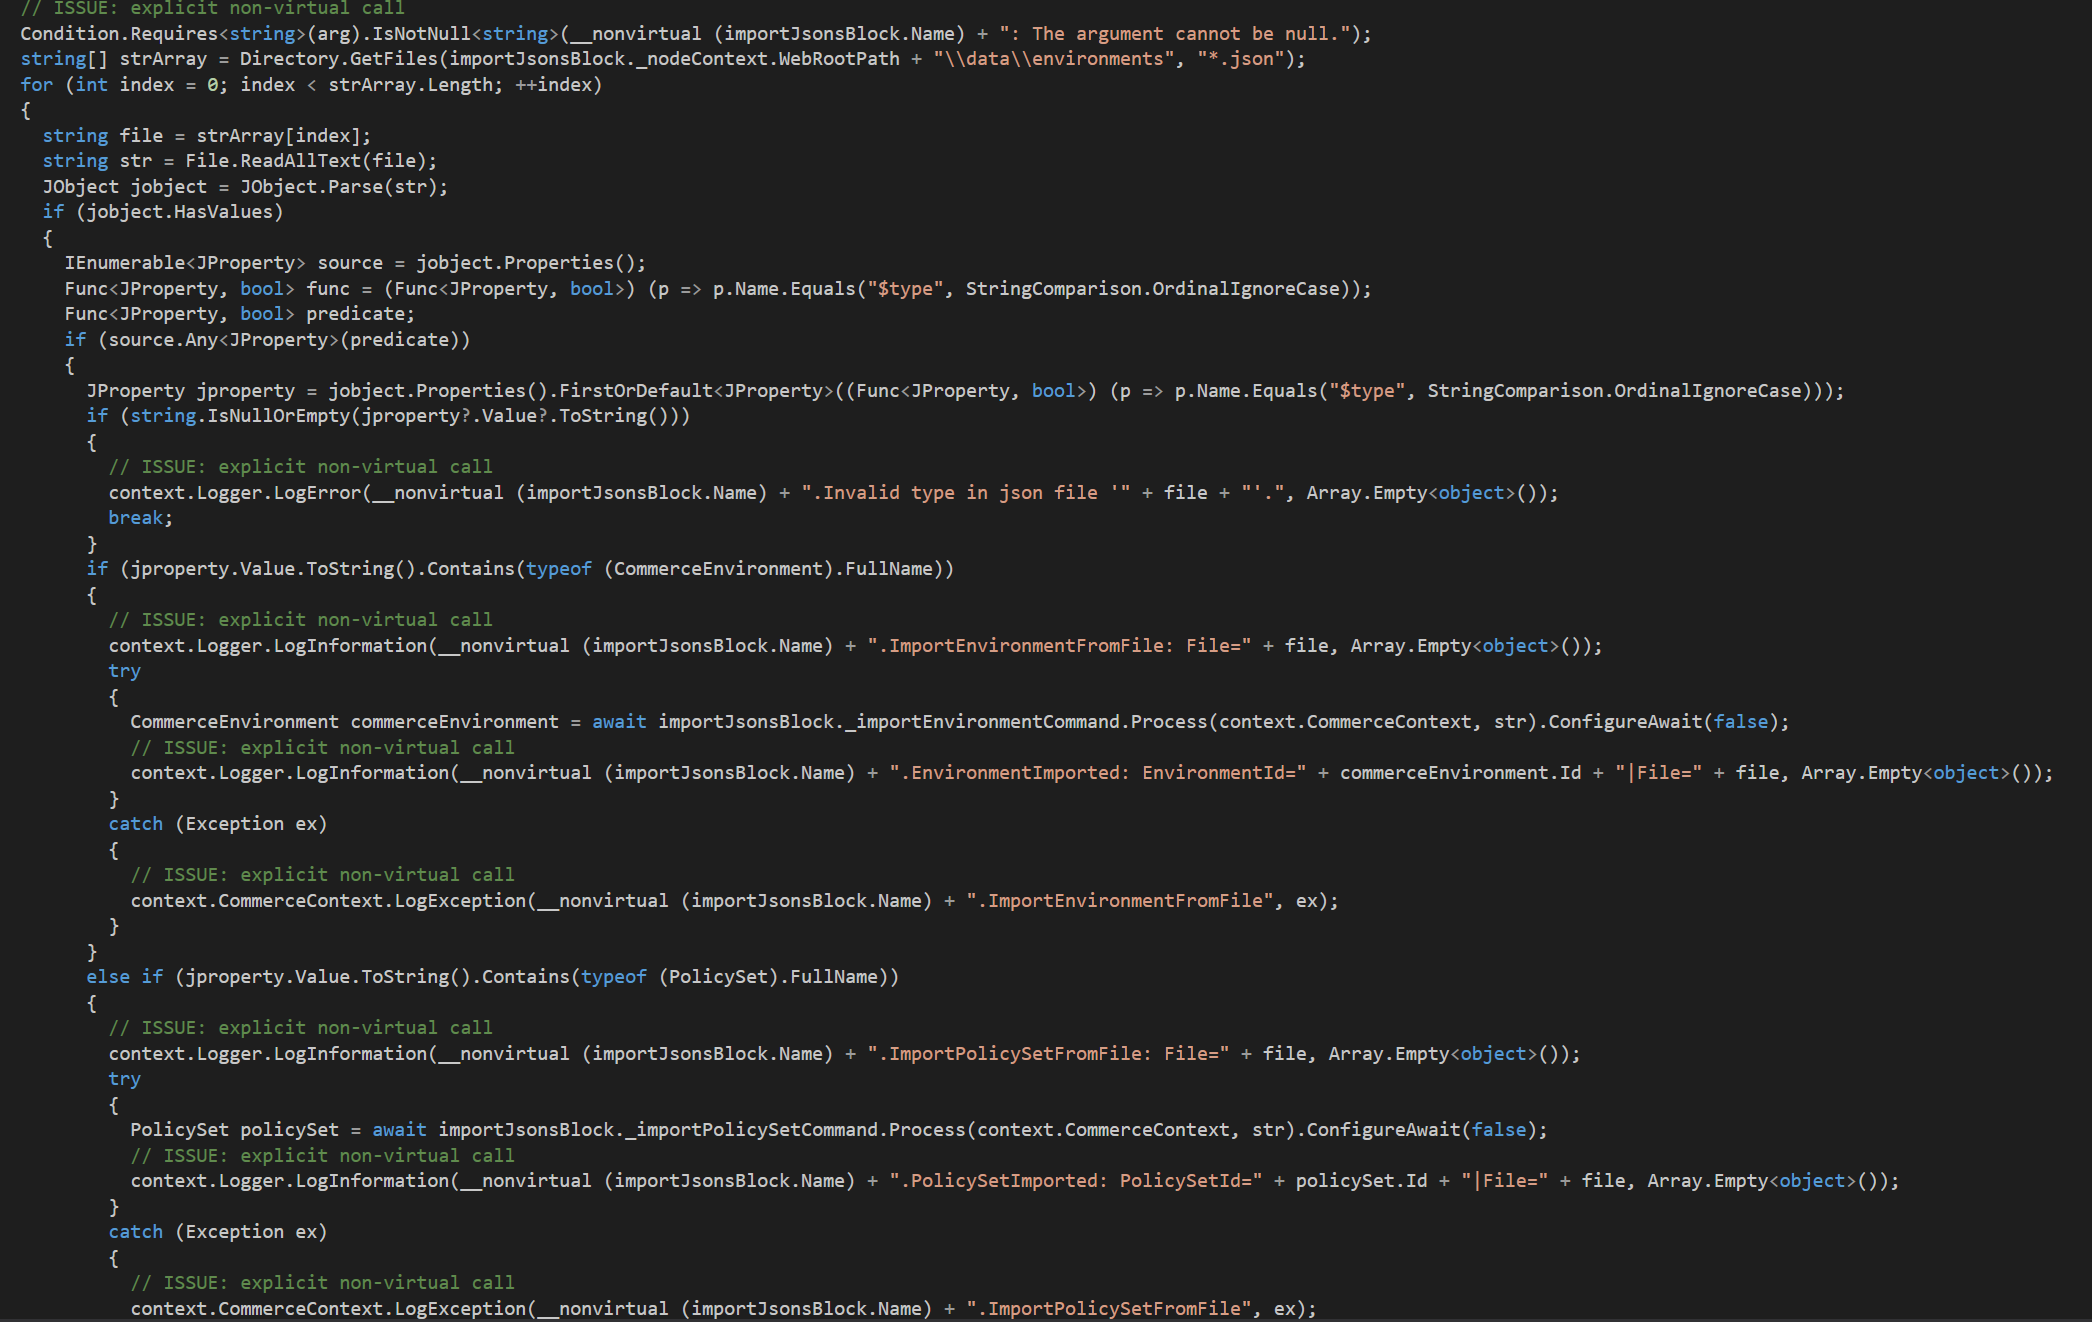
The most interesting part of that block can be seen above. You can see that it just does the following steps to import jsons
-
Grab all files under wwwroot\data\Environments
-
Iterate through all files
-
Make some validation checks if the current file is a valid environment / policy set
-
Based on the information if the current file is an environment or policy set
- Call import environment command
- Call import policy set command
My idea now, when I saw that code, was, that I should be able to use that code and modify it in a way, it would be able to also differentiate between .NET Core environment specific json environments. In the following screenshots.
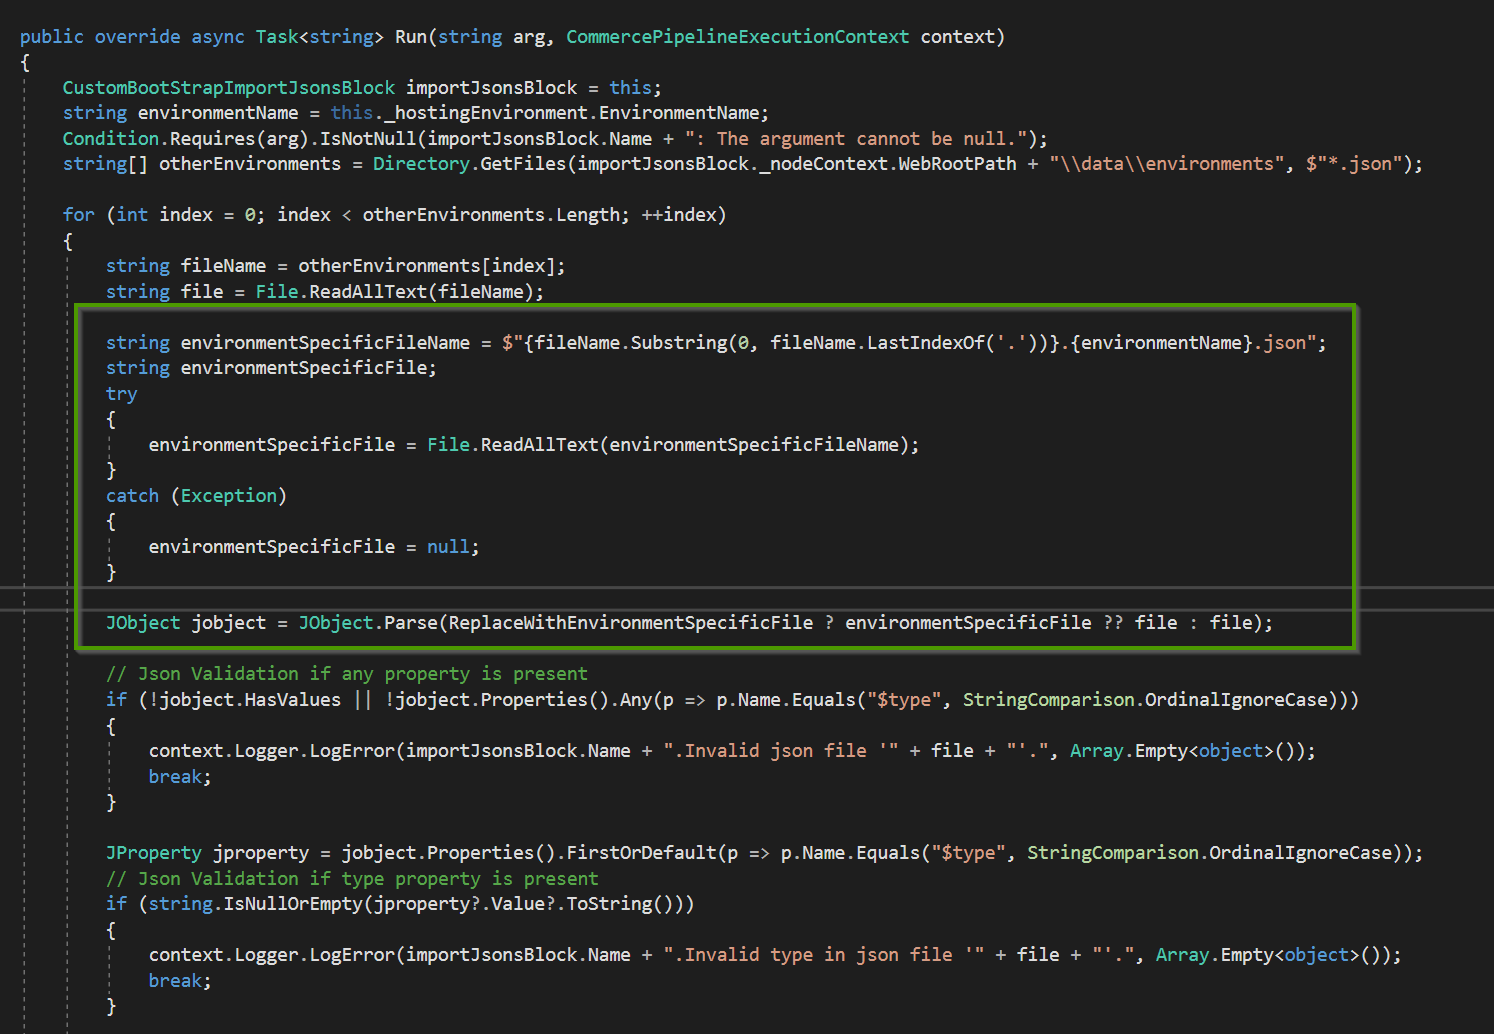
The first change I made in the standard code is highlighted above. I just implemented a piece of logic, which is responsible for loading the environment specific json files in parallel to the original one. The parameter environmentName is based on the current .NET Core variable ASPNETCORE_ENVIRONMENT and reflects exactly the naming used for our environment files. In addition you can see some boolean value ReplaceWithEnvironmentSpecificFile. This is right now some class level property which switches between the above mentioned modes replace and merge. In case of replacement it really just loads the environment specific file instead of the original one. In case it should merge the files you see the behavior below in the next screenshot.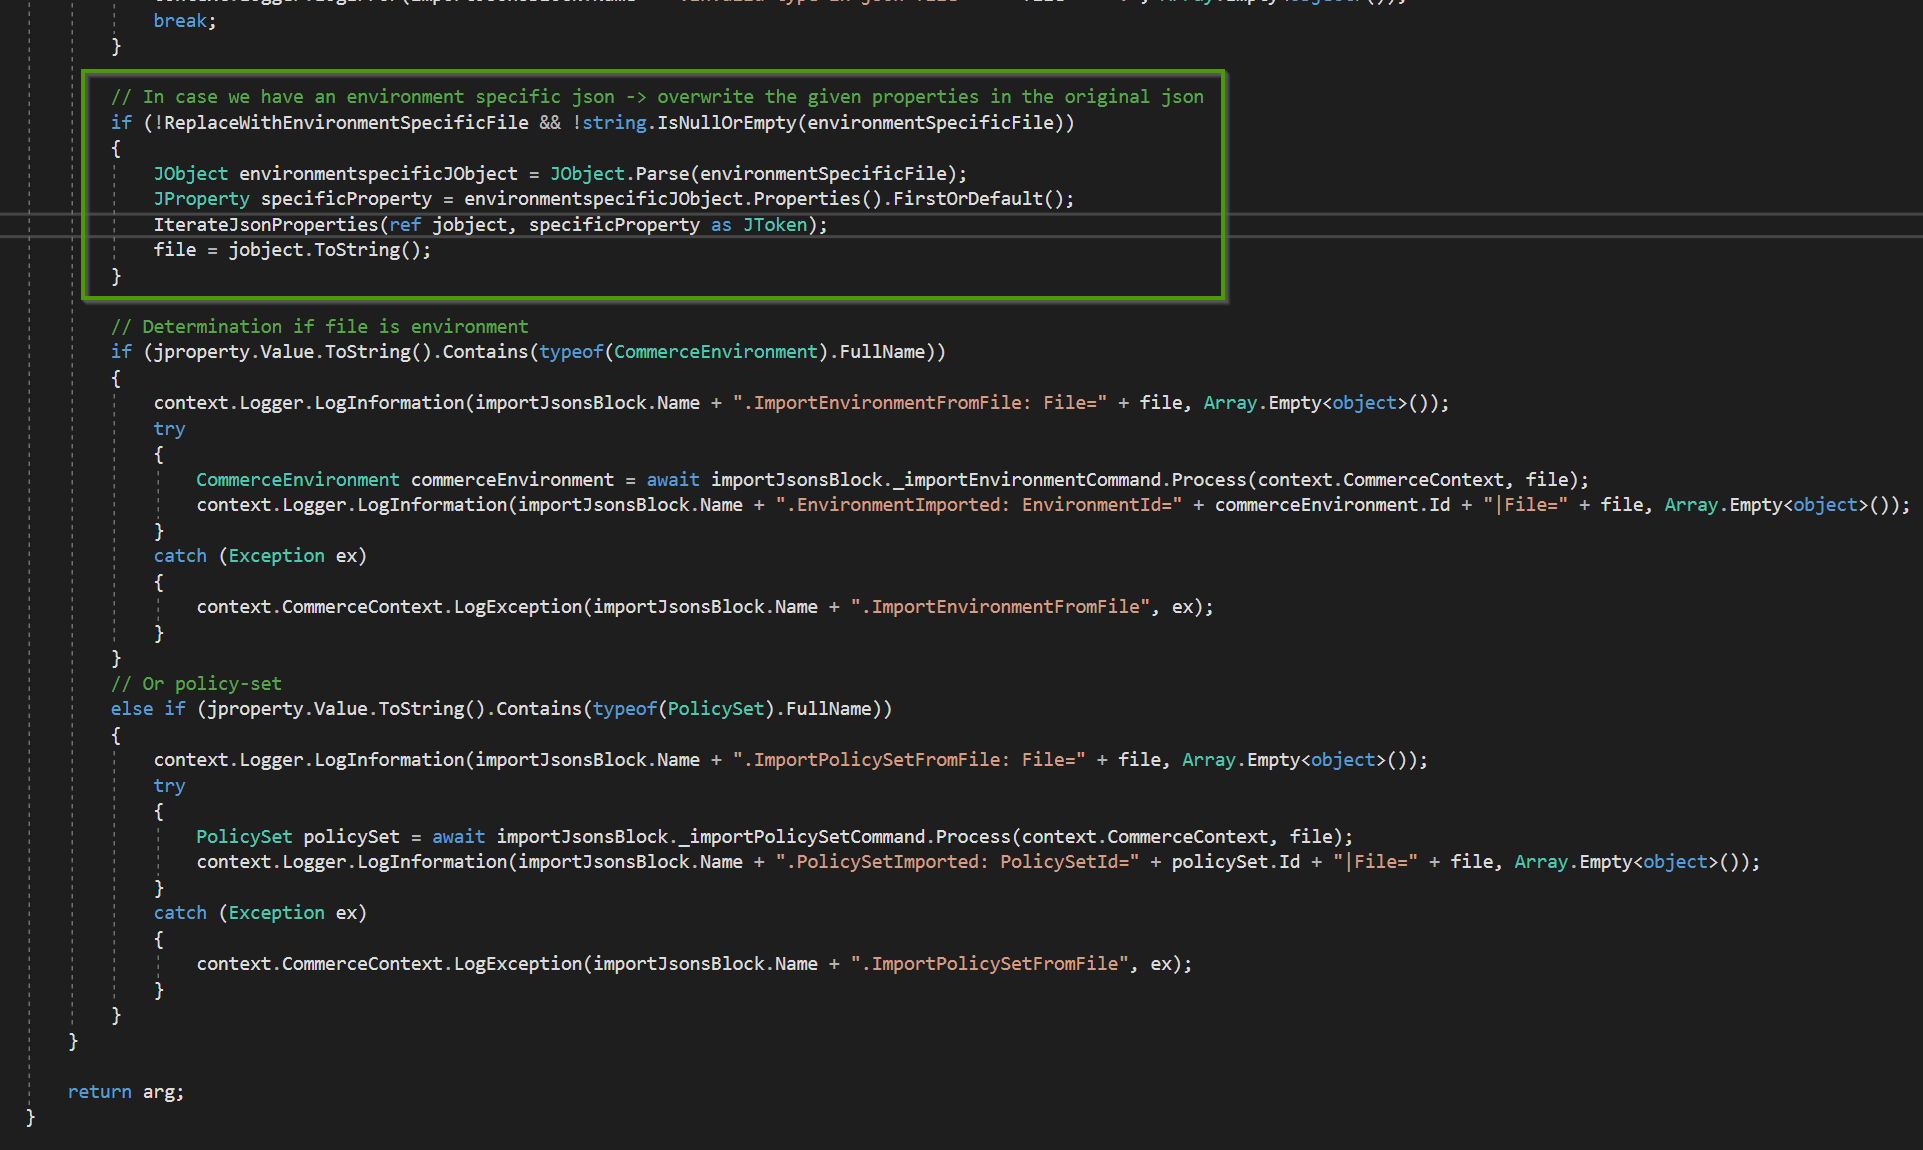
That piece of logic just checks again the flag and if a server specific environment exists. If so, the new logic takes action. On high level the idea is very simple. The idea is just to take the both json files and use newtonsoft board tools to merge these two json files loaded as JObjects. Unfortunately this approach is not as easy as it might sound. If you try to merge the two jsons as whole, the result will not be, what we expect it to be. The board tools are not able to correctly merge the two environment jsons, so the result is a file where some of the policies were just added two times or other elements, which definitely do not belong together were merged together. So the solution was, not to use the whole file to merge the jsons, but to break down the jsons in multiple objects and merge these objects individually, some kind of divide & conquer approach. I decided to use all elements, which start with a type property, cause these elements are complex elements. In addition I only choose first level elements with a type property. In the screen below, you can see an example of how the environment file is spitted by the algorithm in smaller elements, which are then merged with corresponding element the original file.
To always iterate correctly through the environment specific file, find the elements to merge in the original file, I also created two helper functions, which achieve exactly this.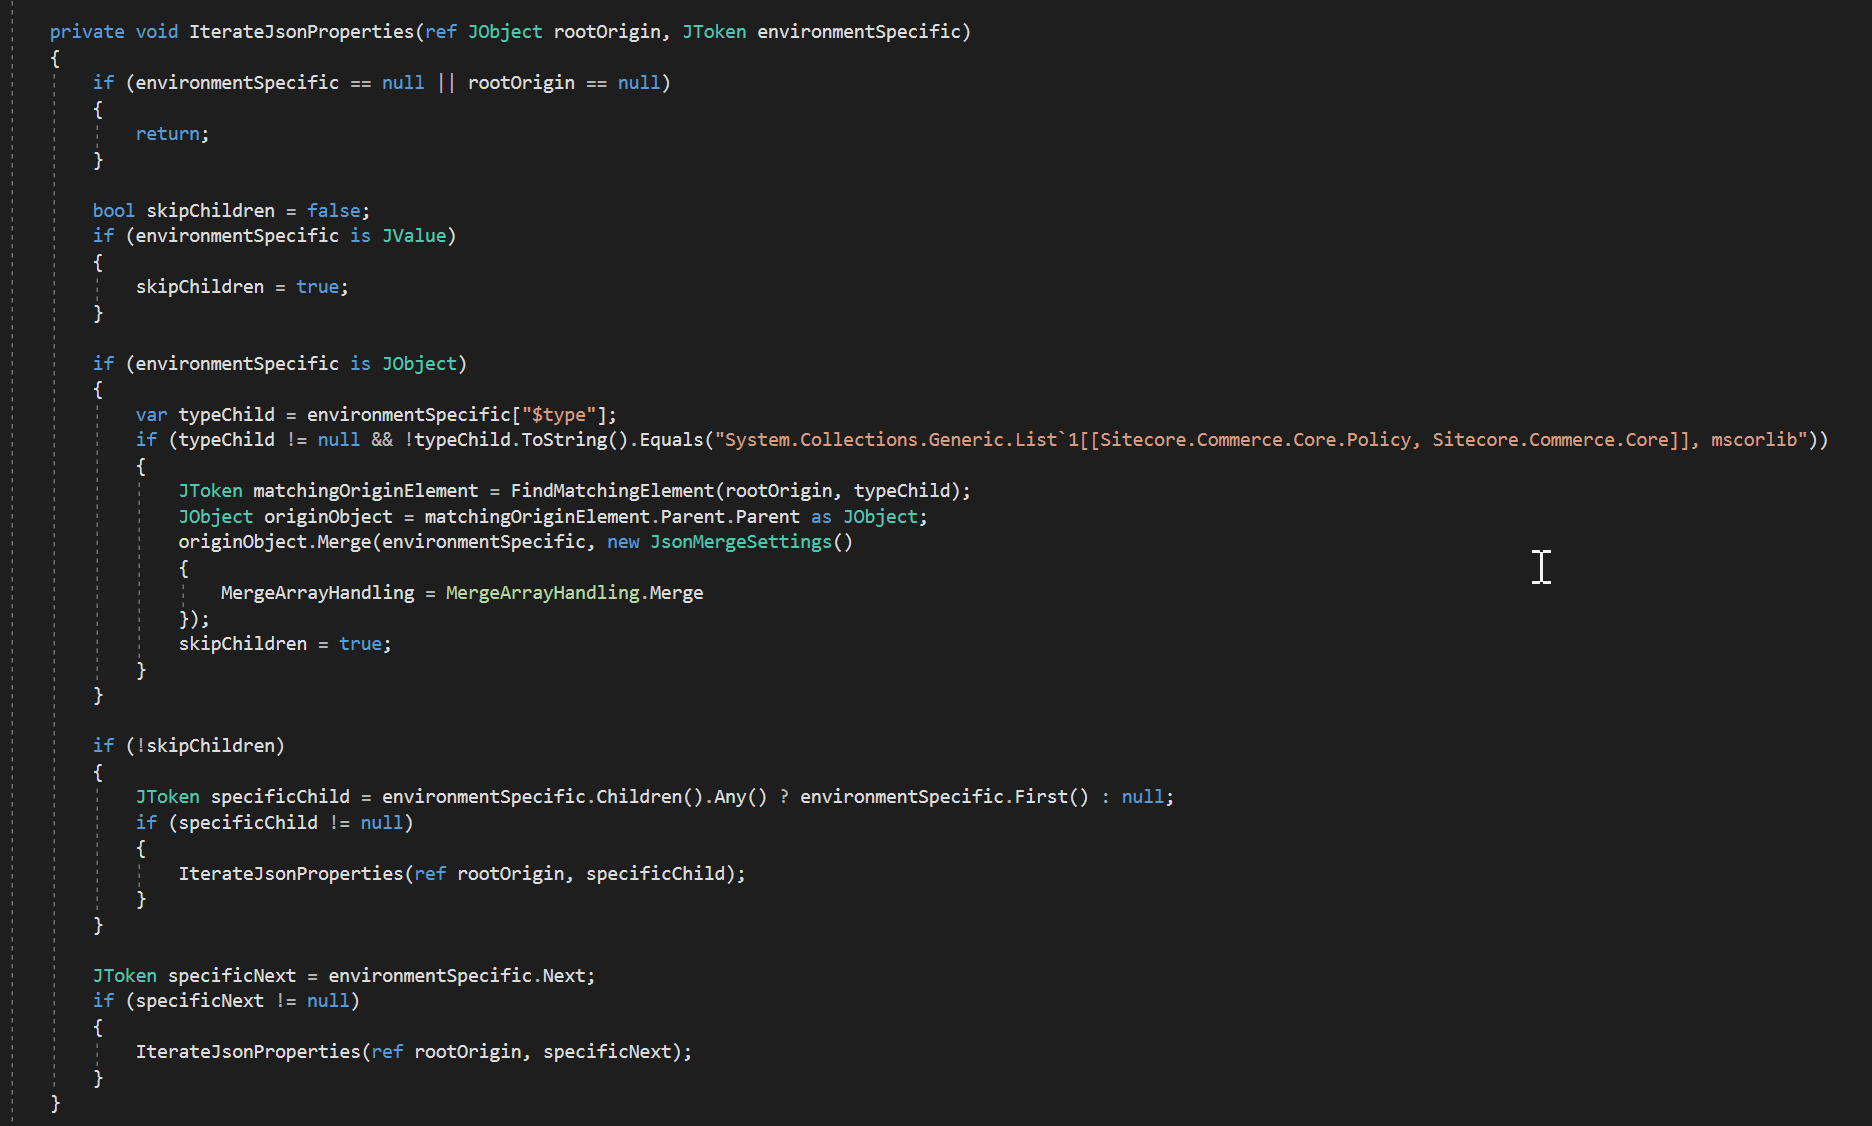
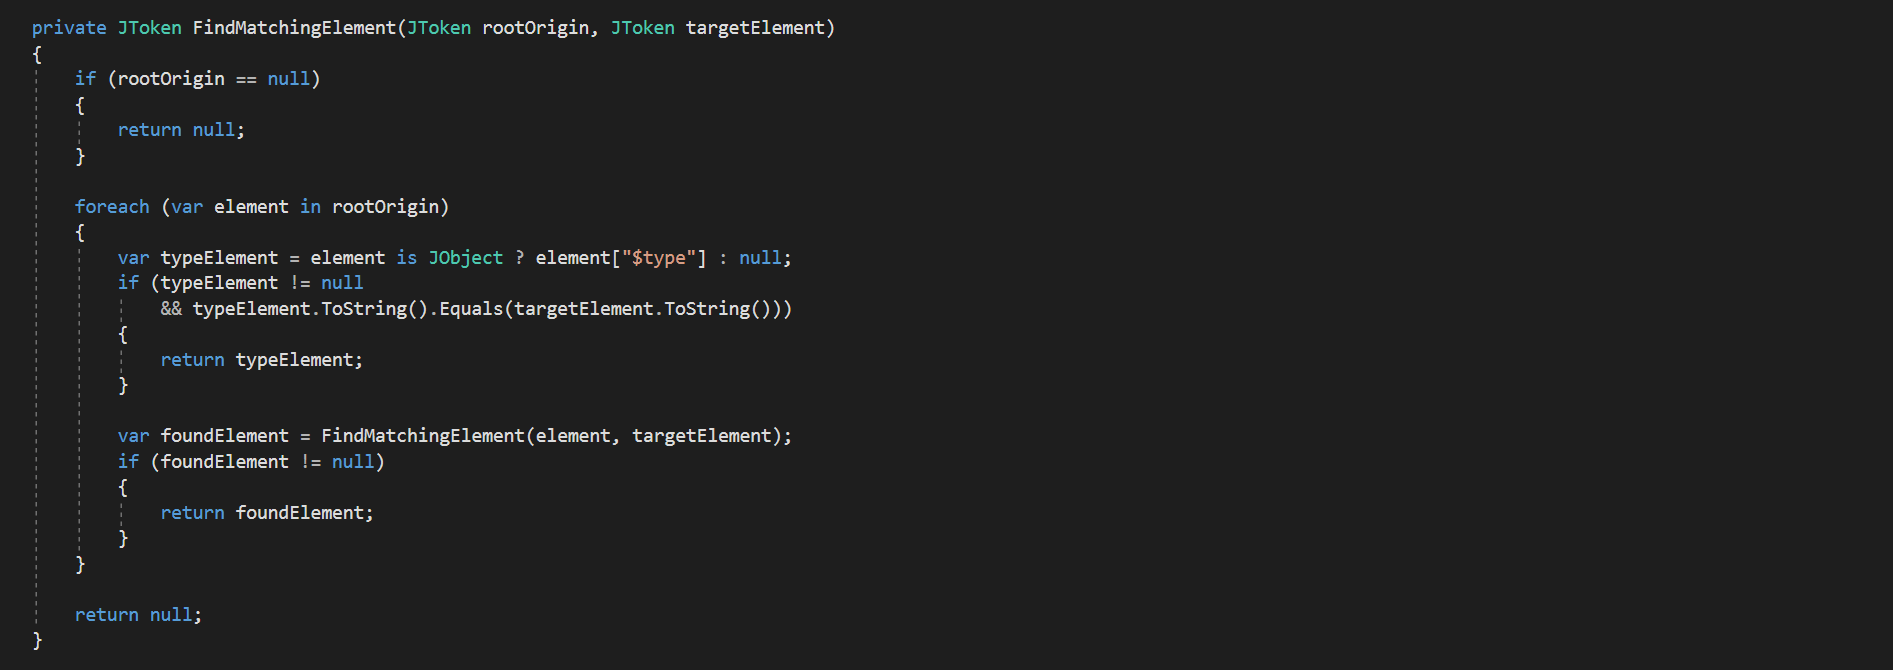
These pieces of logic just iterate through the json. At first it skips the root level type property. After that it iterates till it reaches other type properties. Once it reached that point, it starts finding that type property in the original file. Once we reached one object with a type property, we stop iterating deeper into that object and just go on with the sibling objects to avoid merging sub objects with type property, which are already merged earlier. And cause we are just grabbing all the first level objects with type property we always grab objects ob type policy, which are unique in the environment specific and origin file, so it can easily be found.
Once we merged every object we found, we just come back and produce the json string of that merged file again, so it can be used afterwards in following processes.
Transformations of web.config
Now after we created the new environment files and the new plugin to process these files, we finally have to deal with the problem of how to set the ASPNETCORE_ENVIRONMENT correctly for the server. From what I already read in various posts, there are many ways of achieving that goal. You can
- start the engine with the environment parameter
- set it IIS wide
- set it machine wide
- set it on the website
- set it in VS publish process
- and so on
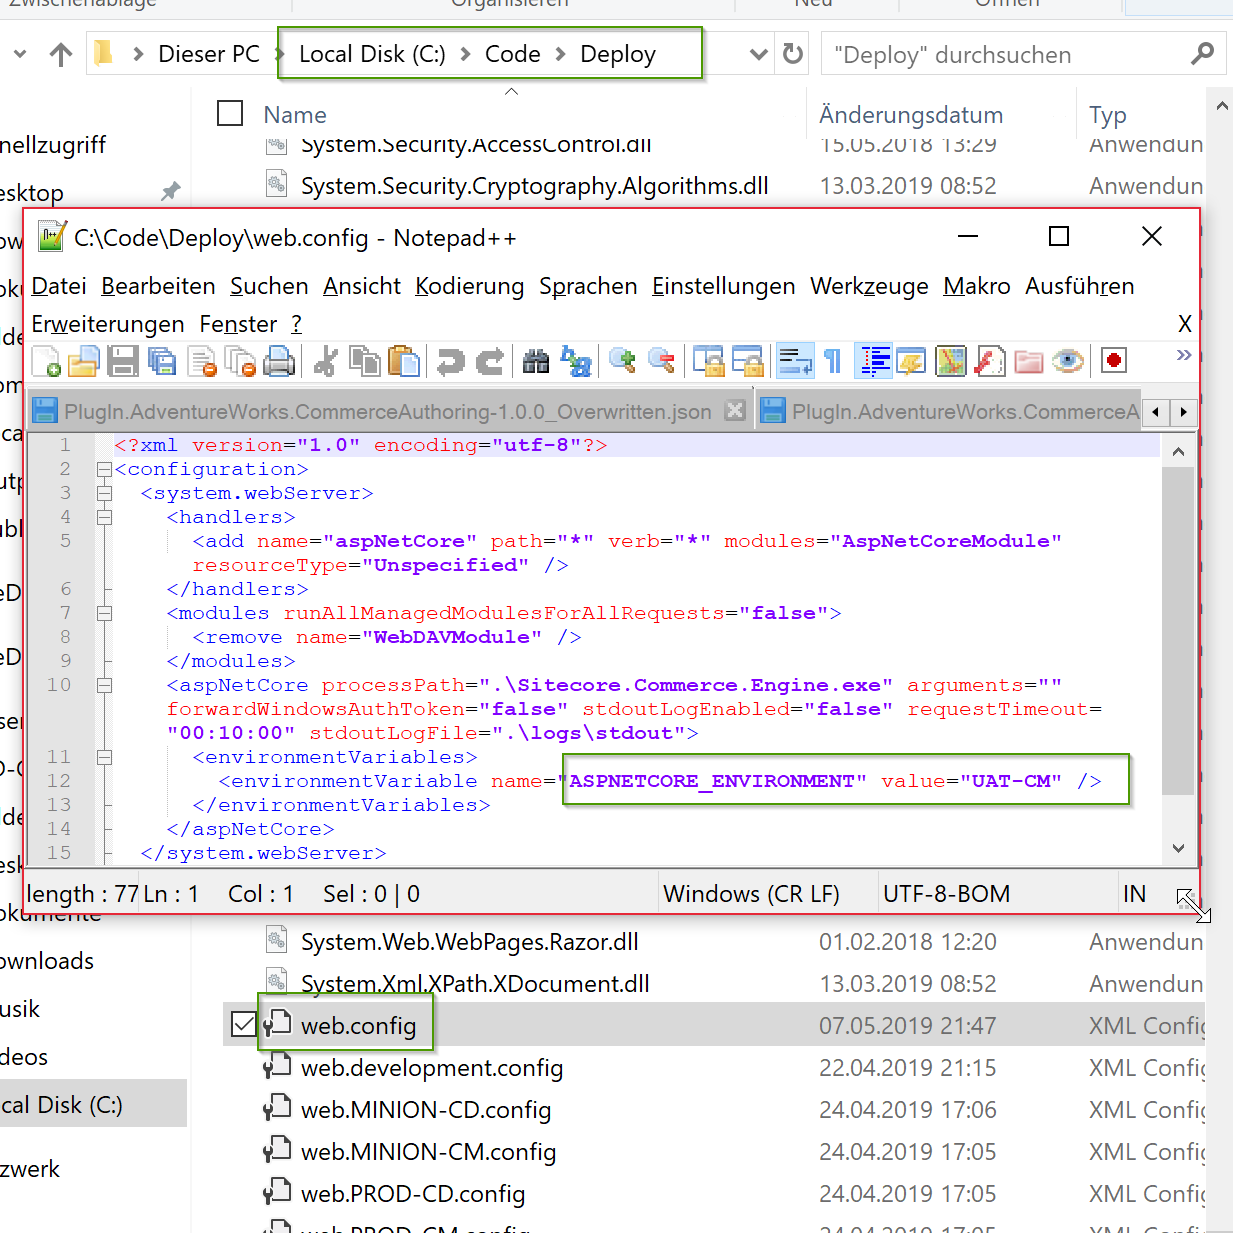
For now I decided to set the parameter on website level, furthermore within the web.config file. An example of the web.config can be seen below.
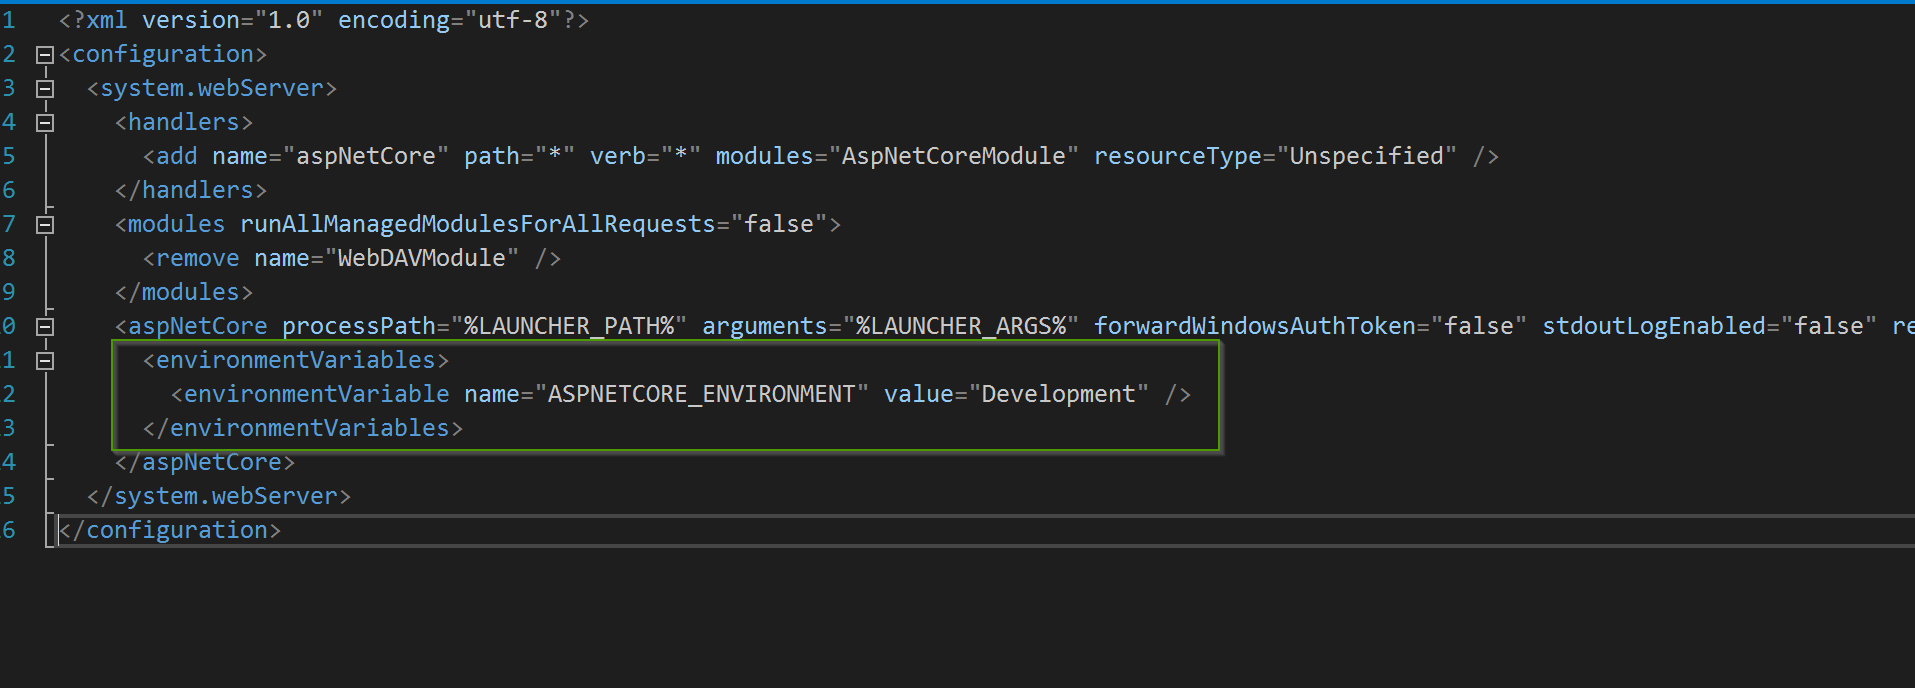
In addition to that entry I created various web.config transformation files, which react on given build configuration parameter. Below you can see web.config transformations in the naming convention, we already know from earlier.
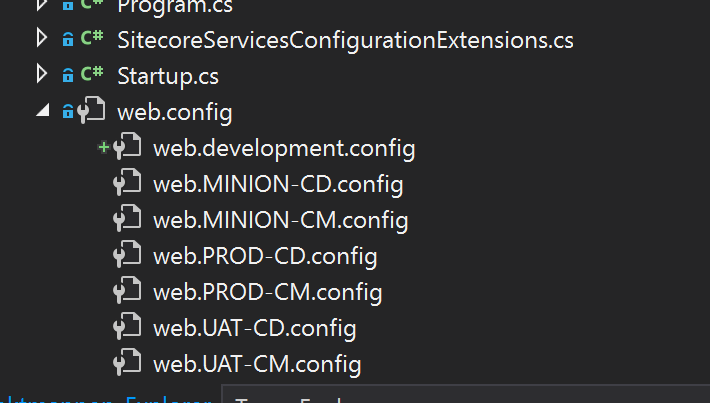
Each of these files at the moment just overwrite the ASPNETCORE_ENVIRONMENT parameter with the correct value. So for example web.UAT-CM.config sets ASPNETCORE_ENVIRONMENT variable to UAT-CM and so on.
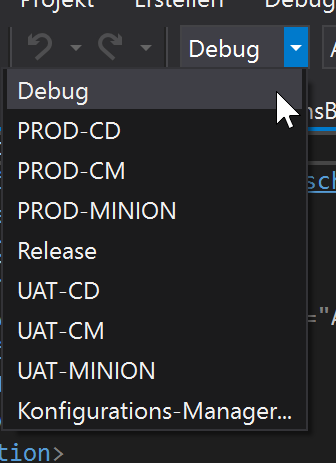
To trigger these build configurations I finally created them also in VS als build configurations, like seen below
Results
So what is now the result of everything?
Now with all the changes we can use the dotnet publish command in the following way, very similar to the one you saw in the beginning, but slightly different in the configuration parameter

The outcome of that command is a fully working deployment package, where the web.config has the patched entry, we will use later on in bootstrap command
If we now deploy that engine to the right place the new ASPNETCORE_ENVIRONMENT parameter will take place on startup for that specific website
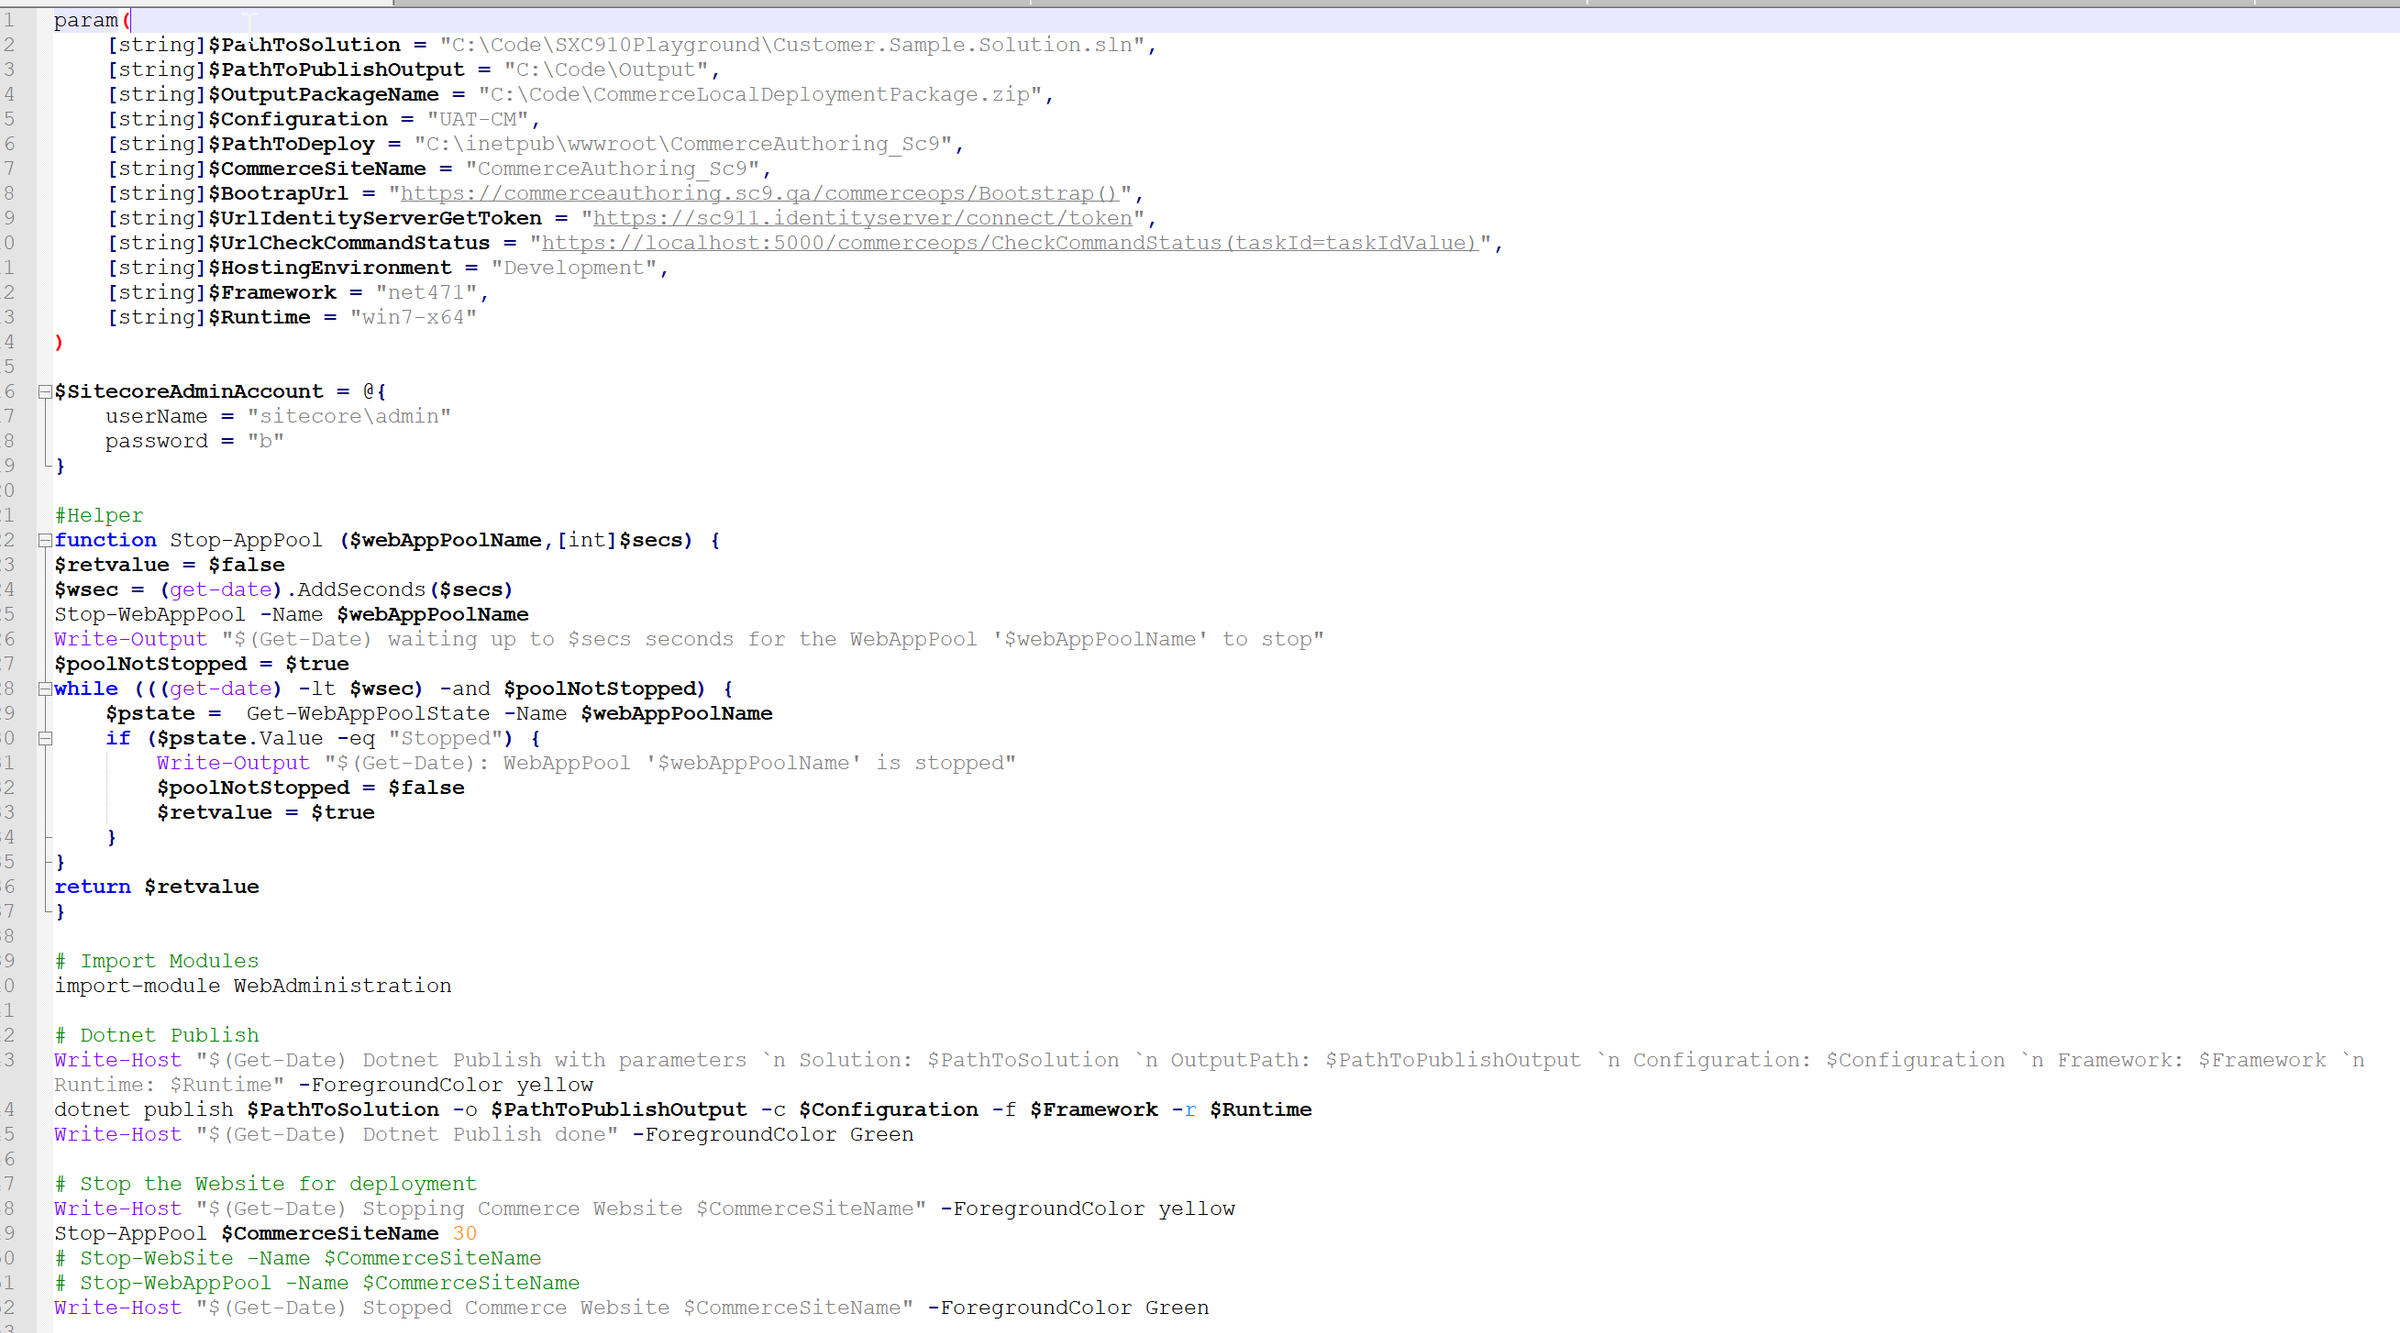
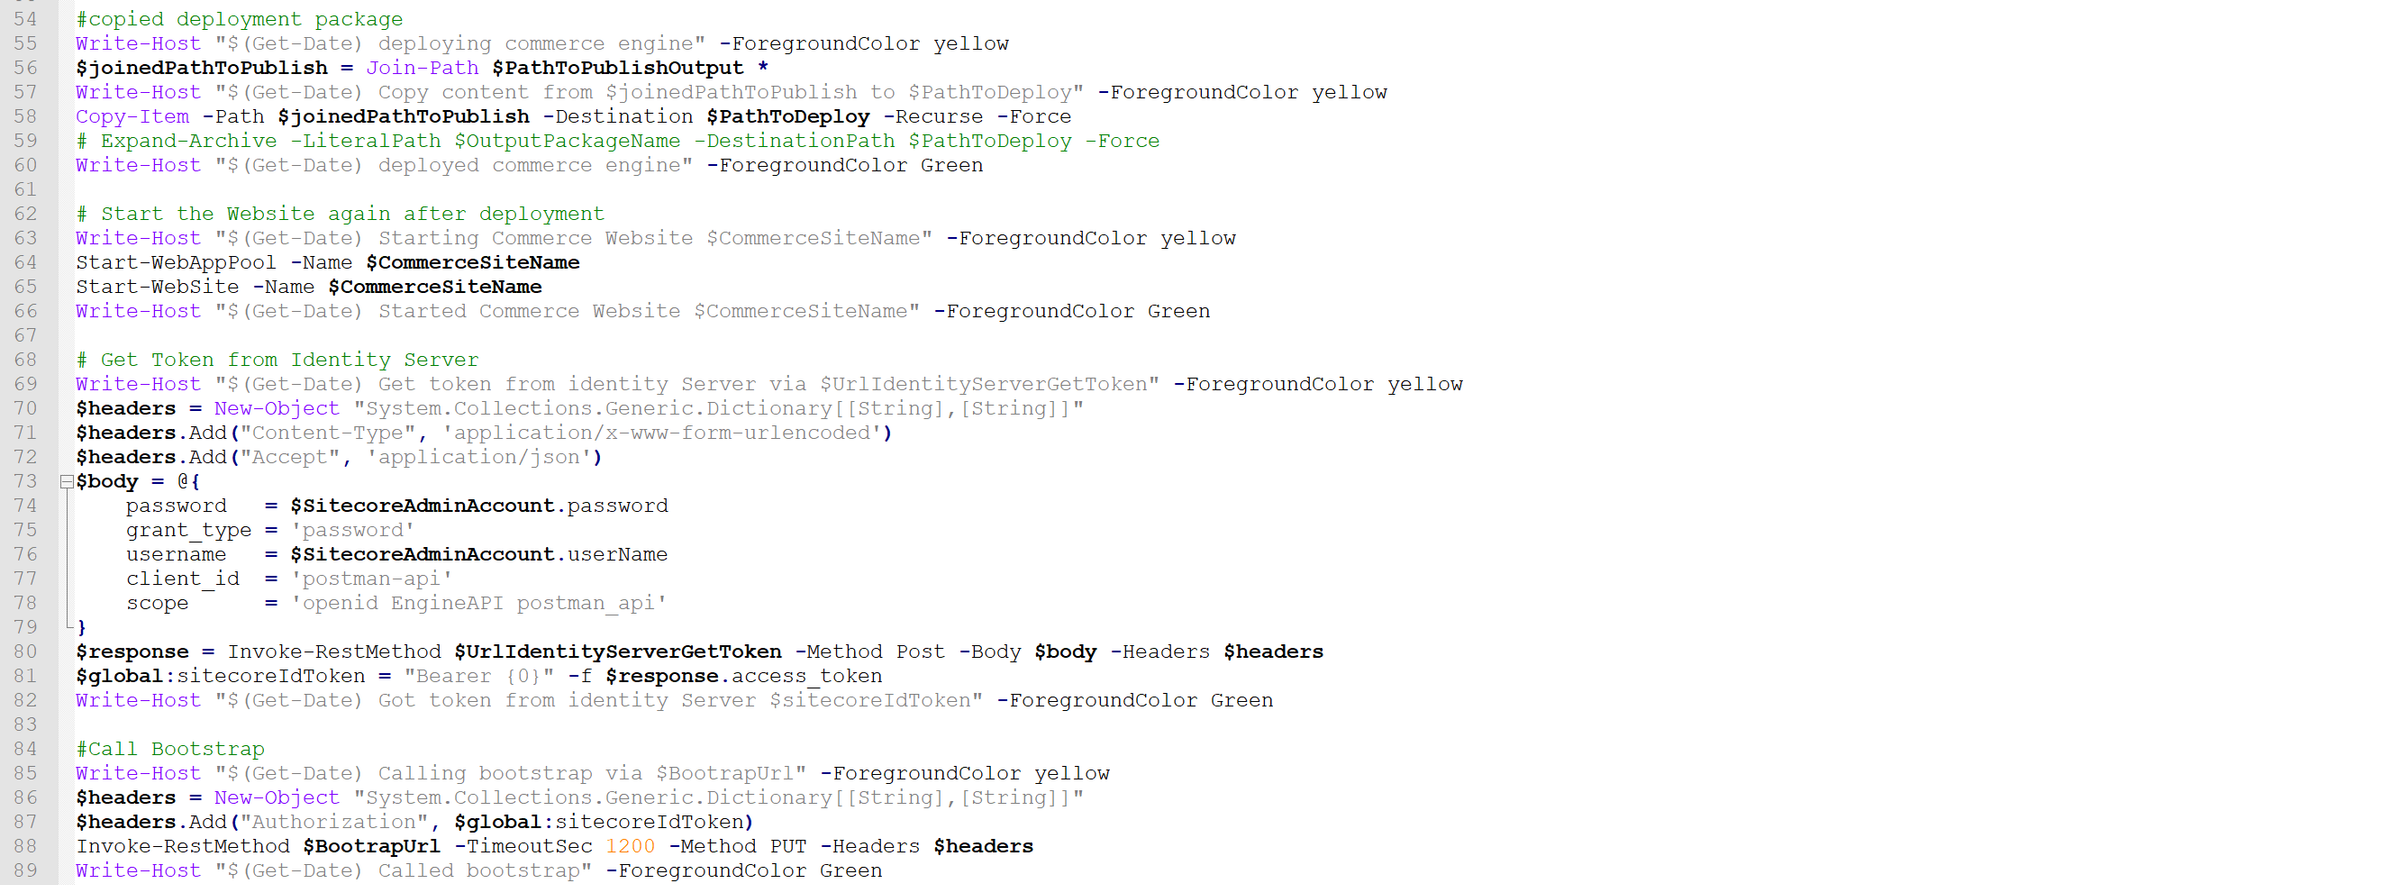
Note: We could also deploy that directly to the right location or use some smarter powershell script to do that job like seen below. For local deployment I just created a small powershell script, which takes over all the manual steps I would have to do
- takes some parameters
- publishes the application,
- stops IIS,
- copies the deployment package to the destination,
- starts IIS again,
- grabs token from Identity server
- and finally calls bootstrap
Now it is getting more and more interesting. After we successfully deployed all the latest changes and called bootstrap we can now see the results. For better visualization I just saved the merged file together with the original one and used Notepad++ compare tool to compare these two files to see all changes.
What are the results?
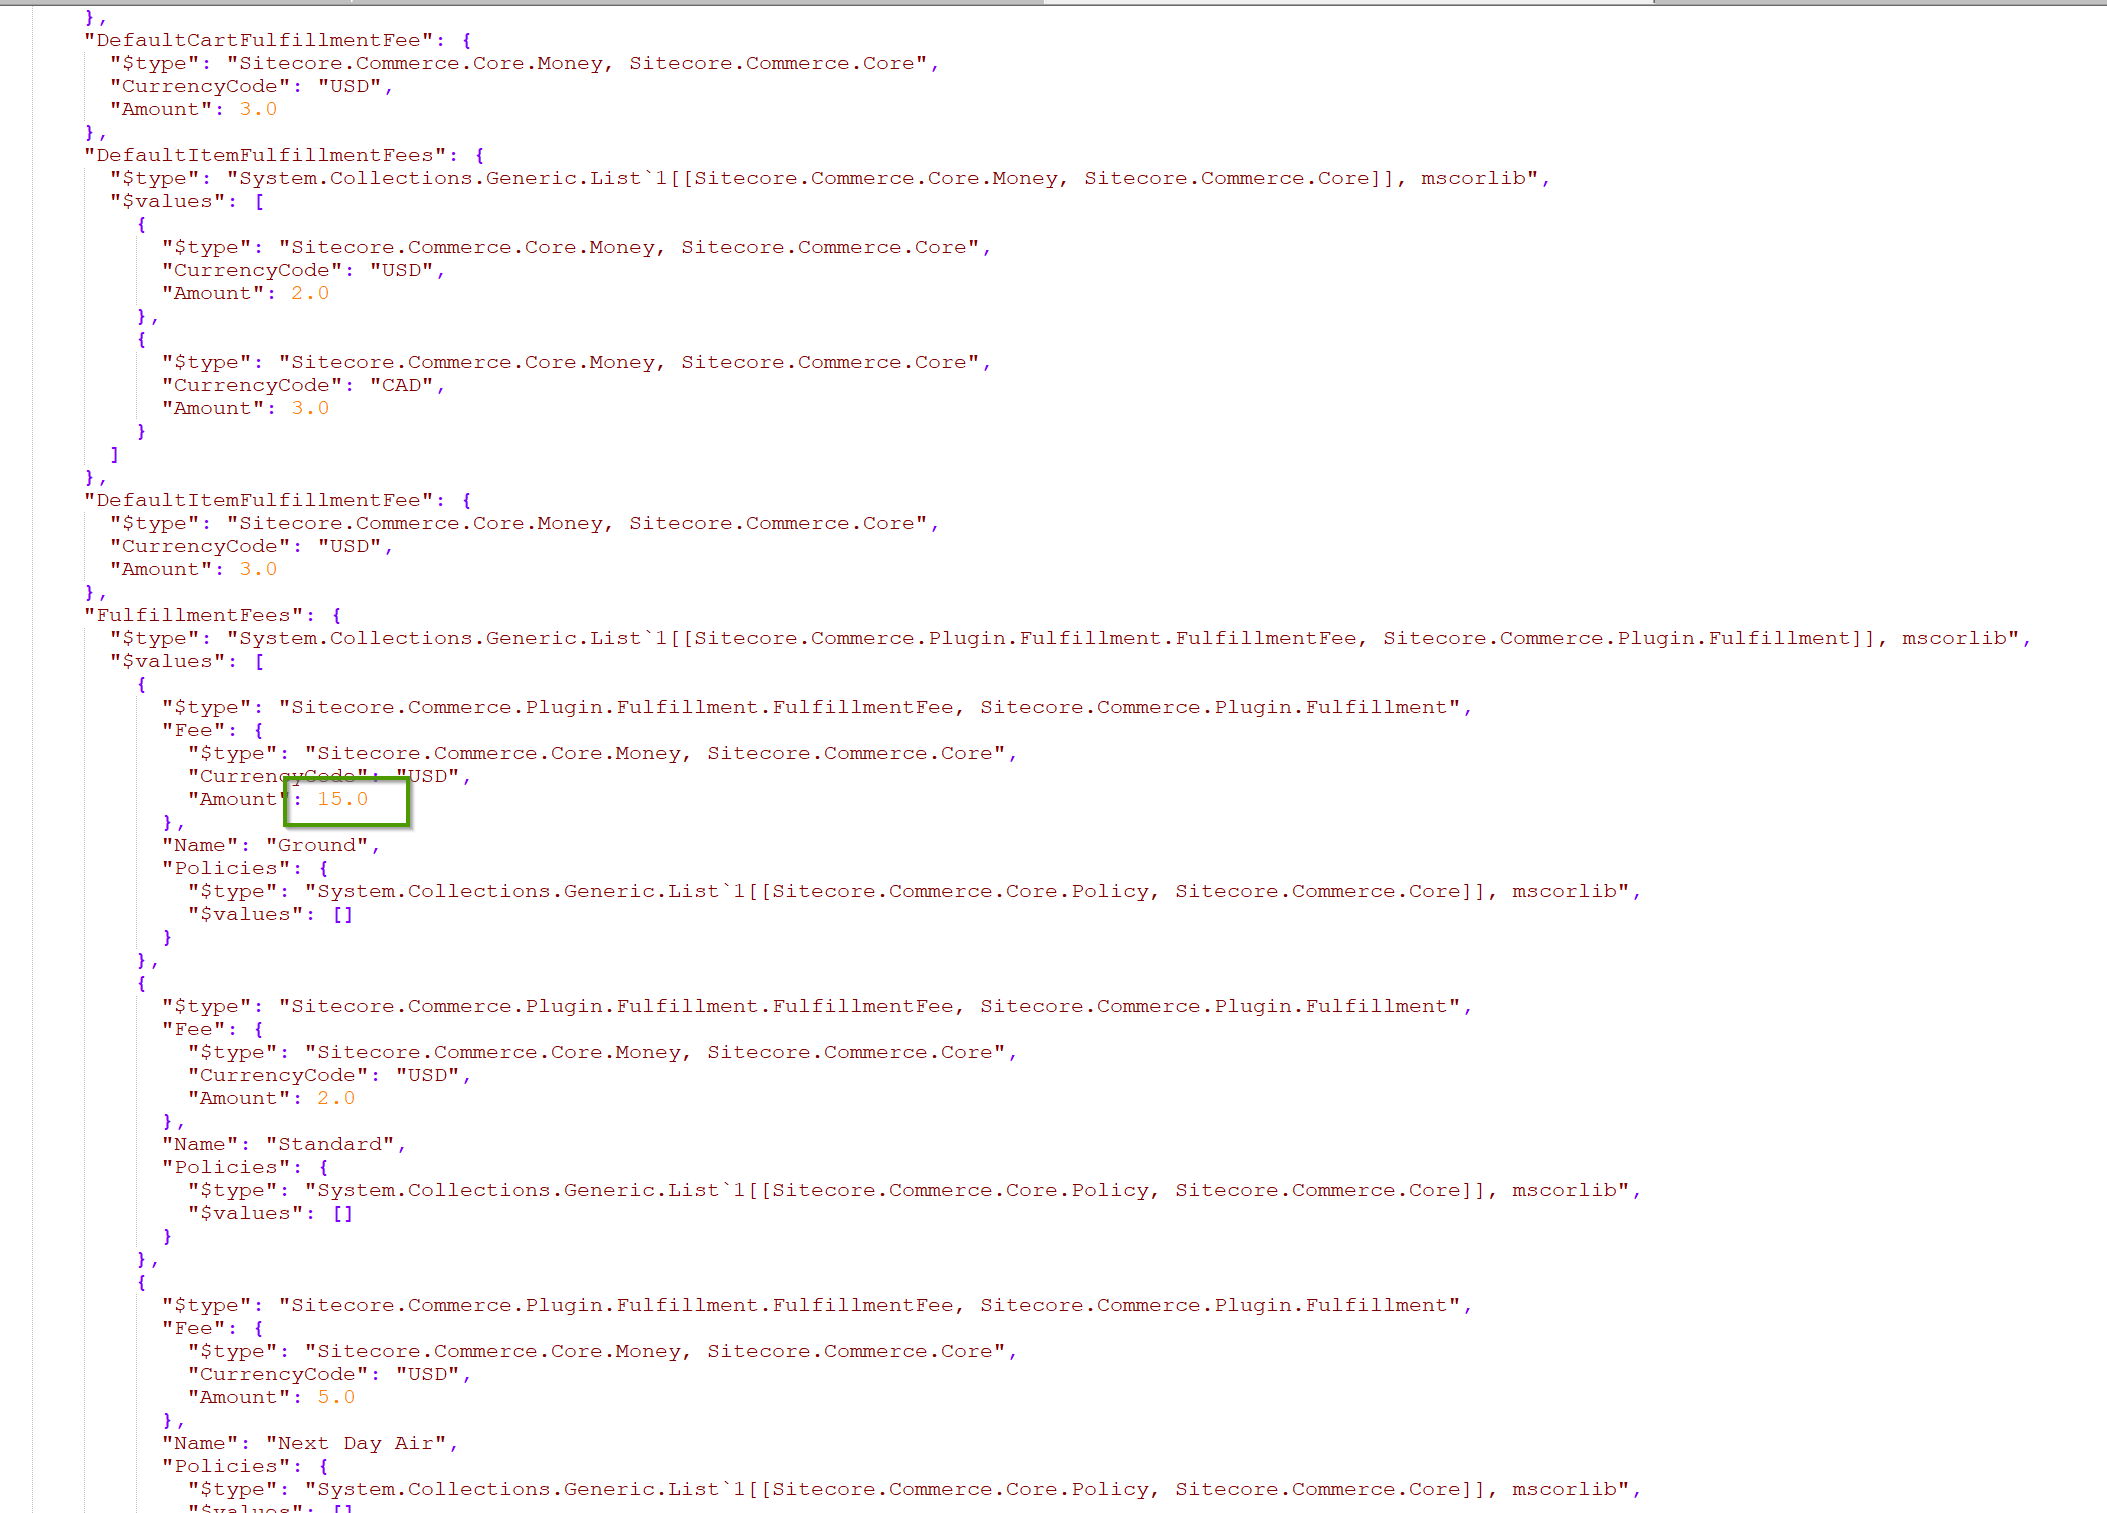
The results are exactly what we except them to be! All the settings we initially patched in the server specific environment are correctly taken over in the merged file. If we additionally have a look how commerce engine deals with the new environment json file, I just had a look at the outcome of the ImportEnvironmentCommand, which takes our json as string, saves that to DB and returns an environment objects. The screens below show the values of the properties we wanted to be changed cause of merging.
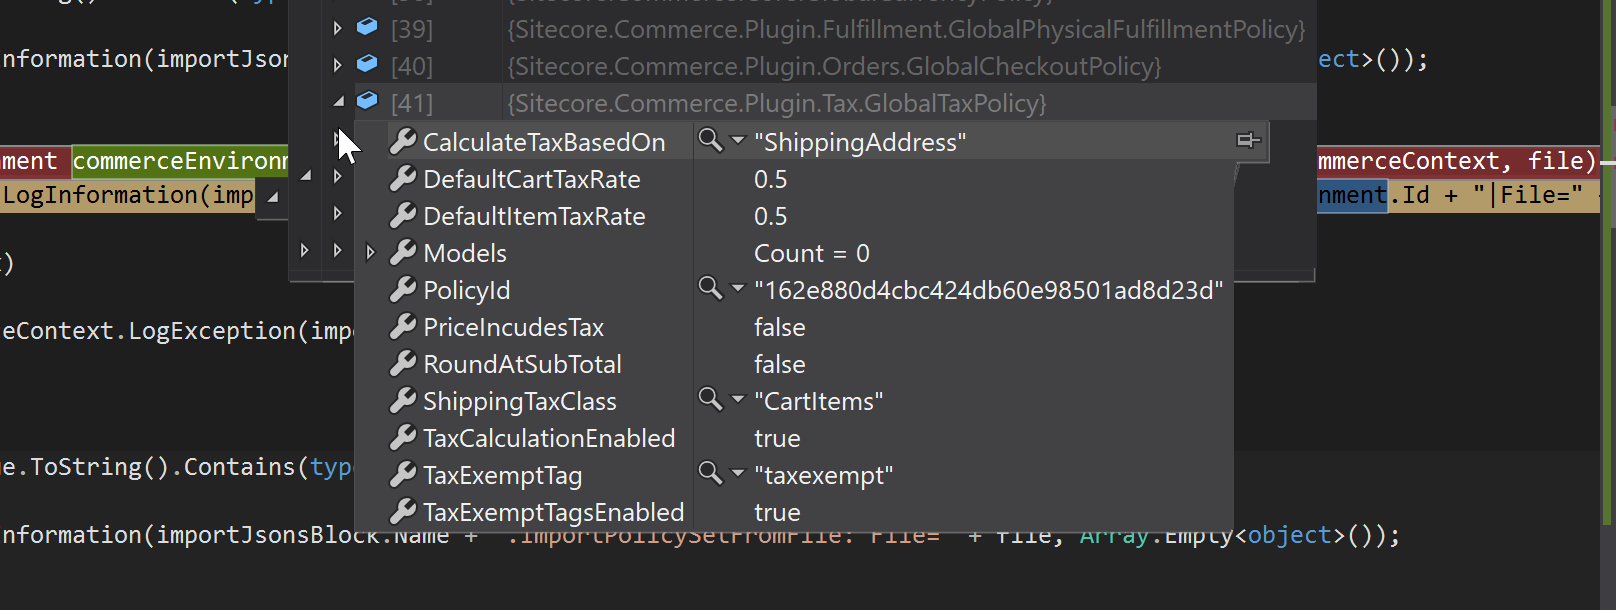
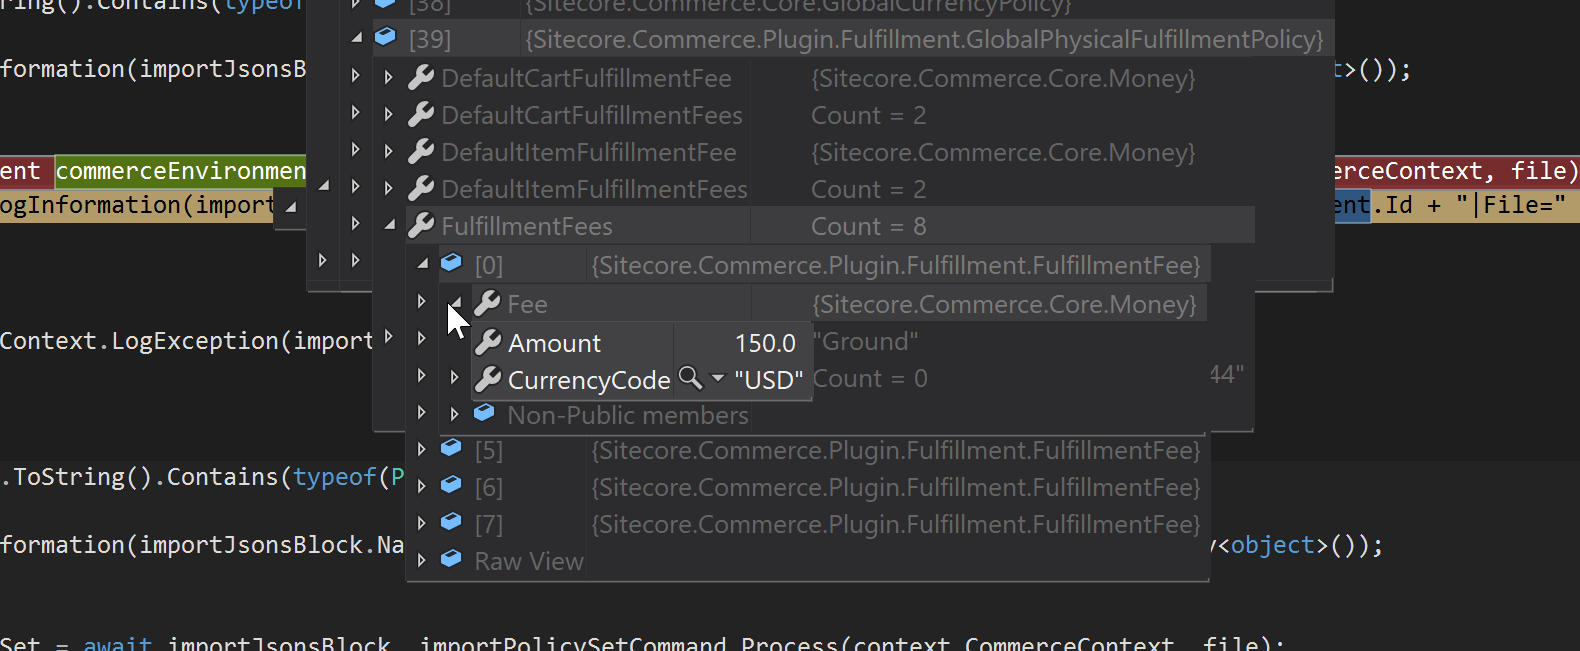
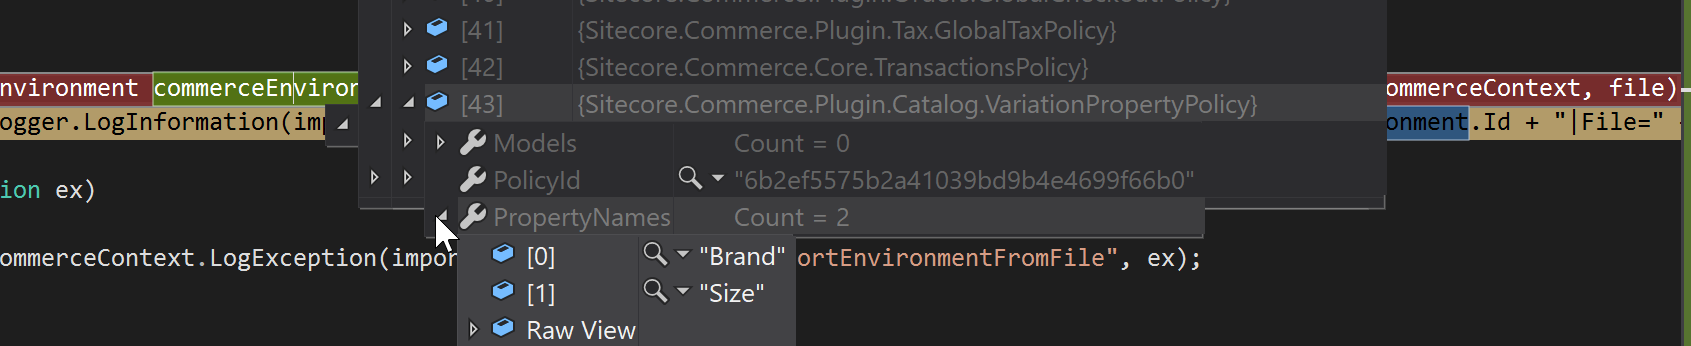
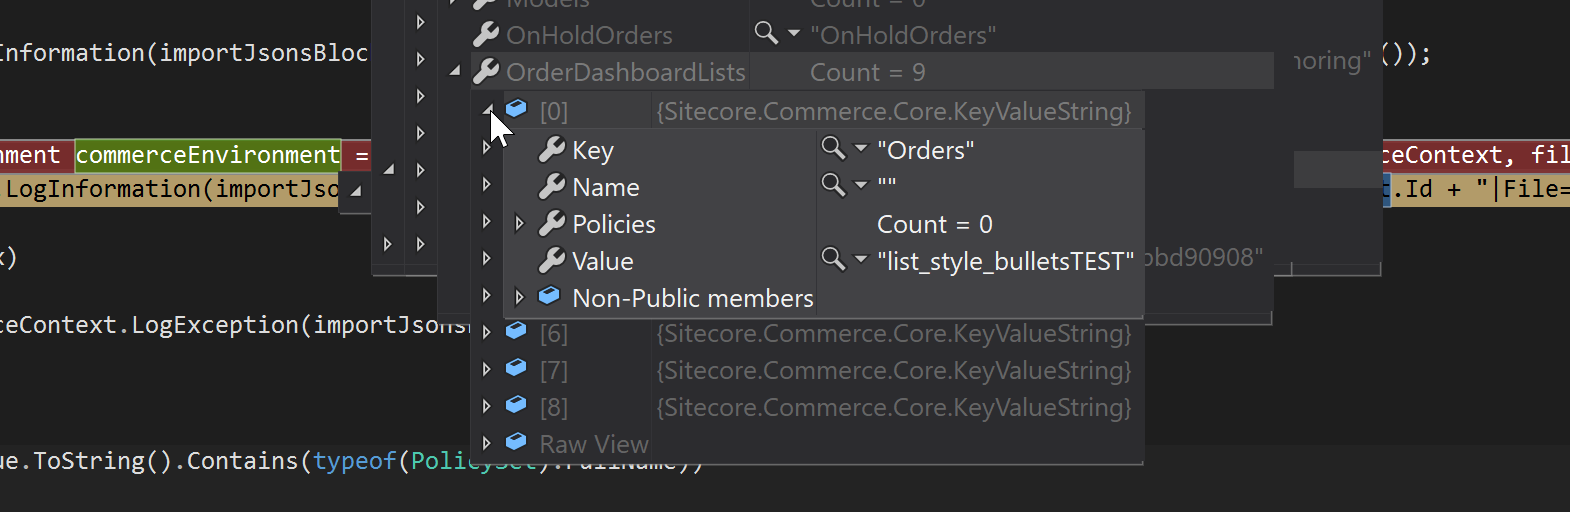
Also here you can see, that Sitecore accepted the merged Json file add was able to create a usable environment file with the merged values of the parameters.
The whole plugin can be found under https://github.com/Chris1415/Custom.Sample.Plugin.CI
Conclusion
Within the today’s blog bost you learned about problems, which might occur when deploying your commerce engine to some other servers than local development. You saw the challenges and how deployments are done nowadays at some places. But in the end you also saw an approach of dealing with that problem to be able to fully automatically deploy your commerce engine based on the target environment.
And as always the code you saw here is just for demonstration reason and not deeply and fully tested. This should be just an entry point for you to get into that topic and get an idea of how to solve the given problem.
- architecture
- devops
- dotnet
- sitecore-commerce
- sitecore-platform