
Sitecore XC 9.0.2 – Commerce Policies, Environments and Roles behind the scenes
Many of you will most likely have Installation Sitecore XC by now and had already a rough look on it. This article should give you a slightly deeper insight into the topic of Environments, engine
Many of you will most likely have Installation Sitecore XC by now and had already a rough look on it. This article should give you a slightly deeper insight into the topic of Environments, engine roles and policies. Let us first start with some definition of the three terms we will use later on.
Policy: “A named, versionable and variable set of data that can be used as facts within
behaviors to influence behavioral outcomes. This provides an auditable mechanism for viewing, simulating, and changing core decision criteria that might be used by business processes or other policy-driven behavior. Various plugins have specialized policies to add additional facts to existing policies and/or new policies, or to implement new concepts, such as dynamic pricing.” (Source: http://commercesdn.sitecore.net/SitecoreXC_9.0/Developers-Guide/Sitecore-XC-9.0_Developers_Guide.pdf)
Environment: “Commerce environments provide the ability to have separately configurable pools of data and service functionality that run together in a single-service
instance. Environments can share the same persistent store as other environments or be separated into their own exclusive persistent store.” (Source: http://commercesdn.sitecore.net/SitecoreXC_9.0/Developers-Guide/Sitecore-XC-9.0_Developers_Guide.pdf)
Role: “The Sitecore XC solution implements the concept of Commerce Engine roles to support scalability. In a production environment, traffic is usually split up among multiple installed instances of the Commerce Engine, which are usually physically located close to their traffic sources. These instances are referred to as Engine Roles. This distinction is purely logical Engine roles are defined by where the traffic they serve originates from. Service roles can exist on the same or separate servers, and can be scaled independently as required. Each service role represents an instance of the Commerce Engine, and has different load characteristics.
Each deployed role can have different policies and behaviors, which can be specified using a specific Commerce environment for that role. When a call is made to the Commerce Engine, the call’s header specifies an environment. This environment is used by the engine to control policies and behavior for that call. Specifying a particular environment allows explicit independent control (per role) of functions, such as caching, data storage, integration connections, and so on.” (Source: http://commercesdn.sitecore.net/SitecoreXC_9.0/DevOps-Guide/Sitecore-XC-9.0_DevOps_Guide.pdf)
The Sitecore XC solution defines four Commerce Engine roles:
- Authoring role
- Shops role
- Minions role
- DevOps role
So in easy words a Policy is a set of parameters. This can be a standalone json file (global policy) or directly set within an environment (local policy). An Environment is a bunch of local and global policies. Based on the Policies, set in the Environment the engine gets a logical Role for the overall architecture.
Roles within standard XP0 installation
Lets start with the Standard XP0 Installation. XP0 means that everything is hosted on a single machine (CM / CD / XConnect / Commerce Engine etc.) Such kind of Environments are most likely used by devs for development or for testintg / demonstration reason. When you follow the Standard Installation guide and install Sitecore XP / XC via PowerShell script, the result will be an up and running instance.
But lets have a deeper look at what exactly is installed.
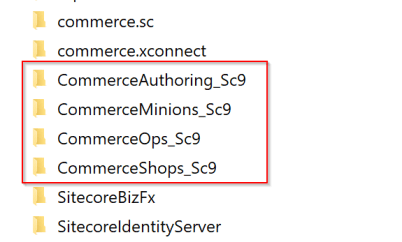
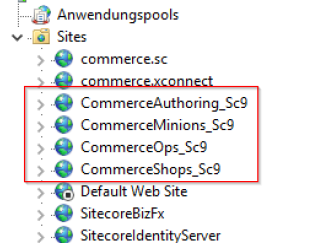
You can see that there is the Standard Sitecore instance as well as a xConnect instance. For Sitecore XC you see that there are now 4 more sites added after installation. (Authoring/ Shops / Minions / DevOps ) At first I was quiet confused about that. I already installed the older Sitecore Commerce 8.2.1. At that time with many Manual steps. And the result was one single commerce engine instance. Now we got 4 instances up and running, all on different ports. So I though all of these instances are even used by Sitecore somehow.
BUT THIS IS NOT TRUE. If you have a closer look at everything, it is more or less like the old Installation for 8.2.1. It is correct that we have multiple commerce instances installed now, but Sitecore is only able to communicate with one single instance at a time, like it was before.
So in the standard installation it is the Sitecore Authoring commerce engine, with which Sitecore XP communicates directly. The other instances are never refereed or used by Sitecore. So instances like DevOps and Shops are in the dummy instances. The only purpose of those instances i guess is, to give us an idea, that commerce engine could have several Roles, depending on the Policies and Environments, which are set.
The last commerce engine “minions” is a bit special. As you might now, minions are background tasks within commerce engine, which handle scheduled or long running tasks. Stuff like orders are processed there e.g. to check and update the status of orders based on a set of rules and conditions. This instance of commerce engine, does not need a direct access to Sitecore XP. It only needs to be connected to the commerce databases and needs to have the proper environment file with the minions policies applied. So also this minions instance, beside the authoring instance, is in the end up and running on you local machine.
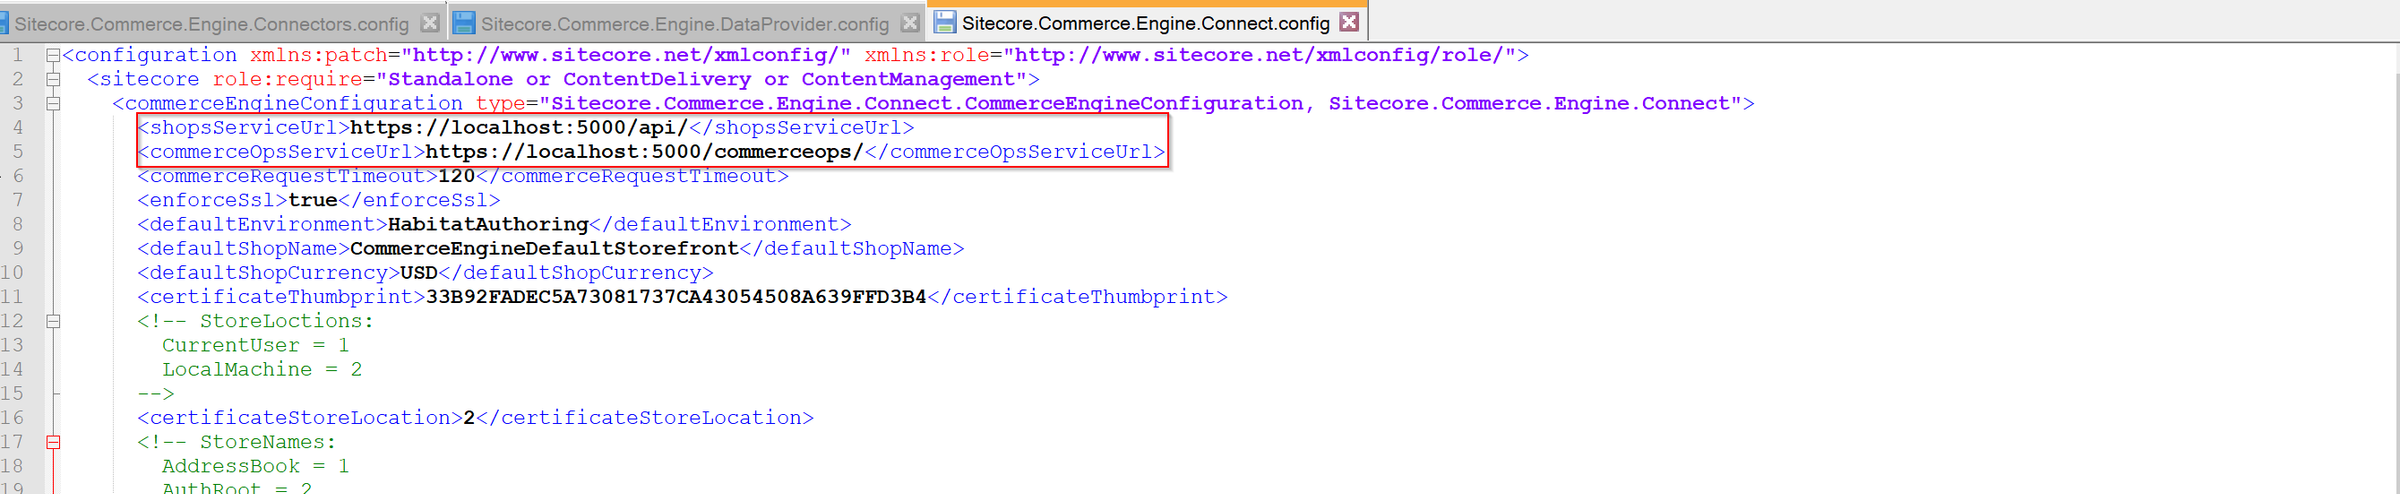
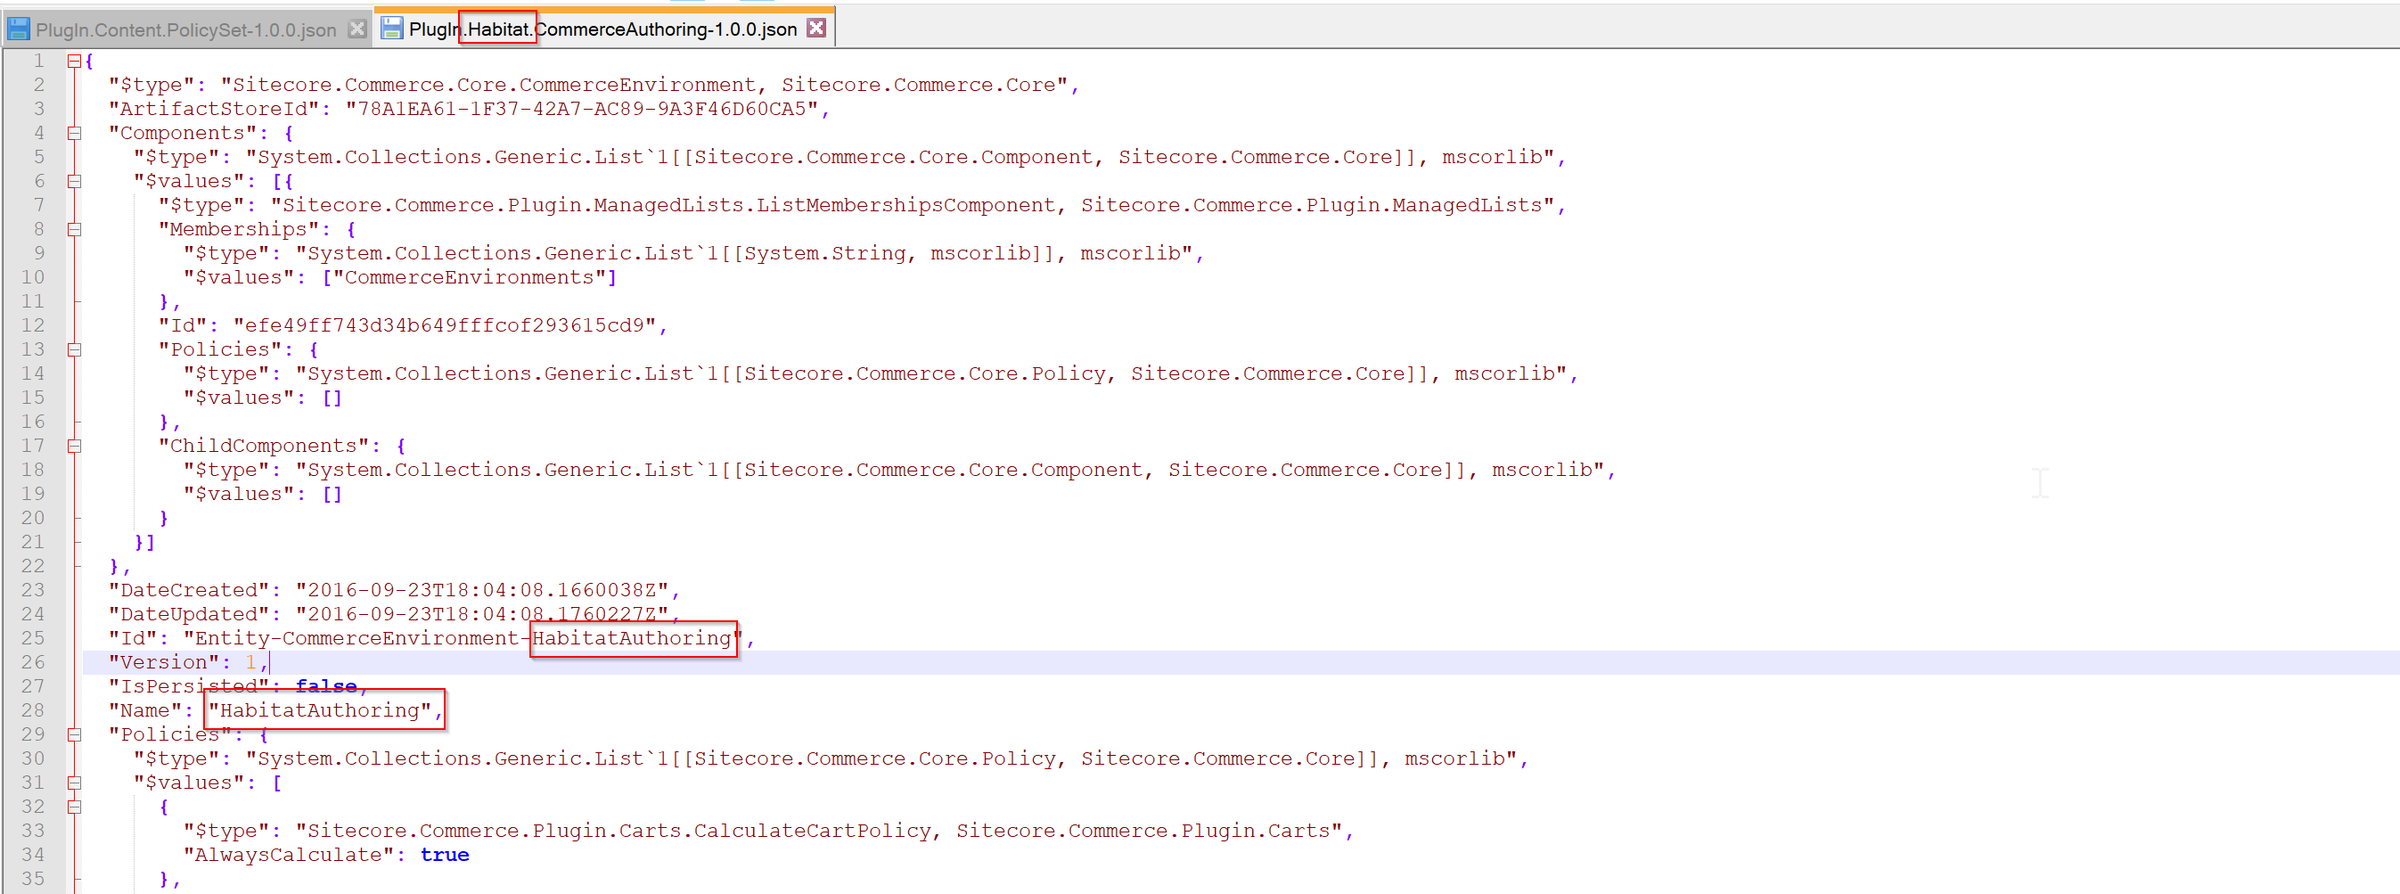
Authoring environment file
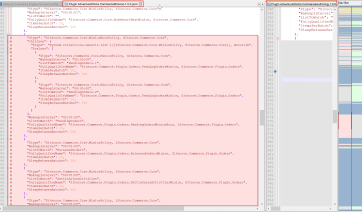
minions environment file
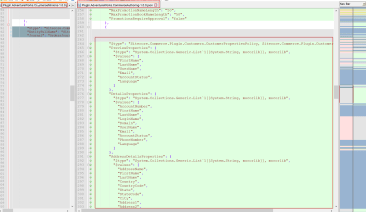
Above you can see some of the differences between a standard authoring system and minions environment. You can see, that e.g. within the Minions file you have policies to register all your minions with dedicated configurations. In the authoring environment file on the other hand these configs are missing, but we have configs for handling various datatypes with properties like for Customers. So based on the specified Policies within an Environment, it gets its logical Role.
Attention: Keep in mind to configure your minions instance properly, or it shuts down at some point, cause its never refereed. See the blog post below about correct configuration of minions instance within IIS. https://commerceservertips.com/quick-little-tip-configure-the-minion-role-to-be-alwaysrunning/
So in the end what counts is, that from the standard XP0 installation you only have to pay attention to the authoring and minions engine.
Roles within standard XP1 installation
Now I would like to finalize the thoughts from the XP0 installation to show you, how a XP1 installation now could look like. And you will see, it is much easier than it might looked like, based on the standard XP0 installation, which had a bunch of unnecessary and confusing commerce engines.
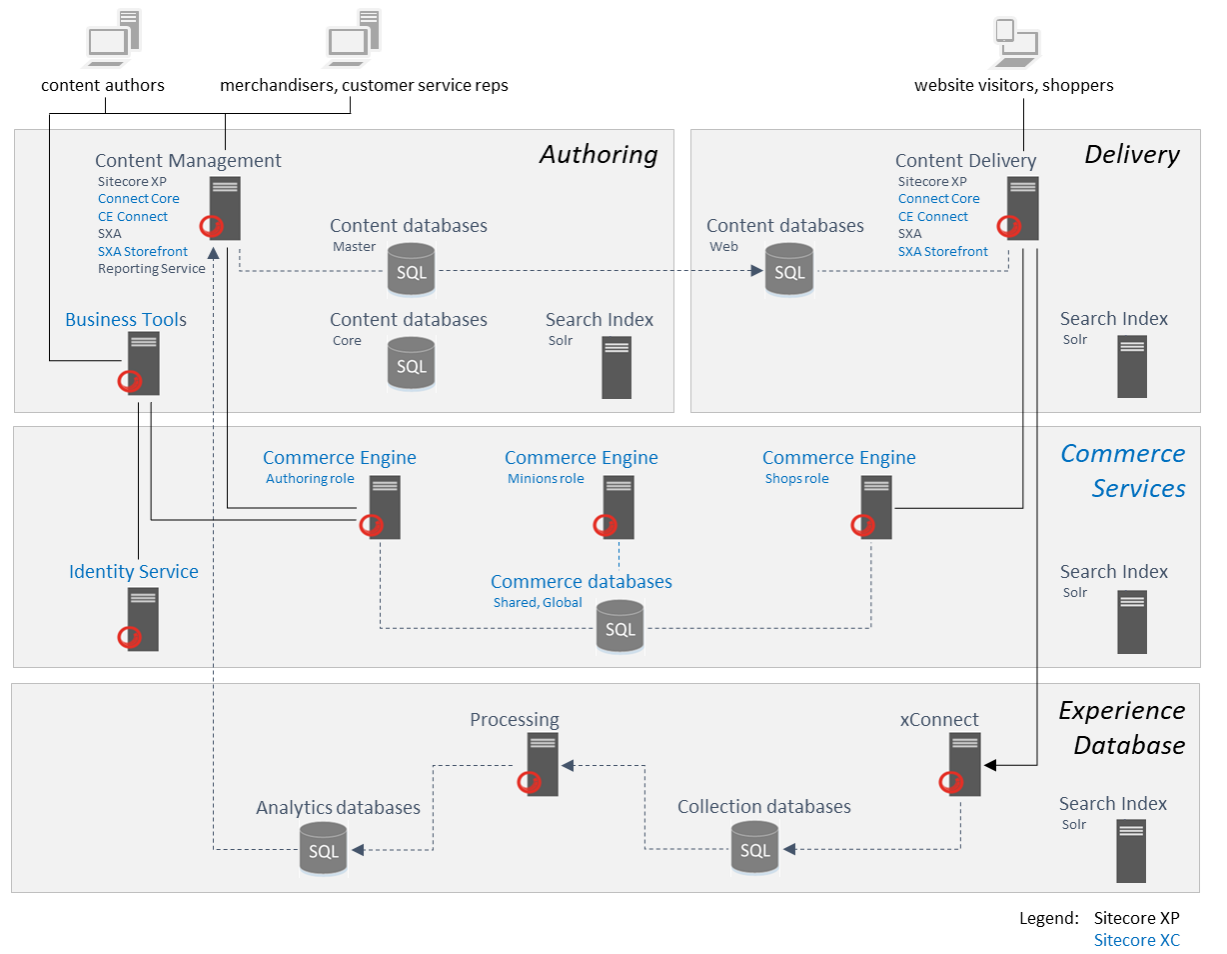
In the screenshot above you can see a standard XP1 architecture. The important part for us is in the middle. You can see the split between CM and CD environments. Respective there is also a split between Authoring and Shops Role within Commerce Engine, depending on CM and CD environment. When you install Sitecore XC in a XP1 environment you should have at least 3 roles for commerce engine. Authoring, Shops and Minions. In the end it does not matter if these roles are spitted among various servers or instances, if they are installed on the corresponding web server (Authoring on CM Webserver and Shops on the CD Webserver), or if they all are installed on a single server. We e.g. had an productive scenario, where we only had two web server one for CM and one for CD and had installed the two commerce engines directly on their web server. This all highly depends on the infrastructure and load you have in your current scenario. But for the roles it does not matter. What is important, is, that we do not have all the instances on all servers like it is done on a standard XP0 instance. In a XP1 instance, we really split the roles and put the instances close to their source of traffic. And the Sitecore instances CM and CD only communicate with one specific engine at a time CM -> Authoring and CD -> Shops. Of course you can see, that the Minions Roles in this scenario is a dedicated server on which we also have a commerce engine installed, but with a minions environment configured. And as mentioned in the previous chapter, this instance is not connected to any Sitecore instance, but only to the commerce database to let the minions run. But also this engine could be placed e.g. also on the server with the authoring engine, so that the authoring engine would have 2 environments; Authoring and Minions. This also highly depends on the load and infrastructure of your scenario.
How to create a new Policy
If you create custom functionality like custom plugins, minions or other stuff you most likely have also to create your own policies, which control these functionalities.
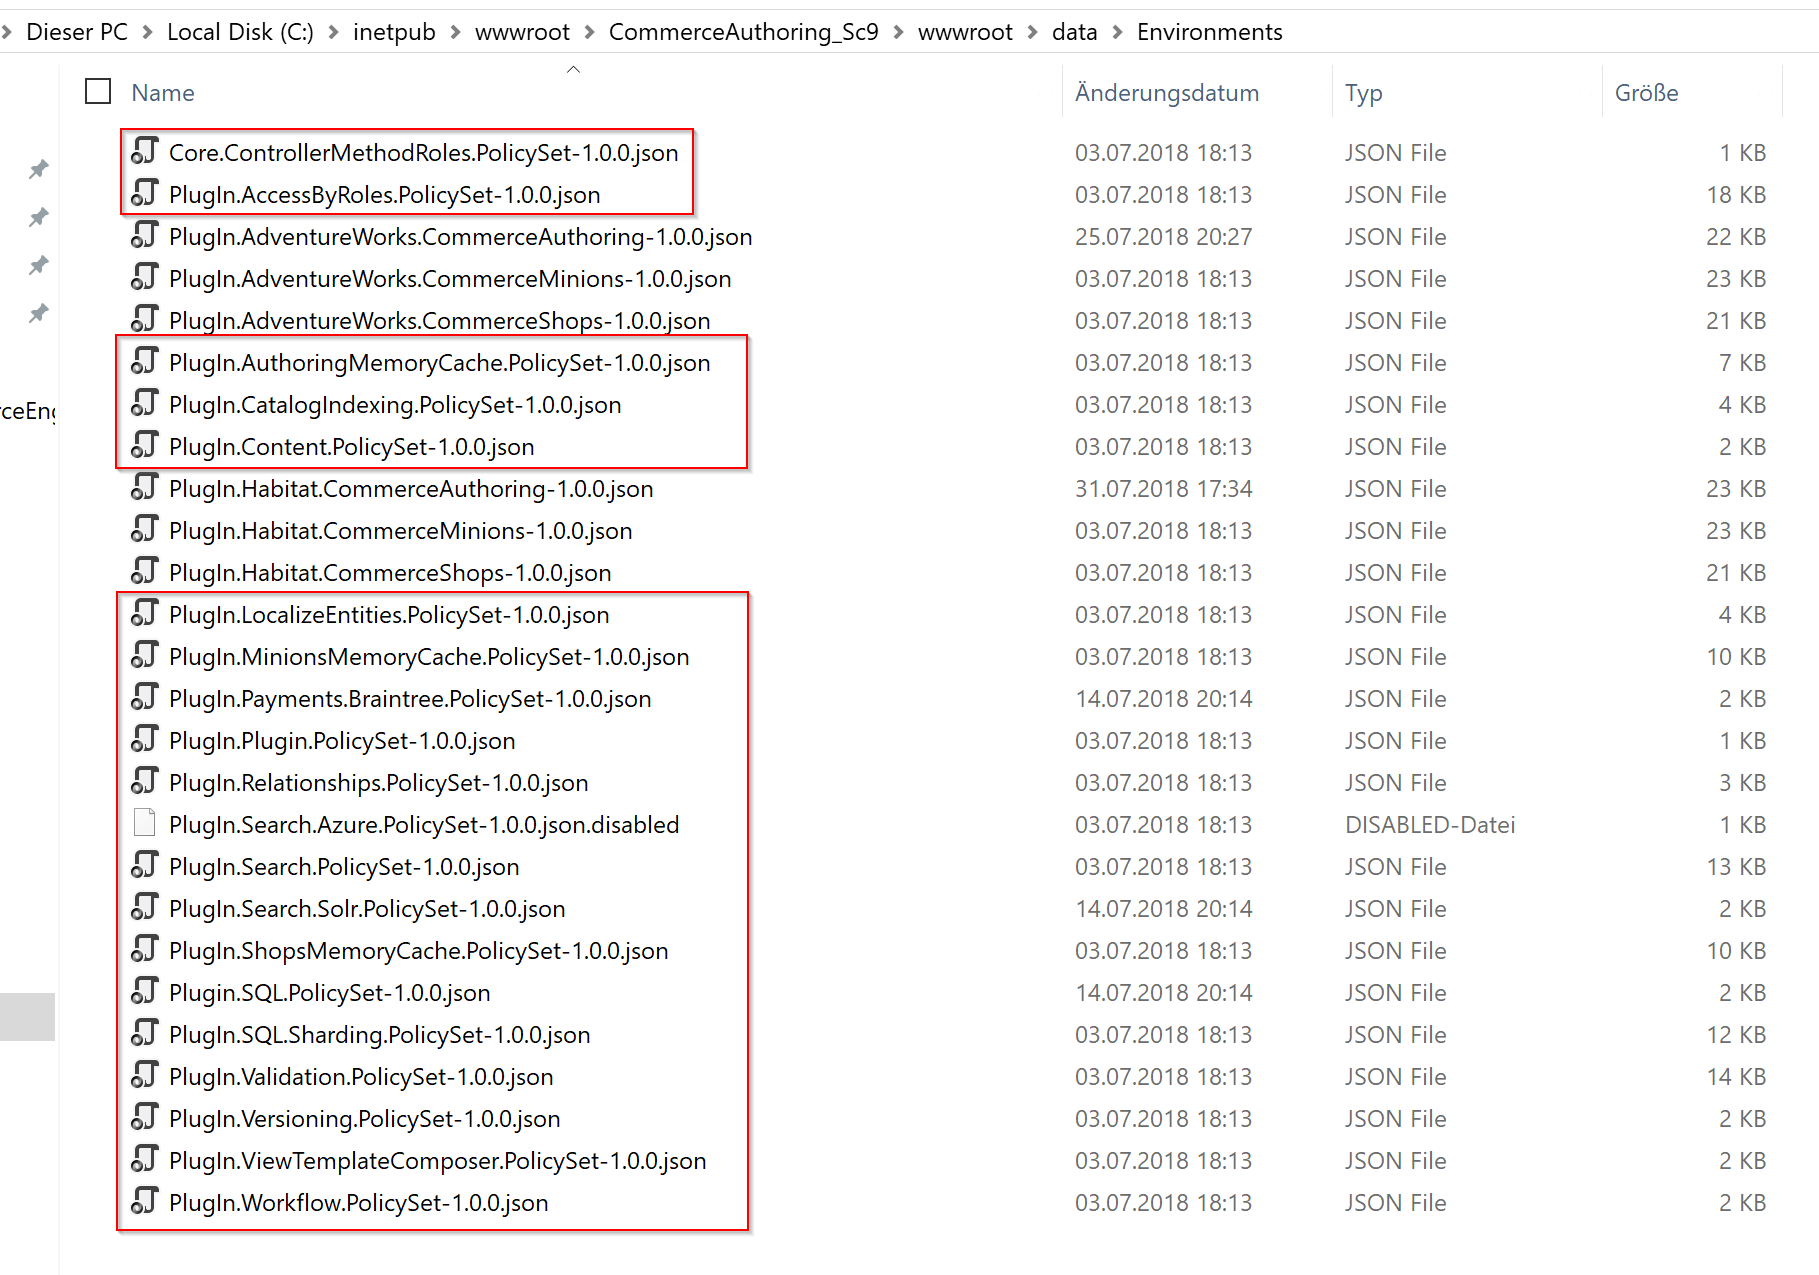
Out of the box you can see within the Environments folder of the commerce engine a various number of json files, like seen above. Here we can differentiate between global policy and environment files.
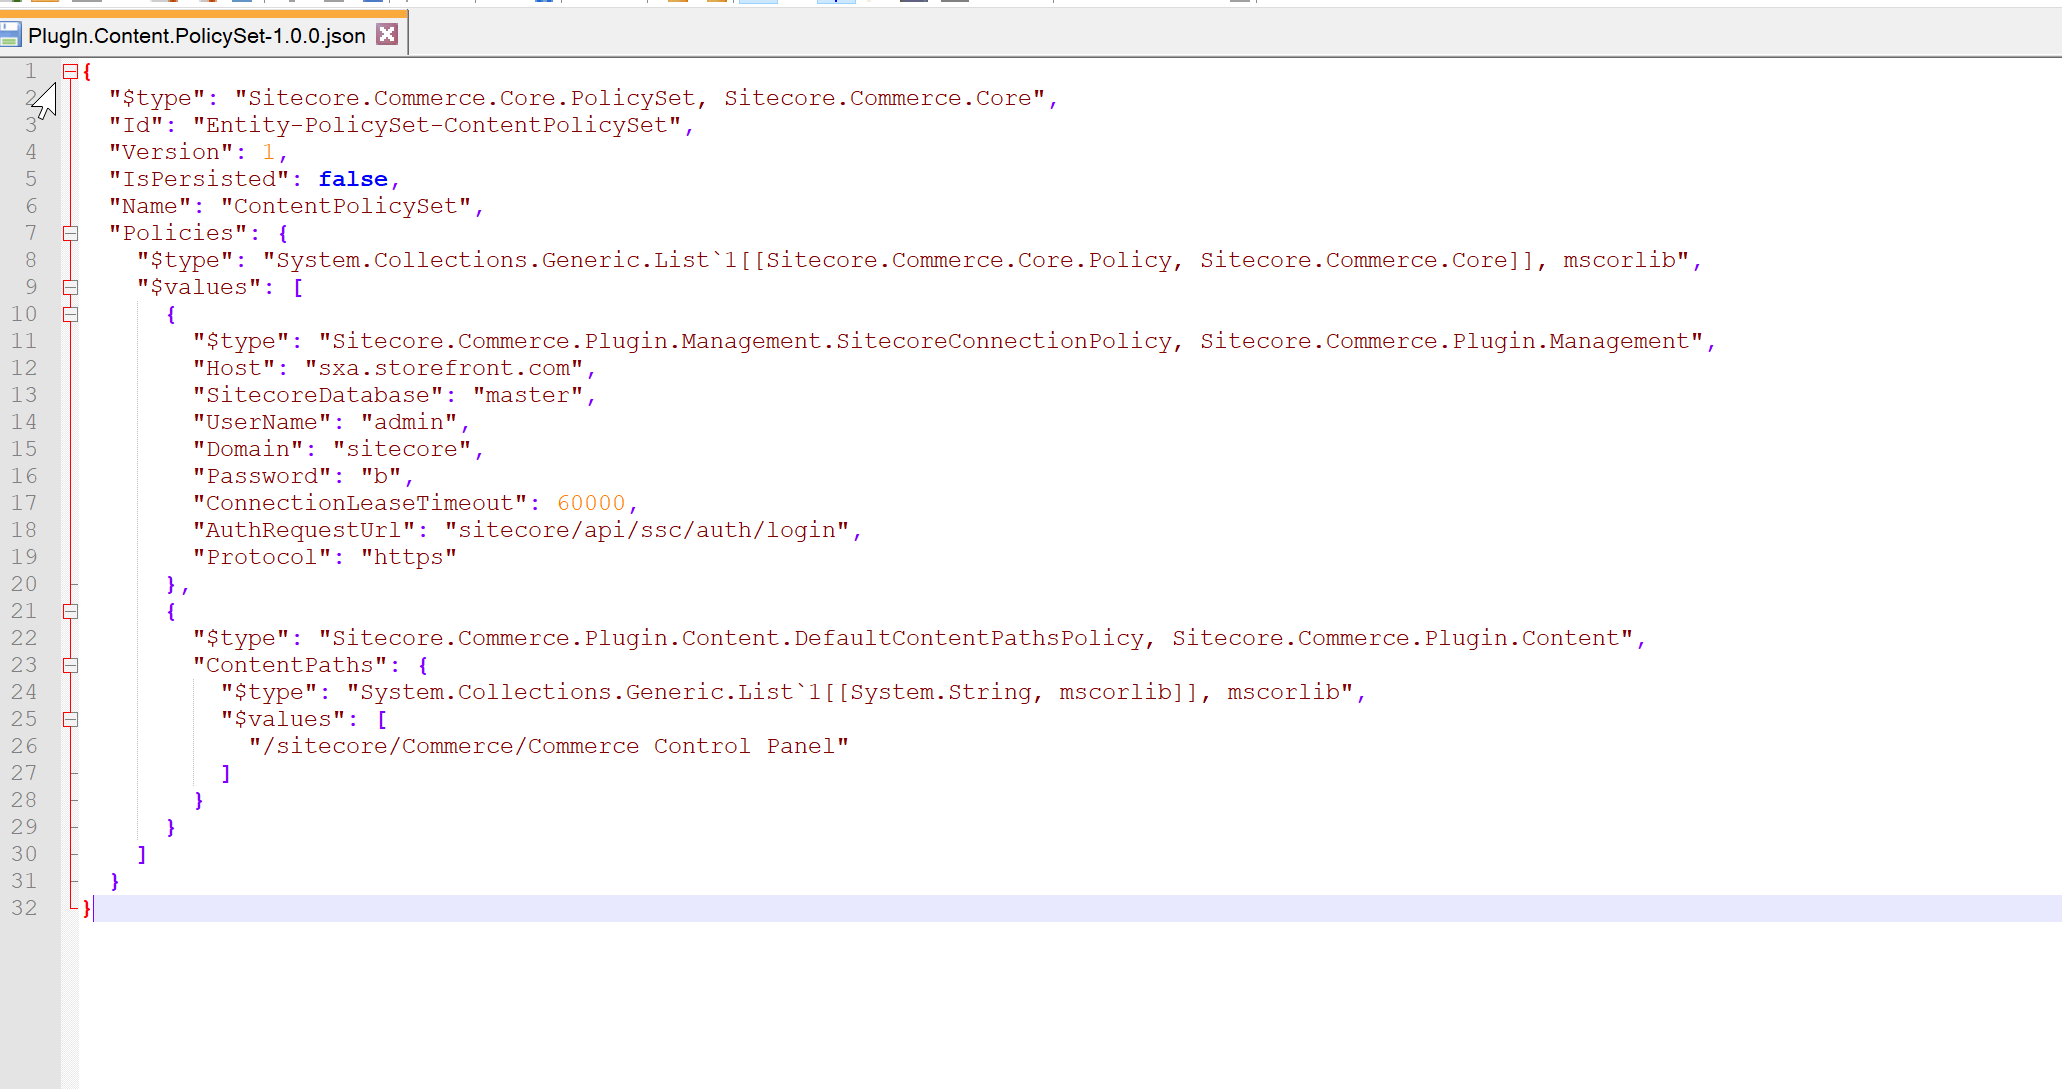
Such a global policy file has a predefined structure, like seen in the screenshot above. Beside some standard parameters, which are mandatory to identify this file as a valid global policy file like
- type
- id
- Version
- IsPersistend
- Name
It also holds a set of specific policies. These policies are all the time constructed in the same way. At first the type of the policy followed by all the parameters.
The same way you could also add your policy not in a custom json file, but directly inside an environment file.

In the screen above you can see an extraction of the standard authoring environment extended with a custom policy. The structure of the policy is exactly the same than in a global policy file. We have a specific type followed by a set of parameters. Here in this special case, I created a custom policy called GenericTaxPolicy, which is an extension of the standard GlobalTaxPolicy seen above. For the background. I did something like that, because the standard tax calculation is only capable of applying one specific tax rate to items and carts. But e.g. in Germany this is not sufficient enough. German products can have various taxes depending on the kind of good. Currently we have 7 and 19% taxes. So for training reasons and to learn proper plugin development, I started creating my own plugin on base of the standard tax plugin.
But creating the new policy entry is only half of the work. You now have also to add that new policy in code, so that it can be mapped and used correctly.
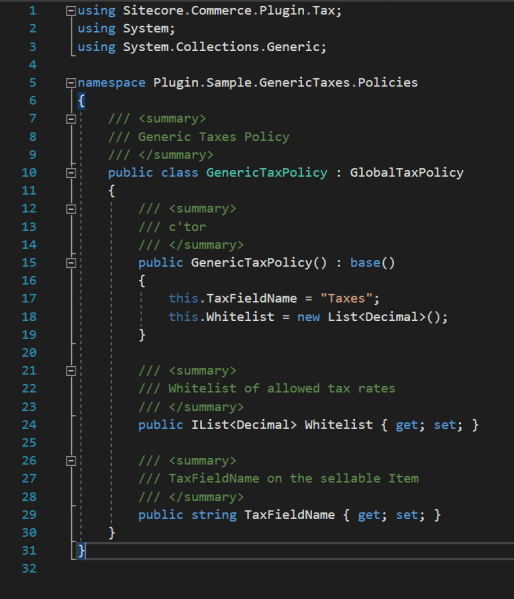
Above is a simple example of a new Policy. You will see that the namespace and dll matches exactly, what was set in the policy within the json within the type field. This policy easily extends the standard GlobalTaxPolicy with two new fields.

Above you can then see how to reference the newly created policy, which internally was mapped with your json file parameters. After everything is mapped correctly, you will in the end have strongly typed access to all of your properties of your policy.
How to create a new Environment
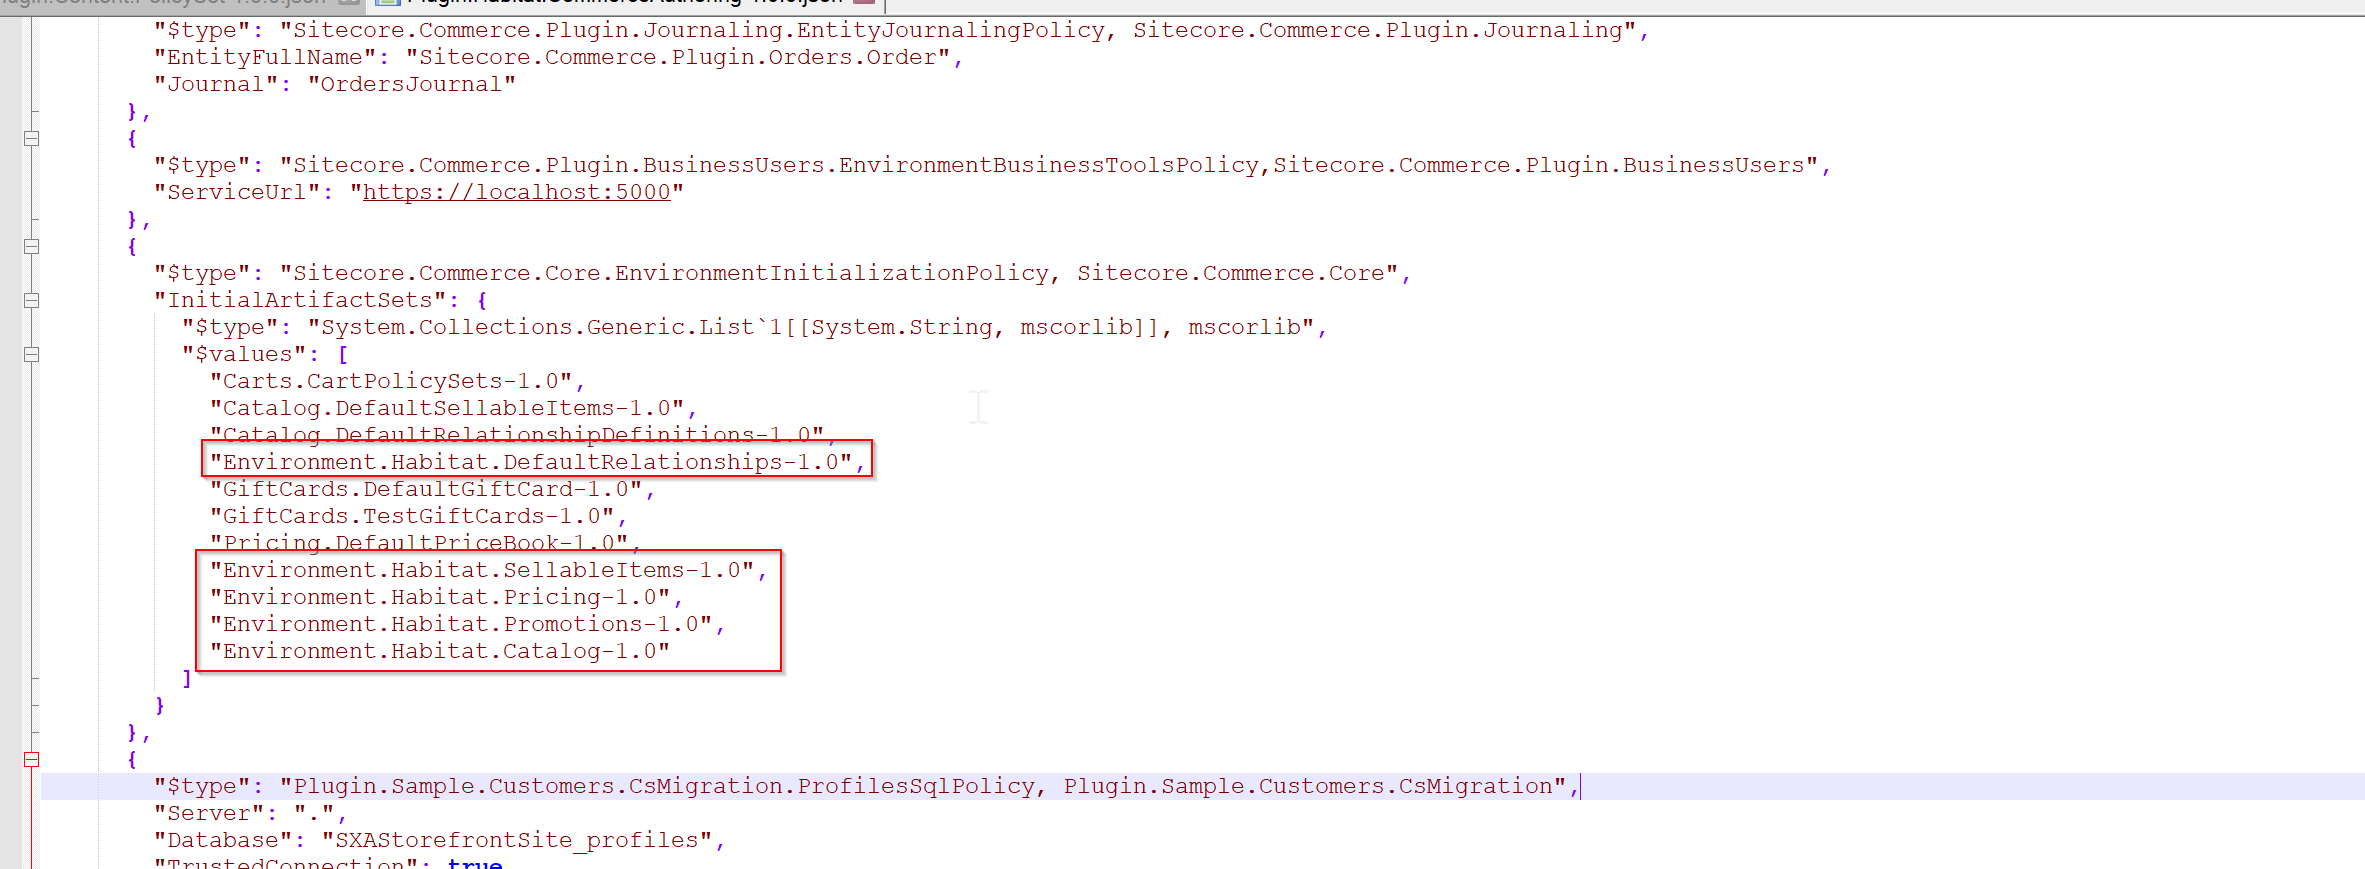
Regarding the other topics within this article to create a new Environment is really a simple task. From the standard installation you already have some example environments for authoring, shops and minions. Of course you can use these .json files as base of your new environment. If you e.g. want to create a new authoring system environment, just copy the existing Habitat Authoring json file, rename it, change the habitat specific entries to something, which fits your site naming convention. The fields are highlighted in the screen below. The same way you can create custom shops and minions environments.
After changing these values you can use and references this new policy the same way you reference all the other environments.
Attention: Keep in mind, that currently the choice of an environment is only possible within Sitecore XP only with a workaround described in that blogpost. https://hachweb.wordpress.com/2018/08/04/sitecore-xc-9-0-2-no-possibility-to-set-a-commerce-environment-within-sitecore-xp/
Conclusion
So to sum up understanding the terms of Policy, Environment and Roles will unleash the full potential of Sitecore Commerce Engine. You will be able to add and create new plugins with custom policies in an easy way. Based on these policies create your own Environments for your business needs and choosing which environment should be applied to which Storefront. And in the end bringing some light into the concept if Roles of the commerce engine, by explaining standard installation engines, putting all the confusion and dummy stuff beside to see what is really necessary to bring up your own instance properly to live.
- architecture
- devops
- dotnet
- sitecore-commerce
- sitecore-platform