
Sitecore Marketplace and Vercel AI SDK – When 1 + 1 truly becomes more than 2
Welcome back to another blog post about Sitecore AI. I know I promised a massive DevEx related blogpost a la “Developer journey from A to Z” and yes it will come! But due to current circumstances and
Welcome back to another blog post about Sitecore AI. I know I promised a massive DevEx related blogpost a la “Developer journey from A to Z” and yes it will come!
But due to current circumstances and a recent hackathon experience I wanted to put this in before. As everyone is speaking of AI and AI integrations, how helpful and powerful they are, I also wanted to share my latest experiences from building a PoC integrating AI into the editing flow for Sitecore AI. It was always one of my bullets on my todo list to build a chat or at least to leverage AI more to understand how to best integrate and use it. One the one hand in a user application, but on the other side also for me in my development flow. So this project nicely combines both and did not even take long to be implemented.
Settle the scene
In the beginning of the year I had the opportunity to join a hackathon that focused integrating AI chat into frontend website. The outcome after two days was a small chat assistant, which was able to understand the website content to best support the visitor in their journey. The idea was simple: help users find what they need without clicking through endless menus or long page lists. During the tests, I asked very normal questions like where to find the latest news, how to reach a specific page hidden deep in the navigation, or where more details about a topic were stored.
It felt surprisingly natural to ask the chat instead of searching manually. And after the hackathon, I wanted to rebuild everything I had seen to understand how it worked. But then the bigger idea came. If this chat assistant helps end users find the right information faster, why shouldn’t the same approach help editors inside Page Builder?
Editors often need even more support. Not only for managing single components, but for complete workflows. They want to start new campaigns that include page creation or management, teaser setup, or creating related content. They want to check page analytics to decide what should happen next. Or highly relevant, check the content against your brand guidelines. They want to follow best practices without switching systems all the time. And today, they leave Page Builder again and again to search for answers, read documentation or brief, or ask colleagues. This breaks their focus.
At this point I asked myself a simple question: What if there was a chat assistant directly inside Page Builder that understands your Sitecore setup? One that knows the pages, the components, the data sources, the structure, and even what usually comes next. An assistant that can explain things, give recommendations, show relevant information, and support the editor without leaving the editor.
That was the “think big” moment. So I began building the first version of a Sitecore Chat Assistant for Page Builder. Not as a full product or a public Marketplace App. That is not the goal here. The idea is to show what is possible when you bring the right technologies together: SitecoreAI, the Marketplace SDK, and Vercel’s AI stack. This project focuses on the developer experience and the potential of simple natural language support in the editing flow.
The technical landscape
So let’s start with the basics and talk about what this app is and what I used to build it.
I want to keep this simple and give you a clear overview first. Later in the blog I will go deeper and explain how everything fits together.
- Sitecore Marketplace SDK (Client & Server pieces)
- Sitecore Blok
- Vercel AI SDK (Core & UI)
- Vercel AI Elements
- Vercel AI Gateway
The main foundation is the Sitecore Marketplace SDK, both the client and the server package. The client package is the one most people already know, all the client-side hooks, queries, usePagesContext, useAppContext, and so on. But this time I also needed the server-side parts. They have been available for quite a while, but I never really had the chance to work with them. This project was the perfect moment to finally try them out. And later in this post I will explain exactly how to set it up so everything works smoothly. (https://doc.sitecore.com/mp/en/developers/sdk/latest/sitecore-marketplace-sdk/sitecore-marketplace-sdk-for-javascript.html)
I also used the Sitecore Blok Design System. It has been out of beta for some time now and is a natural fit. The components are clean, easy to use, and make the UI look 100% like Sitecore without any extra effort. (https://blok.sitecore.com/)
Then there is the full Vercel AI SDK stack, the SDK itself, the AI runtime pieces, the gateway, and everything that comes with it. It is already on version 6, and to be honest, I completely missed that. I only learned about it during the hackathon. Again, perfect timing to try it out and understand how it works. (https://ai-sdk.dev/docs/introduction) (https://vercel.com/changelog/introducing-ai-elements) (https://vercel.com/docs/ai-gateway)
Vercel Side
Let me start on the Vercel side. When I say “the Vercel AI stack,” I mean the Vercel AI SDK, the AI Elements, and the AI Gateway. First, the Vercel AI SDK. The question is:
Why do I even need another SDK?
And the answer, which I already learned in the hackathon, is that it just makes everything easier. It gives me flexibility and a useful abstraction layer. If you think about all the different models out there, integrating each one individually would be a lot of work. Every model has its own SDK and its own way to call it. The Vercel AI SDK supports most of these providers and gives me one unified API to talk to all of them. That’s basically it. I pick a model, pass in a prompt or a list of messages, and decide if it should stream or not. Streaming is helpful for long answers so I don’t have to wait. And of course, besides chat I could also use completions, image generation, speech‑to‑text, text‑to‑speech, all the usual stuff. Especially speaking of the UI part here we get predefined hooks like useChat or useCompletion, which easily glues the server piece and the client part.. It’s well documented and very easy to get started.
Let’s also shortly look at the power of Vercel AI SDK by showcasing the simplest code I have ever seen to interact with a LLM to execute a prompt
/* Server route /api/chat */
import { generateText } from "ai";
const { text } = await generateText({
  model: "anthropic/claude-sonnet-4.5",
  prompt: "What is love?",
})
/* Client */
 const { messages, sendMessage, status } = useChat({
    transport: new DefaultChatTransport({
      api: '/api/chat',
  }),
});https://ai-sdk.dev/docs/introduction & https://ai-sdk.dev/docs/ai-sdk-ui/overview
Then there are the Vercel AI Elements. The SDK handles the communication with the models, but without Elements I would still have to build the whole frontend myself, the input field, the chat messages, the streaming logic, all of that. AI Elements solve this for me. They give me ready‑to‑use components like the chat, the messages, confirmations, basically everything I need for an AI interaction. I just feed them with data.
And last, the AI Gateway. I already mentioned it briefly. It sits under the hood and is basically the reason why I can talk to so many models in a unified way. The gateway gives me one endpoint and one API key that unlocks hundreds of models. That’s why in some places you see a “gateway” namespace, that’s this part working in the background or in the code above it is more deeply backed in into the AI SDK Core part for instance when you choose your model. There you automatically use this Gateway, but of course can change this to use whatever provider you want via BYOK (Bring your own Key).
Sitecore Side
Now coming to the Sitecore side. This basically consists of the Marketplace SDK. I played around with Marketplace a lot in the past and built many apps as most of you know, but I actually never created an app that includes real server‑side functionality. So this part was new to me. What you will see is an app that uses the traditional concepts, some hooks, and some server features. It is a Page Builder integration, so it sits on the left‑hand side in the Page Builder UI, which makes sense, because if someone wants to edit and manage content, that’s exactly the place where a chat assistant should be to support them. So it’s a perfect extension point.
For the server‑side part, you will see the setup, what is needed, and in the getting‑started steps you will see everything from the initial signals up to a full working full‑stack app.
About Blok, I don’t really need to explain much anymore I think. It’s out of beta now for a while, it’s the Shadcn + Tailwind version, and it should basically be used in every Marketplace app. It ensures that the Sitecore applications really look and feel like modern web applications, and not like something completely separate. So Blok should be there, the components should be installed, and everything should be styled correctly. In my case I scaffolded everything with the CLI, so Blok is already in place and Marketplace SDK sits on top of it.
Vibe Coding – Your best friend or worst enemy?
And how did I implement then all of that? The answer will bring us deep into the vibe coding area. Getting started was easy, copy a few snippets, open the first chat window, ask something, get an answer. From there, I had to implement real things.
If you followed my blogs closely 😉 you might have noticed that I began Vibe Coding some time ago with v0 for visual work mostly. Building Marketplace Apps which are visually appealing, follow Blok Design system and so on. For this project I tried Cursor, as I also recently started using it, mostly for demonstration purpose, see Marketplace Hackerspace from Symposium or Marketplace App creation with Blok Design cases. Because my setup and MCP services were already connected (Blok, Next.JS, Sitecore Docs etc.), Cursor had context and also learned from my code. Autocompletion was strong (around 90–95% right), especially for repetitive tasks like small tools or APIs, often without using chat.
For the chat UI, I started simple: “make it look like Blok,” add dark mode, add a model switcher. Cursor handled layout and colors well. I asked for predefined questions to guide users (editing, analytics, personalization, content). It proposed simple ideas like page trends, content updates, page context, they made sense, so I used them.
Then I extended the predefined questions: add a headline, a visual name, and the internal prompt. Cursor generated all of that and added icons when asked. Small UX tweaks were fast too, e.g., replace the big “New Chat” button with a small “+” near the theme switcher.
But it wasn’t only UI. It was also pretty strong in generating lot of backend code for me. Mostly initial implementations, presenting ideas, how things could work and how things could be implemented. Something like “Please add logging in the following file.” or “Please implement this API with following description” or even “I have following bug, how can I fix it”. All this was amazingly good.
Overall I can say, that a good amount of this project came from Cursor. I guided it with clear instructions and structure, and more important double checked most of the results; it executed.
One warning: if docs or types are unclear, Cursor hallucinates, adds comments, ts-ignore, or uses any/unknown. Errors disappear, but so does correctness. You must check the output, fix it, or provide the missing info. So for me it felt like being an Architect and telling a developer exactly what I want him to do and partially also how.
If you do that, Vibe Coding is a huge boost. You build in hours or days what usually takes weeks or months. For me, it’s clearly a best friend, not a worst enemy.
Getting Started
Usually I would now start pretty extensively to describe step by step a getting started. But due to the fact that first it is pretty strait forwarded and second, the post will already be pretty long I will just stick to the most basic stuff.
- Scaffold a new Full Stack Marketplace App and configure it accordingly (https://doc.sitecore.com/mp/en/developers/sdk/latest/sitecore-marketplace-sdk/quick-start–cli-.html#scaffold-an-app)
- Create a new app in App Studio (https://portal.sitecorecloud.io/app-studio)
- Install AI SDK
- Get a new Gateway Key (https://vercel.com/docs/ai-gateway)
- Copy & Paste a very simple first example to ensure it is up & running (https://vercel.com/docs/ai-gateway/getting-started)
The current state (Still a PoC and fun project)
Now let us come to the status quo of the project after something like a week of work. First of all a bit about the concepts I used as well little demo videos about the major functionalities.
Concepts & Implementations
Now coming to the most interesting part, the concepts & implementations. So within this chapter I would like to deep dive into some of my weird thoughts why and how I implemented things so it looks like the version you see later in this article. I will cover server side backend logic like the chat route, how I am using Agents, Tools and other Vercel AI SDK functionality. In addition I will highlight some cool features on the UI level when using the OOTB AI elements and how to perfectly customize those based on your needs.
Chat functionality
Starting with the actual chat implementation / route. As you know this is the starting point from above. Every LLM interaction in this app lands at that route and it has to deal with it properly.
As you will see below the basic implementation is more or less still there, just with a few additions. I tried to keep additional logic out of that route to keep it as clean and readable as possible.
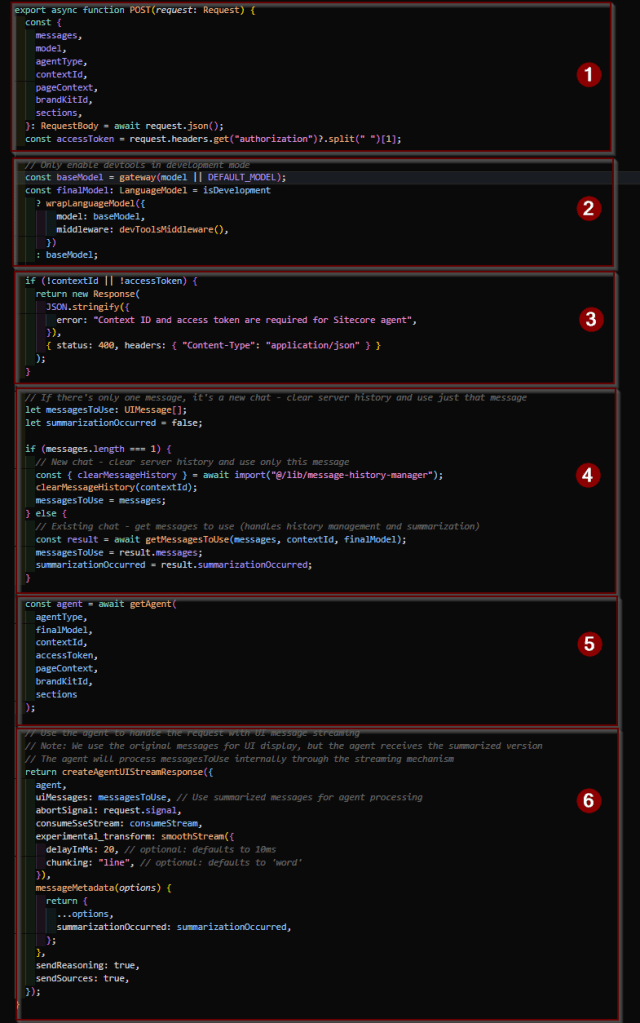
Let us examine the whole route step by step.
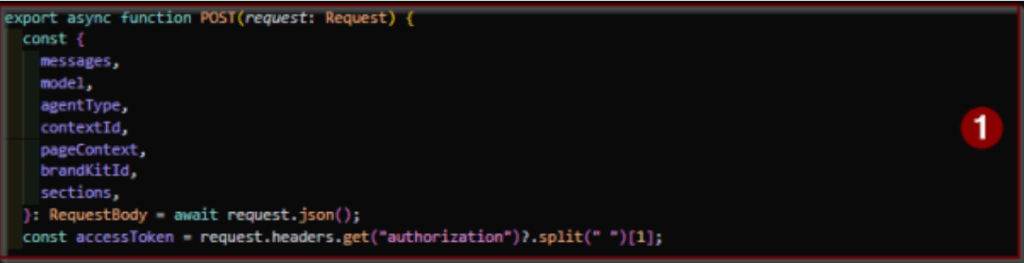
1) For the Agents and the tools later to work properly I add to slightly adjust the input parameters of this function. I added critical parameter like contextId and accessToken to body / header. You will see later, that we need accessToken to initiate the Sitecore Marketplace serverside client and the contextId to actually execute a request. Then I also added some “optional” nice to have ones for additional functionalities. The first is the agentType. This one is currently controlled by the UI and dictates the route, which Agent should be instantiated. Another parameter is the pagesContext. This context is caught at client level with usePagesContext, including context updates and is just sent to the server route to be added to the agent system prompt as fundamental knowledge. Spoiler: Just because of those data and the fact, that we constantly grab updates, in case pages context changes, the LLM got ultra powerful in understanding where it is and what happens to plan executions and next steps. Last but not least I also submit the choice of the BrandKit including the chosen Sections of a brandkit, so that the corresponding tools under the hood are fed with the right data when brand review is executed.

2) This one is quickly described. I am using the standard Vercel Gateway to prepare the model chosen by the UI and put this one optionally (depending on DEV or PRODUCTION mode) into the devTools Middleware, which I describe later in more detail.

3) Also an easy one as this just ensures that my accessToken and contextID is present as without those most of the tools from all the agents would simply not work and therefore would be totally useless.
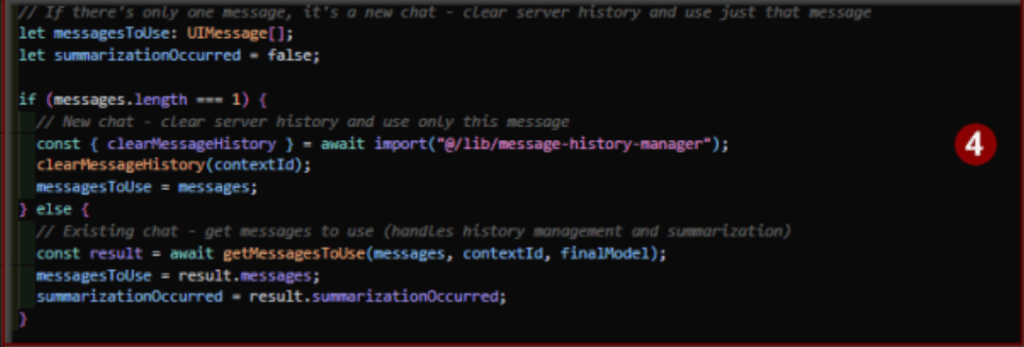
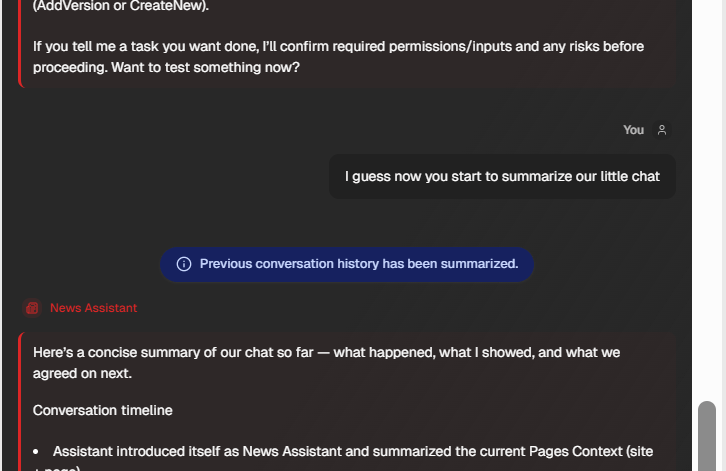
4) This part handles the special feature of chat history summarization. You can see that this part only handles two cases. In case a new chat has been started, for instance when clicking new chat, the whole server side message history is cleared and just the last / first user message is taken. Otherwise a special logic is executed to identify if summarization needs to be executed or not. Basically via counting the number of user and assistant messages. If that exceeds a threshold we summarize and put it into the history. So in the end the chat history contains the first system messages from the agent, the summary and the last assistant answer and the current user input. I decided to keep the last assistant answer as well as usually a user wants to build on top of that and we might loose critical information when we simply summarize this as well, this keeps the end of a conversation highly relevant.
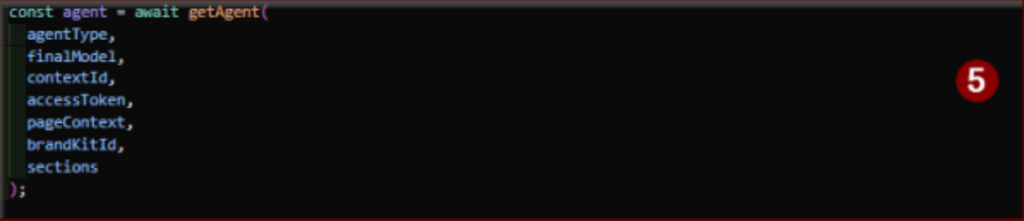
5) This one is just my agent factory, which decides, based on the given input, which Agent should be initialized. More on Agents in the next sub chapter.
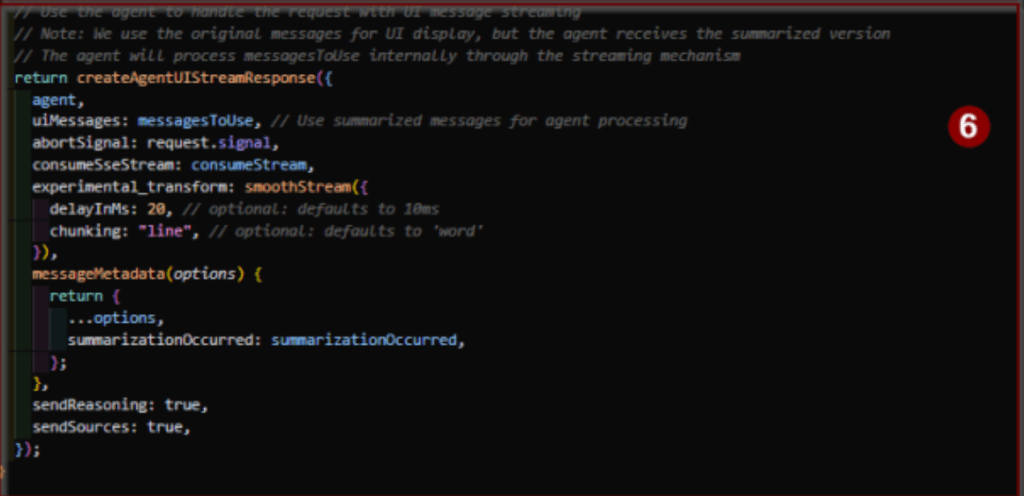
6) And this one is basically the standard streaming, but for the Agent version. I just added a few little things. I changed the streaming and added smooth streaming. I also enabled sending back sources and reasoning as I plan to display those as well in the future. Note: Of course this increases the number of tokens sent back. Last but not least a custom addition again. In case a summarization happens, I add this as metadata to the current response, so that I can display it in the chat and the user is at least aware of the fact, that the context might not be 100% accurate anymore now.
Agents
Coming to the part of the Agents. Basically it is the core or heart of chat assistant. The very initial version even in the getting started is using something like generate text, where you can add your model, tools, system instructions etc. directly. With the concept of an Agent, there is now an abstraction layer to encapsulate all this and put it into a reusable component.
As you see above, based on this concept I created several Agents. I followed two approaches and basically want to do a bit of experimentation. I want to find out if it is better to have
- One massive agent with all the existing tools I have, specific and generic tools as well all the very domain specific ones.
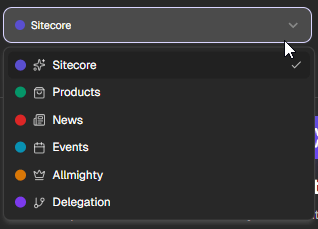
- Or if it is better to have several highly specialized agents like for different areas Products, Events, News etc. On top of this one pretty generic one for non-specialized areas, which has domain knowledge, but no specifics about those special areas.
You will see later in the demo section, that I use the Pages Context information to dynamically change the current agent to be most relevant. For instance, when I move into the news area, it automatically switches to the News agent. When I go back to the home page for instance, it would automatically change to the general Sitecore agent and so on. On top of this concept I am trying to implement an agent called Delegation Agent. This agent would have just one task. Based on a given input and history it has to decide, like a gatekeeper, which other agent fits best to handle this input. This way I get the benefits of both approaches above. Basically there is one agent which knows everything, but only because it knows who to ask.
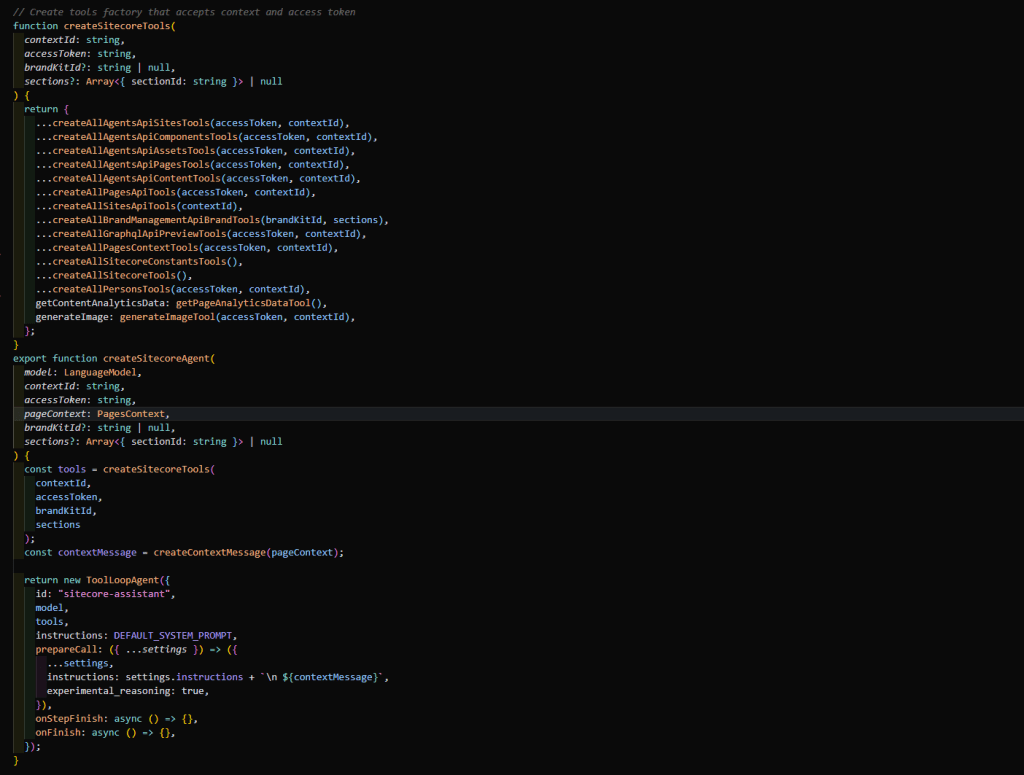
Coming now to the agent implementation itself. This one is pretty straith forward. I provide a createAgent function, which accepts all the needed parameters. Some are passed directly into the tools creation function as they are needed there to actually do the external communication. Others like the context, is not baked in into the system prompt and acts like the fundamental behavior and knowledge of my Agent. By saying that, below you see an example and my current version of the so called system prompt from my Sitecore Agent. Note: I am still playing around with all of that, if more or less information make sense and how much specific phrases change the LLM behavior.

And yes I know it looks like a massive system prompt. Not sure if thats a good or really bad one. But the chat results are pretty good and understandable and helpful.
Tools
Coming to the next level, the tools. You already saw the tool initialization in the example above. I decided to split my tools across different APIs used as well if it offers a more domain specific tool set or not. This ends in a few imports in my Agent, but at least for me a cleaner and better understandable and handleable way to manage tools.
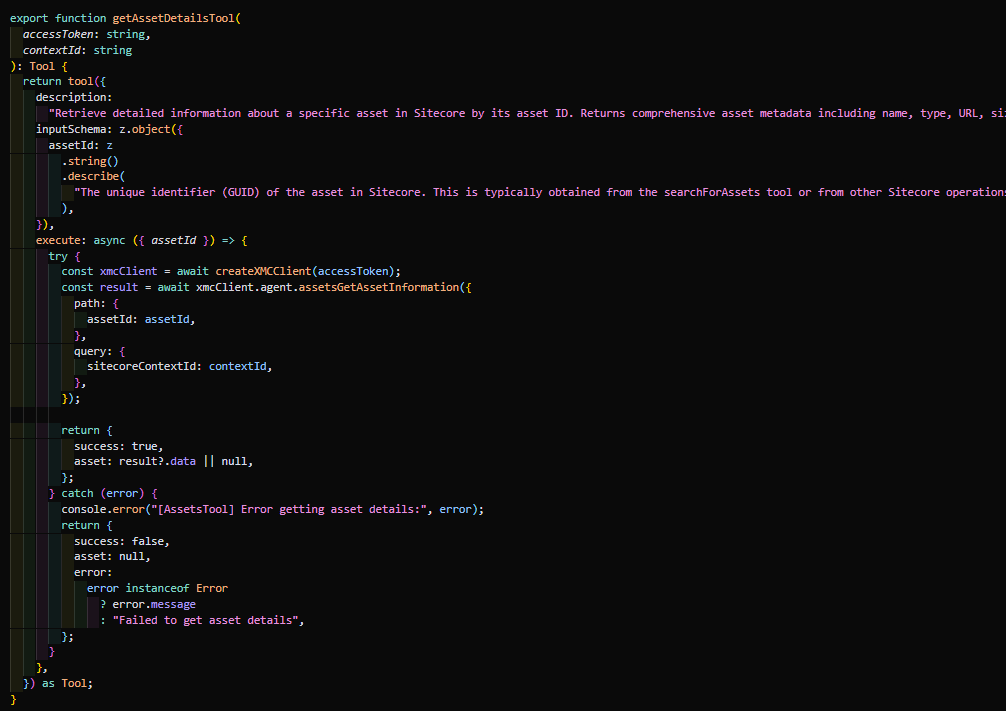
Atomic
Starting with the most basic type of tools I am using. I am calling it atomic tool as the only purpose per tool is, to call an external API. It basically acts as a wrapper around an API and adds some fancy AI metadata like zod based input and output schemas, descriptions etc. All those tools alone are pretty boring and just settle the scene for larger use cases. Once we let the LLM have access to many of such tools, it gets all its capabilities to execute more complex tasks later on.
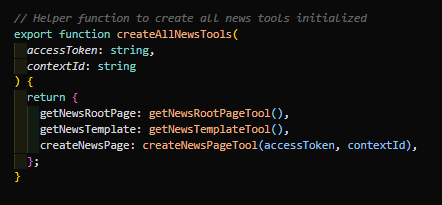
Domain
The next type of tools I am using are more domain specific ones. Below is the example of News tools. Those tools provide very specific information about content architecture and structure specifically about News Pages / the News Area. Also the createNewsPageTool is in the end just a highly specialized version of a standard create page item tool / service, but with very specific news related parameters. This way we can easily ask the editor very explicitly to provide needed data to manage / create a news.
Client Trigger
The last type of tools I am using right now (pretty sure more to come) is something I called Client Trigger. The reason is pretty simple. Imagine following case:
I want the user to ask the LLM to navigate to another page or simply refresh the current page for instance “Translate the current page and navigate to the translated version” Or “Create a new News Page and open it”. As all of the navigation and refresh happens client side, but the LLM decides on stuff server side, there needs to be a mechanism to let the client know, what it needs to do. So there are as of now two tools “refreshPagesTool” and “navigatePagesTool”. In case the LLM decides, that those tools should be executed, they simply send the needed data back to the client in a structured way. In the client I can easily identify the fact, that such a tool was called and have access to the structured data. For navigation for instance I get all the needed data like version, language or itemId to mutate the pages context then. So in the end the brain is still the LLM and identifies the need to execute a navigation or refresh and the client is actually executing on this.

The Interface
Closing the backend logic and coming to the UI. Let us start with a high level description of, what you can see below.
Very first I would like you to show the “current” version of the heart of everything. As AI SDK delivers not only server side pieces, but also the needed hooks, why not using it? So this is the useChat hook, which makes it ridiculous simple to access all the needed information and even offers some functionalities to push data upstream like new messages or responses to tool approvals etc.
  const {
    messages,
    status,
    sendMessage,
    setMessages,
    stop,
    addToolApprovalResponse,
  } = useChat({
    transport: new DefaultChatTransport({
      api: "/api/chat",
      body: () => ({
        model: selectedModel,
        contextId: resourceAccess?.[0]?.context?.preview,
        agentType: selectedAgent,
        pageContext: pagesContext,
        brandKitId: selectedBrandKit,
        sections:
          selectedSections.length > 0
            ? selectedSections.map((id) => ({ sectionId: id }))
            : undefined,
      }),
      headers: async () => {
        const accessToken = await getAccessTokenSilently();
        return {
          Authorization: `Bearer ${accessToken}`,
        };
      },
    }),
    sendAutomaticallyWhen: lastAssistantMessageIsCompleteWithApprovalResponses
})
And yes this is already a customized version of the bare minimum one like you can see below. I just extended it over time with new props, which were needed to fulfill my use cases properly.
  const { messages, status, sendMessage } = useChat({
    transport: new DefaultChatTransport({
      api: "/api/chat",
      body: () => ({
        model: selectedModel,
      }),
    }),
})And even in the minimal example the api endpoint is actually not needed as this is the standard fallback, if nothing is set and model could be hardcoded server side to not need to send it over. So you see that the hook in essence offers access to all the messages a way to send a new one and the current status like the ones below
submitted: The message has been sent to the API and we’re awaiting the start of the response stream.streaming: The response is actively streaming in from the API, receiving chunks of data.ready: The full response has been received and processed; a new user message can be submitted.error: An error occurred during the API request, preventing successful completion.
In my customized example above I even access more properties from the object like setMessages to manually change the message history, basically to inject stuff as well the toolapprovalresponse to feedback the user input for tool approvals.
On top or better around this useChat hook you see following elements available and fully working.
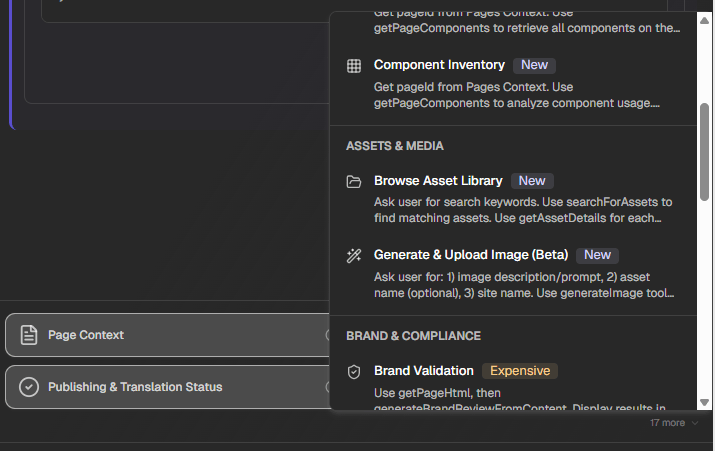
- Agent Switcher: If you want you can switch the agent manually, (or you trust the context to choose it for you)
- Model Switcher: This is a choice from popular models from varius provider like OpenAi, Google and Claude. Due to some stupidity I did during implementation, I decided to mark them as cheap, moderate and expensive as well display specific prices.
- BrandKit & Section Switcher: This is the possibility for a marketer to choose precreated and configured Brandkits from the system for various content related tasks like brand validation, which uses exactly this choice to validate against. Next phase could be to easily update the content with the given recommendation or already use the Brandkit on content creation.
- The chat window itself: In Empty state it offers additional information about the currently chosen Agent. During a chat it just displays the messages and offers overview between Use and Assistant (and which Agent exactly answers), a possibility to delete single messages as well the possibility to interact like approve / reject tools.
- Predefined Questions: First part contains the top 4 predefined questions with a nice label. It offers a detailed view on the prompt by hoover. Second part contains even more interesting examples with prompts, what you can do with the current state of the Chat Assistant
- Last but not least the input fields: This includes file attachment, message input, audio input (currently not working due to iframe restrictions) and a send button.
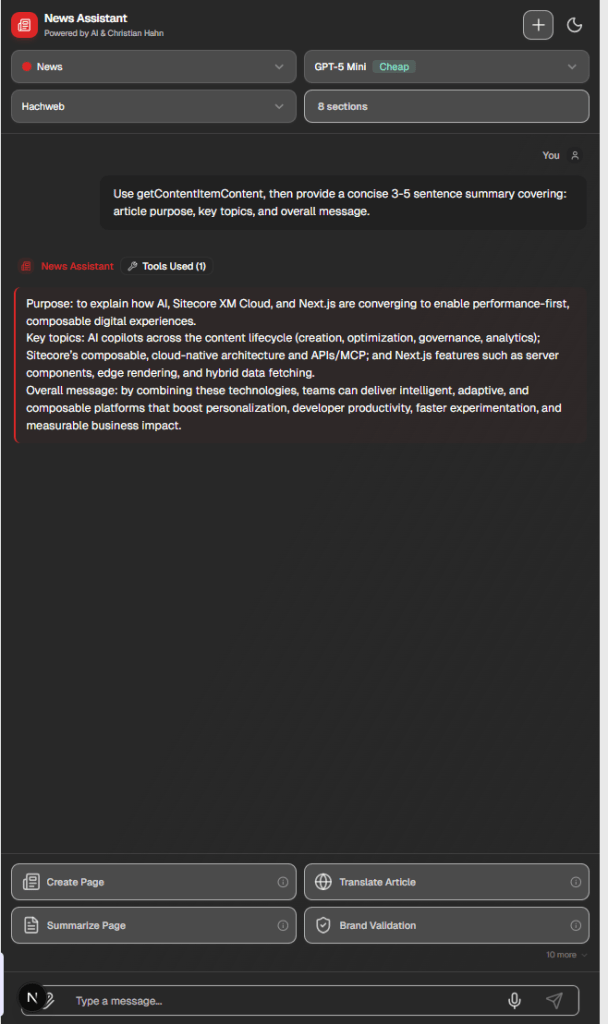
Below is the example of the News Agent during a conversation. You see a changed color set, based on the chosen agent as clear indicator and visualization of the context switch. During a conversation the empty state stuff goes away and is replaced by simple styled user / assistant messages. You clearly see, who wrote the message like “User” or “Assistant” and even which Agent specifically answers. This is more interesting for larger message histories and multiple context switches. You also see which tools were used under the hood to produce the given output.
Custom Visualization
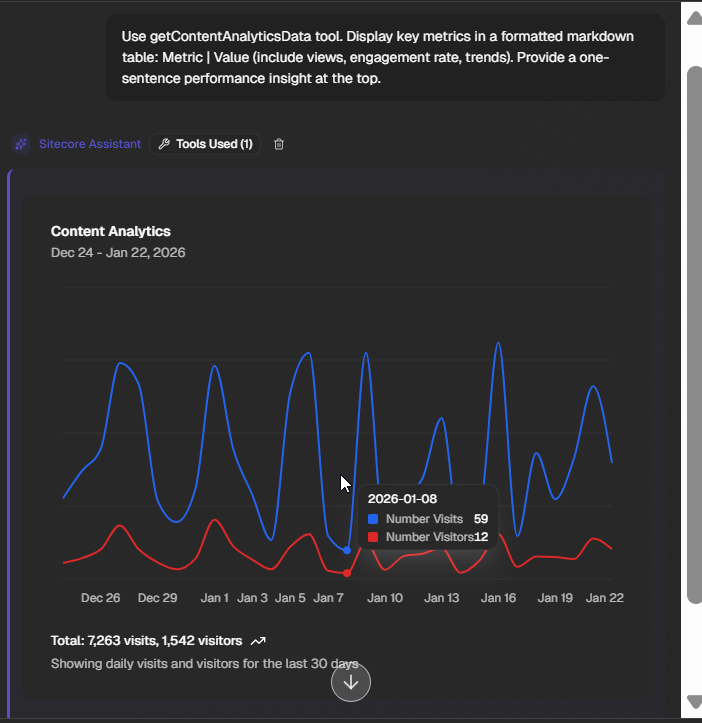
When we talk about visualization there is nowadays also often the requirement to bring custom UI into the chat. Usually the LLM decides how stuff is returned and presented. But luckily we can simply hook in into this process. We can easily and clearly identify, while rendering the messages, if a part of the message (or the whole message) was the output of a tool with structured data. In such a case we simply render those data exactly the way we want it. In the example below I asked for analytics data and got back number visitors and number visits of the last 30 days. Of course the LLM would simply output it like a list or table. But I wanted to have a nice graph. Luckily Blok has a chart component. So I just used this one and fed it with the given visits and visitor data and the output is a nicely Sitecore styled graph within the chat.
But we can do even more. Let us also have a look at the example of a Brand Review. We know that we dynamically get data back based on the chosen Brandkit, but especially based on the chosen Sections. Inside each section the data are pretty much always the same as you can see below. And again I can easily use Blok to render the review results nicely rather than in some kind of table or an even simpler list.
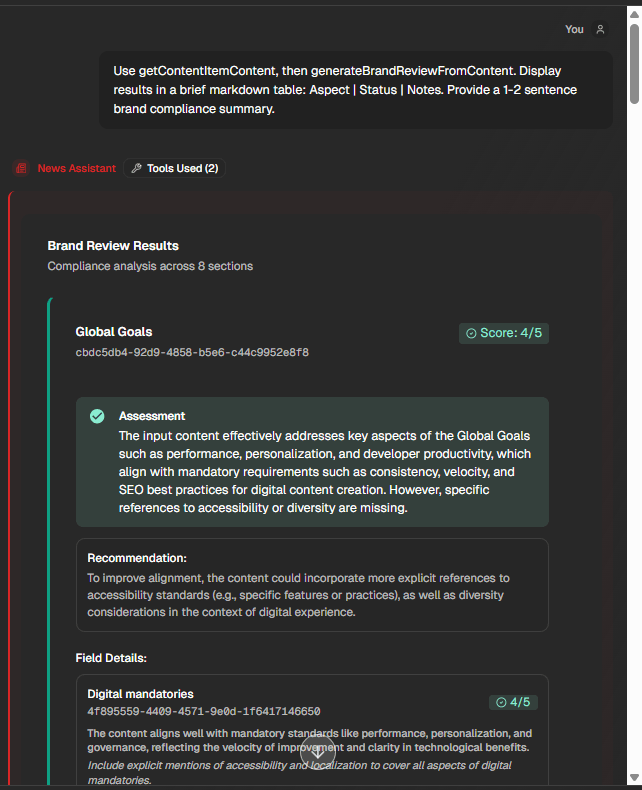
If you compare above and below screenshot direcly with each other you exactly see the difference and what I mean. I personally like the more visual appearance above much more than the table like view below.
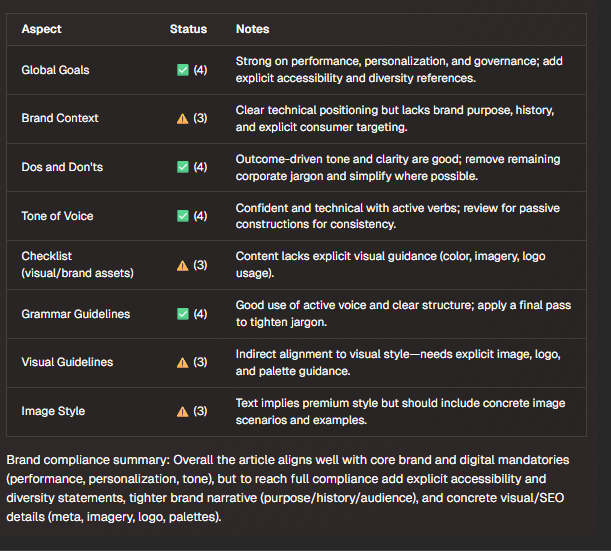
Keeping this in mind you just have to find a nice balance between highly customized UI and the generic, but powerful output of the LLM directly.
Predefined Questions
Coming to the next and last UI piece I want to highlight. When I was at the hackathon I saw something like this as well and turned out it was massively helpful to either way get started or to execute commonly used or repetitive tasks, without the need to always write potentially complex prompts. Below you see the concept of 4 highlight predefined questions.

If you hover of the “I” Icon you get a tooltip with the actual query, which would be executed on click. As this might be more complex and pretty specialized, it is packed into a button like this to increase editor performance interacting with a chat.

As it turned out that 4 questions are nice, but more might be needed to best support and maybe play around with things, I decided to offer more with the little X more icon and a context view highlighting further predefined questions.
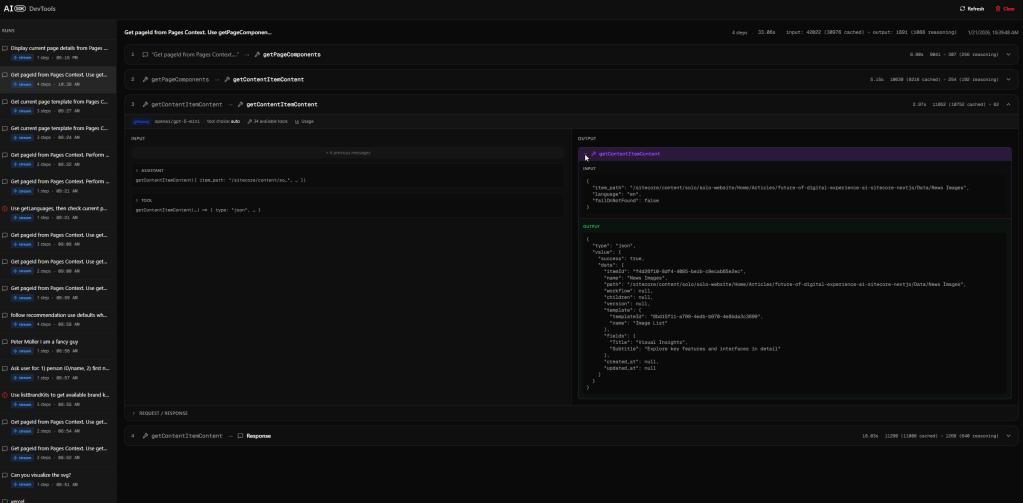
Dev Tools Middleware
Last but not least a pretty cool tool / feature when using the AI SDK. Above you already saw that I included the devTools middleware into the chat function, which is executed in development mode. Turns out it is a massively helpful debugging tool to understand, what the LLM is actually doing under the hood with the input, which tools it calls, with which parameter, the output including number of used tokens and more. This way you can quickly identify critical issues on LLM level. For instance I used this one to debug my summarization logic as it was pretty easy to follow on that view.
Major Features in action
Now coming to the most interesting part of the whole blog. After reading all the theory and implementation details, you most likely want to see everything live and in action now? Sure no problem. I splitted the micro demos into different areas. First is UI, where I just present the UI elements one after another. Then I will deep dive into some use cases classified with Simple, Advanced and Cool. The idea here is to show, what the Chat Assistant is already able to achieve, where simple cases just settle the scene and are not really interesting on its own. But combined together we reach some of the advanced use cases. And when we really go crazy, we reach the cool stuff, which feels like pure magic.
Basics
Starting with first basic use cases. See them as the ground work needed for the more advanced as well the really cool cases.
Context Retrieval
First of all the context retrieval. This is also added as predefined question and should demonstrate, that we have access to the whole Pages Context all the time during chat. This is provided by Marketplace SDK in real-time via usePagesContext hook, where we can even subscribe for updates and react on them. I decided to add those information as system prompt / instructions to the agent as core / fundamental knowledge base. Turns out having these information makes the LLM massively powerful for later cases.
Publishing & Translation Status
Next case now starts using provided tools, which in the end use for instance Sitecore Agent API. It might be relevant for some editors to understand if the current side is live or not and together with this piece of information to understand the multilingual status of the page. Just this is interesting here and there. But based on this (and some other provided tools) the LLM as of now is already able to generate a whole report for your whole site to tell you, which pages are published in which language version and which ones for instance have a language version, but are not published and which do not even have a language version. So based on this it gives you a nice indicator, where to look next. As I said, this alone is not that stunning. But based on this and other tools, which work hand in hand you unlock a whole new level of interaction.
Analytics Data
This special feature is a cool one and same with above on its own quite nice, but in combination with others ultra powerful. This feature allows an editor to understand the analytics data of a page let us say for the last 30 days.
Note: I have to admit that the data themselves are random as of now, as I did not find any official API to get analytics data. But all the rest like tool and custom UI is fully working and can be easily used, ones data are available.
By saying that, the cool part here is the custom UI. I simply react on the fact, that the analytics data tool has been called, which gives back the analytics data of a page for the last 30 days. This way I was able to feed a custom blok based UI with those data to make the UI highly relevant and most attractive to editors and marketers. Keep in mind, if you combine this with the fact, that you can retrieve any page in any language version you can now easily ask the system to generate a site wide analytics report, highlight anomalies and even give explanations or recommendations.
Navigation / Page Refresh
This one is really not a cool feature on its own and just releases its whole power combined with others. The interesting part here is, that I am able to ask the LLM to execute a page refresh (right hand side canvas) or a full navigation to another page / version / language. The initial problem, which I had to solve is, that such operations are only working client side, but I get my tools and tool execution server side. The solution then was pretty simple but effective. I decided to let the LLM decide, if a refresh or navigation should be executed given the whole context. It should add the necessary data and just send the whole answer back to the client. The client then simply examines the last message to see, if this special navigate or refresh tool has been executed. If so, it gets needed data from the structured response and then simply executes client side again using the usePagesContext with prepared functionalities. This way I am able to still let the LLM decide when to do what, but the actual execution is done client side afterwards.
Advanced
Cool, based on all the use cases above (and those were just the most interesting basic ones. There are even more) we can now enter more advanced use cases, which usually use a combination of other tools together with a smart prompt to reach the goal.
Brand Analysis
Starting with the Brand Analysis. As you might remember you are able to choose a Brandkit and Sections from THAT Brandkit in the UI. This use case is exactly one, which uses those data. To execute a brand review the system needs to get content. You can provide content via URL or via content string directly. If you do not say anything, it just takes the current page as content. Depending on the possibilities it decides to grab content from fields or simply grab the whole markup from the page to feed this into the new brand review api. This then checks the provided content agains the brandkit and the sections to give proper recommendations. I decided to also provide a custom UI for the presentation of these results. Of course we could now extend such kind of features to also cover content creation to check and review content before it even lands in the system, or not only give recommendations, but directly apply them on the page.
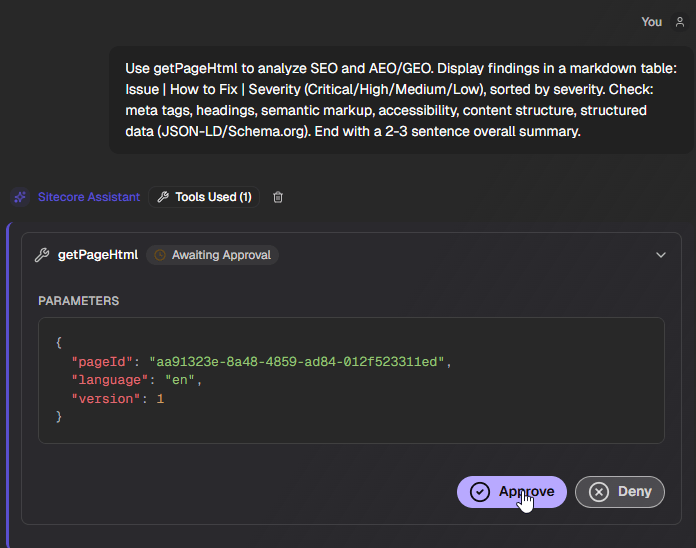
SEO/GEO/AEO Check
Next more advanced, nice and nowadays relevant use case is the overall check of a page. Not only against custom brand guidelines, but against overall SEO, GEO/AEO guidelines. For this we just need to extract the markup of the page to execute the analysis. In this case I let the LLM do the analysis, so it might differ from model to model. Of course you could easily write a tool, which connects to a 3rd Party Analysis provider, if you want.
Content Update
This one is a case, which on its own, is really not that powerful, as an editor will always be faster typing stuff into the canvas then asking the LLM to do something. But combined with larger use cases, where lots of pages and / or components are involved and maybe external data like a pdf. Then to be able to update content from components on a page is massively powerful. So below I just ask the LLM in natural language to update the top hero banner title and description to XXXX. The LLM asked several tools as well the current page context to understand, details of the page, all the components on a page, getting component details including data source to finally be able to access those fields to then use an update content item tool to actually do the updates. To be honest the minute this was possible, I was not even aware it is now possible. I did not even know that there were now all the information and tools available to achieve this goal. After debugging and following its path it all made sense, but at first it was like magic.
Cool
Coming finally to some really cool use cases. They are cool as they really bring lots of value to editors and marketers and just by combining a few tools, with context page information and LLM knowledge and capabilities.
Create News Page, Translate & Navigate
First case feels natural and pretty obvious as this is daily business for editors. This use case involves creating a new News page, automatically translate it and afterwards open the translated news page. For the sake of simplicity I just told it it should fill the news with whatever it want.
The cool thing here is, due to the very domain specific tools I provided, the LLM has a good understanding what a news in my system is and which fields it needs. If I do not tell it to use what it want, it would simply ask me to provide all the needed information. And it does it very specific like “Please tell me the Title. Give me an Excerpt. Enter up to 5 Key highlights” and so on. After the creation it immediately started using a given API from Sitecore to execute the translation. As there is only en and de-DE in the system, it also automatically knows the target language and finally it is able to open the new news page in the other language version. Thinking of this workflow or task list there are countless possibilities how to leverage all of this. Automatically create massive number of news based on given data. Translate many pages to many language versions and so on. Combining this with the publishing and translation status above, we could easily ask the system to automatically do all the translations for us, if it identifies gaps.
Campaign Creation
Last but not least the campaign creation case. This is pretty similar to above, but involves page creation together with content updates on another page. And all of that based on a given PDF file. This pretty much reflects, what day to day work of an editor might be. If not typing in manually, editors usually get texts or content via doc or pdf to be added to the system. With an approach like this I can easily upload the pdf and tell the LLM to take it to first create a new news page based on the given information and second to update for instance the home page top hero banner to promote the new news page. Of course this is just one very specific prompt. You can even extend this by telling it to update several components on several pages, update the news and translate it automatically and much more. By combining a lot of given tools, the LLM is easily able to achieve even such complex content management tasks in the system
Pitfalls & Challenges
This chapter should be about all the things you might not think of the first time you are working with AI and LLMs. And exactly thats the case for me. So for some it might be pretty obvious, but others might profit from this 😉
Context Window overflow
First thing is the context window. I guess it is pretty well known, that LLMs do not know everything. They have tools to grab information and they have a so called context window with information they use for their reasoning.
In the beginning of the implementation, when I tried the SDK and UI elements first time, it was all about simple prompts. Some tokens in, some tokens out. Doing bigger conversations… all great. But the more I implemented, the more complex the cases were in the end. And in the end I experienced two things. One I will highlight here. The other in the next chapter. During a little demo I encountered the result “context window exceeded….” The reason for that was very simple. AI SDK does not natively take care on context history. This means you give it all the messages you want to give it. In case this exceeds the number of tokens you need to take care on that on your own
“There’s no built-in conversation compaction in AI SDK v5, so managing long history/summaries is something you implement yourself.”
So what did I do? Two very simple things to be honest
- Cut of older messages -> This means that when I give the server side route a list of messages, which exceeded a predefined number, I simply cut of all except of the last two (to keep the most relevant stuff) and then started over again server side. Client Side I obviously displayed everything
- By cutting off you might loose very relevant historic data, so I decided to implement a summarization as well. This means I have a LLM call to summarize all the messages into a single one. And this single one then is added to the Message history, which significantly saves number tokens AND preserves most of the context.
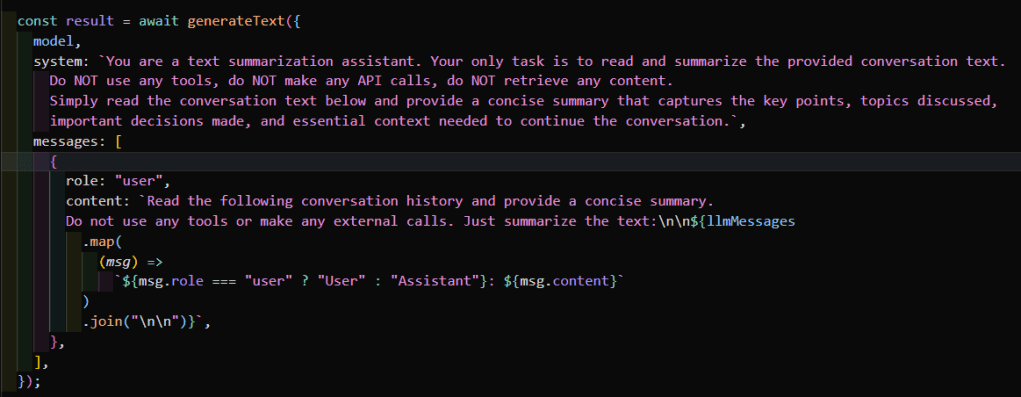
Beside some logic to identify when this summarization has to happen and how I update all the list, the core logic is the one seen above. Basically the LLM call to summarize the message history and keep the underlying information, which are important.
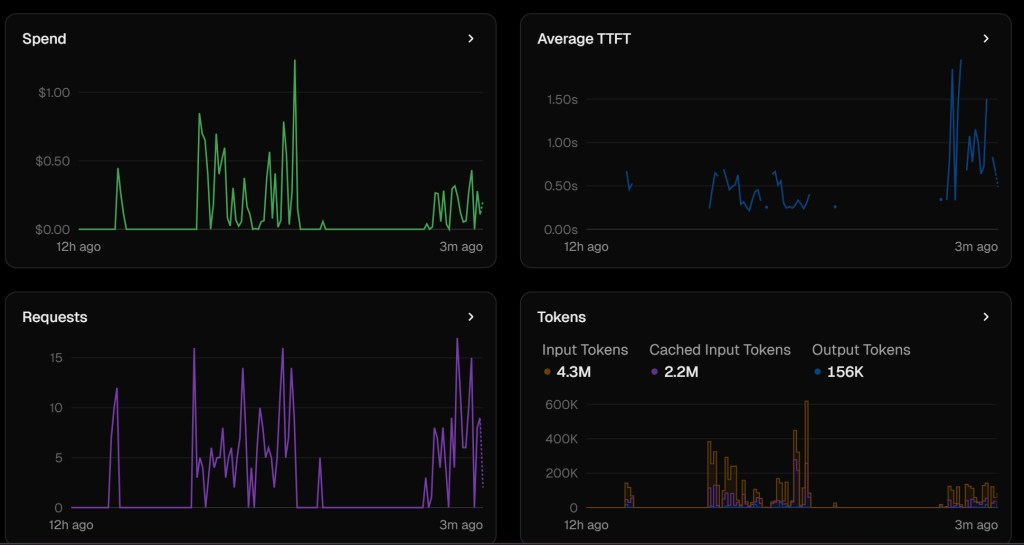
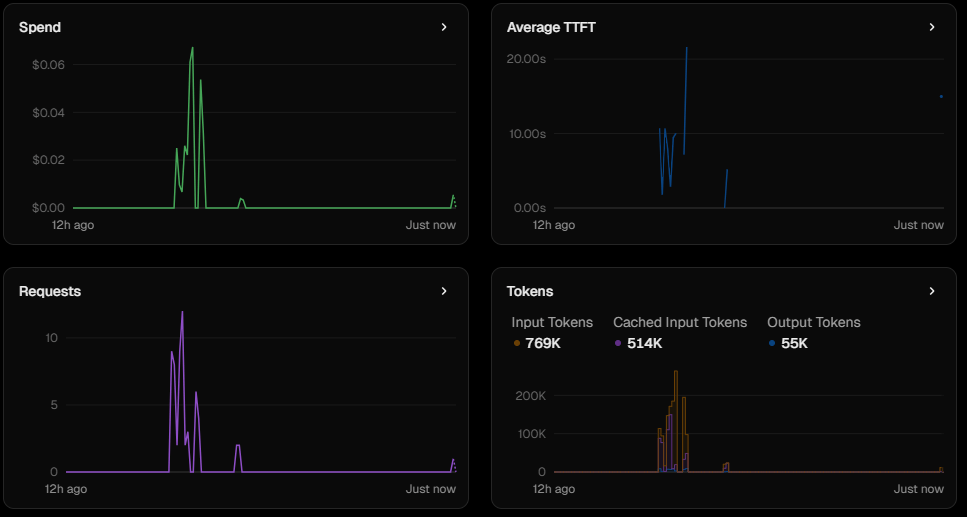
In the screenshot above you see what the results were shortly after implementation. First You see lot’s of tokens were transmitted and used. (Which potentially comes with more costs) After the message history and limiting implementation you see a significant improvement. I executed the same series of queries and prompts, but it just took around 1/3 of the tokens. You can see the number of requests is pretty similar than before, but with less tokens and of course less money spend. The only downside is, that with a summarization logic, is that the TTFT increases whenever a summarization happens. So in the end it has to be a trade off between speed, tokens spend and costs, what ever fits best to you.
Choose your model wisely
Now coming to the second aspect, which of course has to do with #tokens, but also goes far beyond that. When I started, I started with Model GPT-4-o, which was standard and I did not care about it at all. I just started implementing stuff and as things evolved I ended up in spending lots of tokens during testing. The result was, that my budget was wasted withing days. Just then I had a look at the model, which other models are there, differences etc. and found out significant differences in pricing, but also capabilities. Yes for some of you this is pretty obvious. But for someone who gets started, it is a whole new world 😀 So deep diving into the Models overview Vercel offers, which comes with the Gateway
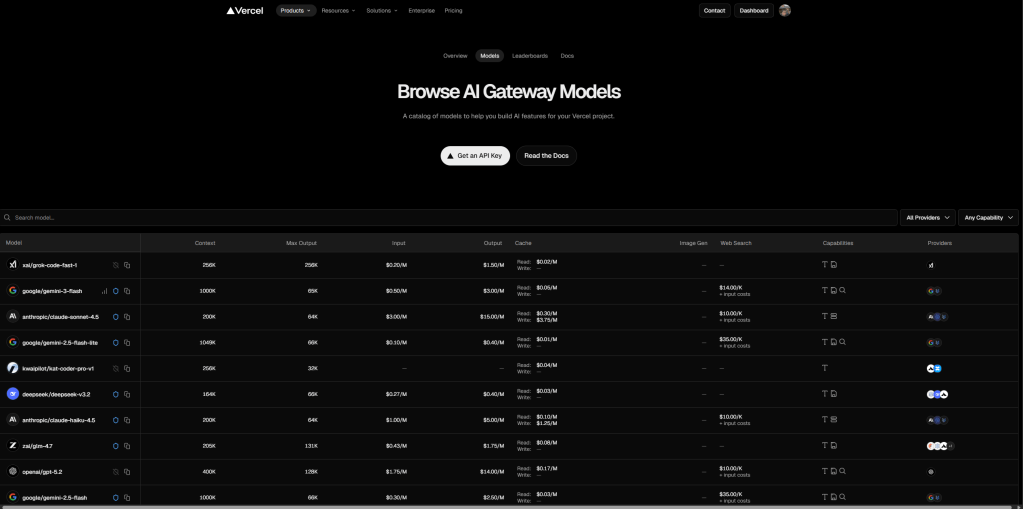
https://vercel.com/ai-gateway/models
You see various different providers, with various different models and prices and capabilities. So in the end I came up with two results
- I added an overview in my Models Dropdown to indicate “cheap” “moderate” and “expensive” models, as well give an overview over the exact pricing.
- Use gpt-5-Mini as default, as it is totally sufficient for me.
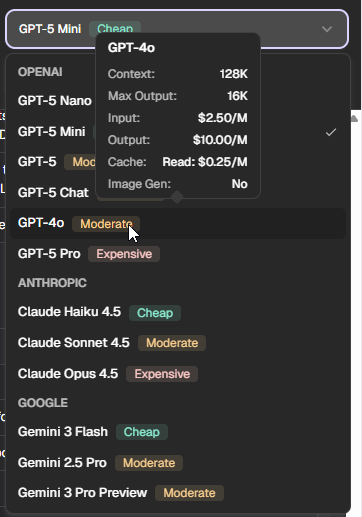
Above you can see the difference in the models between the one I used before and the one I used after. From a functionality pov for my testing and experimentation, it really did not matter much, which one to use. But the costs is 1/10 for input and 1/5 for output tokens 😀 So in the end you see the cost spendings while using the new model below. I spent far more tokens than before with far less price. So goal achieved the hard way.
Keep the user in the loop
This one does not sound very important at first glance, but I can tell you it is. In standard each and every tool for instance in Vercel AI SDK is just executed. Which means, whatever the LLM says to do is executed. This might sound great at first. But what if the LLM executes a delete files tool, which wipes out your whole hard drive? Not so cool anymore, right?
So there might be tools, where the LLM should first ask for permission to execute it with the given parameter set. Luckily Vercel AI SDK gives us the toolkit to easily enable this mechanism, by just telling the tool it needs approval.

From server side: That’s it. The tool it not automatically executed. BUT we need to handle this state in UI properly. First you should add this line of code in the useChat hook

This ensures, that when you send back approve OR deny it continues to work and executes further steps. Then things become a bit more complicated as you need to build the UI for actually telling the user approval is needed and give possibility to approve or deny. In code it is a switch case like this + a custom UI.

And somewhere in your custom UI a line like this, which comes from our good old friend useChat.
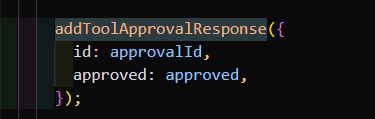
This way we send back the information, if this tool is approved or not. We can react in the UI as well server side on this and continue the execution. In case of approval the LLM will just start using this model. In case of rejection, it tries to find another solution.
Conclusion
Oh wow, after writing (and reading) all of that a summary is really difficult. But I would stick to the original message, that the combination of Vercel AI SDK and Marketplace SDK is an amazing fit for SitecoreAI. You can build first chats/completions or similar within minutes. By adding Marketplace SDK and Sitecore APIs like Agent API you get the whole Sitecore Context (in my case Pages Context), or easily load data additionally to be fed into the LLM Context to be properly evaluated.
Be careful with some of the special use or edge cases like keeping the user always in the loop, where it makes sense, message history management, context window limitations, variations in model prices and you are perfectly good. In it’s current state I already demonstrate the amazing devex via simple getting started, fast development, great documentation and more. This way developers can quickly and easily bring maximal value to marketers and content authors. And again, see this as a PoC and practical experimentation to connect to cool tools / sdks together to create something more meaningful; do not see this as full blown app to ever land in the official Marketplace, but more a practical knowledge sharing post with some interesting approaches.
- ai
- devex
- nextjs
- sitecore-marketplace
- sitecore-platform