XM Cloud – Uncover all the Secrets of Embedded Personalization
Welcome back to another block post about Sitecore XM Cloud. This time I would like to talk about Embedded Personalization. I am pretty sure, if you are using XM Cloud you most likely have already
Welcome back to another block post about Sitecore XM Cloud. This time I would like to talk about Embedded Personalization. I am pretty sure, if you are using XM Cloud you most likely have already used Embedded Personalization. But didn’t you ask yourself:
How is Embedded Personalization actually working?
This blog post should tackle exactly this question. Some time ago I was faced several questions about Embedded Personalization and I had to admit, that I was not entirely sure how exactly it is working. I mean really down to a code level. When do we execute what and why?
The documentation is a great starting point to get an overall idea how it is working. (https://doc.sitecore.com/xmc/en/developers/jss/217/jss-xmc/personalization-in-jss-next-js-applications.html) But if you need to reproduce that on your own, there are missing pieces for sure, where you most likely need to reverse engineer foundation.head or JSS. And exactly for those cases I think it makes sense to get some more technical introduction really down to a coding and function level. Also as sneak preview I created some stand alone application, which is able to connect to XM Cloud and execute the personalization to be able to fully understand AND test it. Especially the testing part is quite interesting for some of you. But we will cover all of that in more detail during the blog post.
What is Embedded Personalization?
So for all of you, who did not know about Embedded Personalization at all here is a very short summary of what it actually is.
In short Embedded Analytics & Personalization is a very thin slice of the overall offerings Sitecore CDP together with Sitecore Personalize. With Embedded Personalization (together with Embedded Analytics) you are able to first capture basic site events like View / Forms etc.
Secondly you are able to use those data and more to active them in predefined conditions
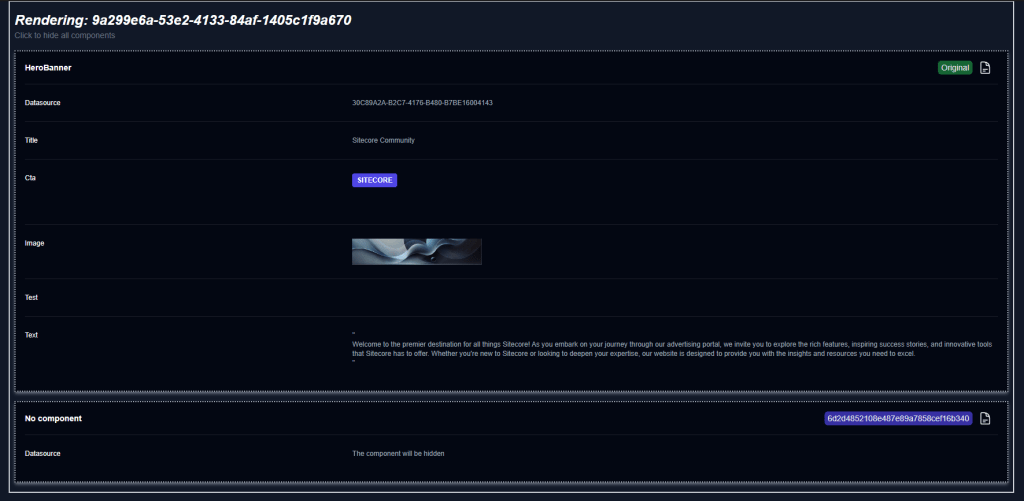
Based on a combination of a set of conditions, combined via AND or OR you will get a dedicated Audience. Now you are able to customize / personalize the page based on a dedicated Audience. More specifically you are able to either way replace a Datasource with another (same rendering) or exchange the rendering with a compatible one, or just hide the component.
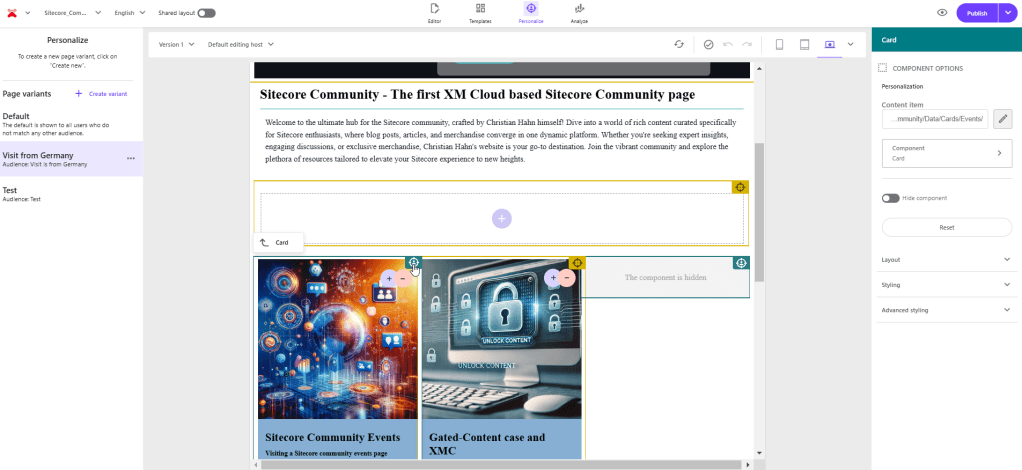
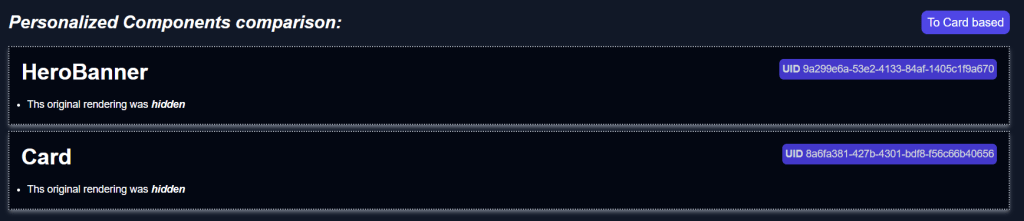
Above is an example, where you see that one component is exchanged by another Datasource and another is simply hidden for a special audience.
Basically, that’s Embedded Analytics & Personalization from a Marketer point of view. But of course we are more interested into the coding aspect and the “how is this really working”. The next topic will cover that in more detail.
Entering the rabbit hole of the coding part
Now let us deep dive into the topic of, how all this works on a coding level. And to be 100% honest initially, before reading the documentation or having a look by myself, I thought it would work fairly differently. So tbh. good that I deep dived by myself to clarify all of that for me.
Let us start with the beginning of a request. The request lands in the next.js Middleware and there in the Personalization Plugin. This plugin has 1 responsibility; To determine, if a personalization should be applied for the current route.
This is done by executing the following pieces of logic:
- Determine if Personalization should be applied at all or not (e.g. don’t apply on redirects or if it is disabled at all) [personalize-middleware.ts – JSS]
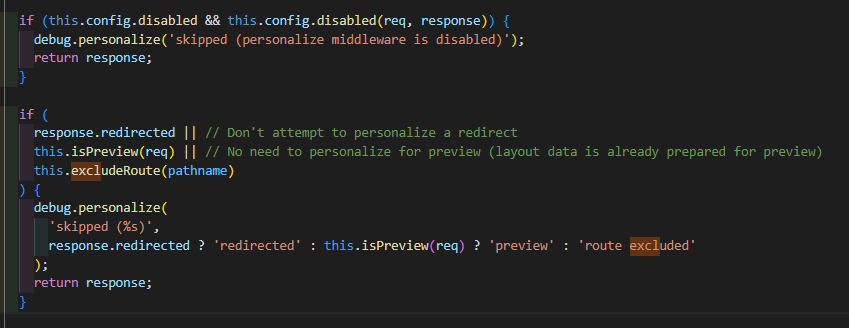
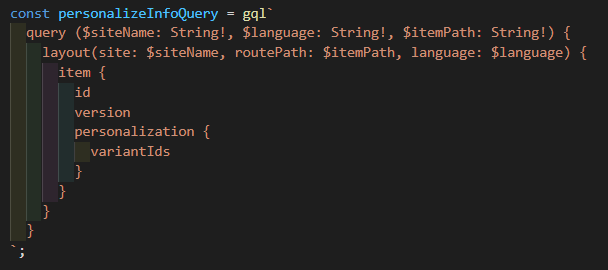
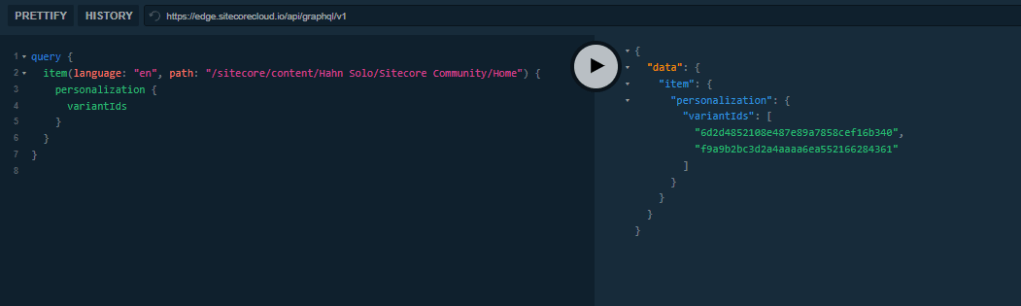
- Call Experience Edge and get all the Personalization variants of a page. [graphql-perosnalize.service.ts – JSS]
- Do some processing of the IDs to match the Embedded Personalization Schema. [personalize-middleware.ts]
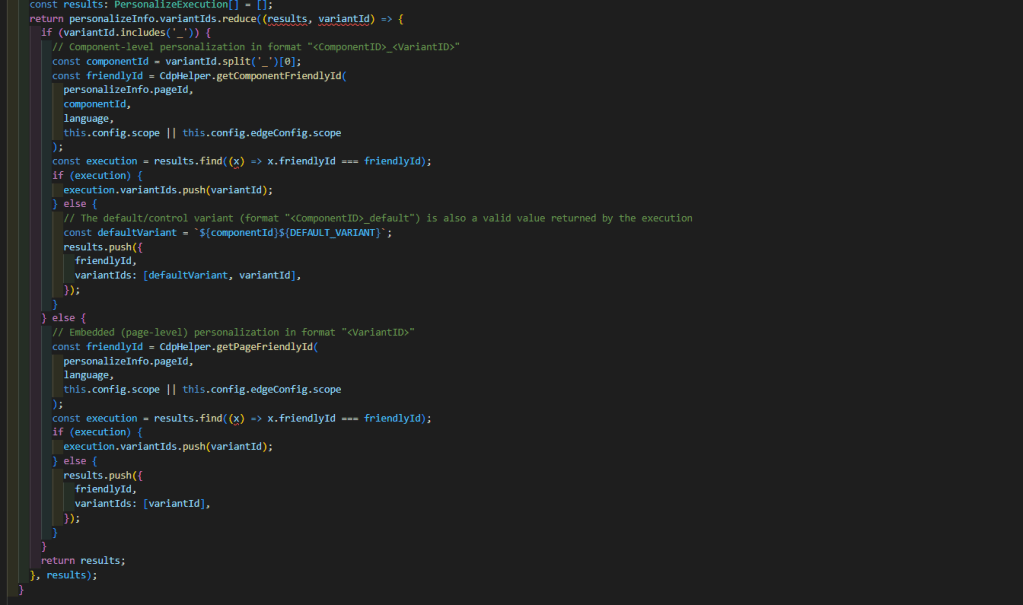
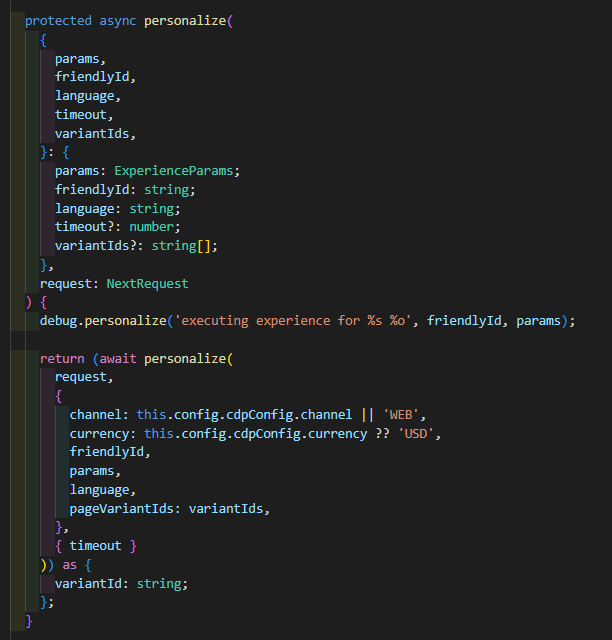
- Execute Personalization per Execution result (For Embedded Personalization there is only one for A/B/n Testing there might me multiple) Those personalization’s are ultimately executed via the new Cloud SDK (https://doc.sitecore.com/xmc/en/developers/sdk/002/cloud-sdk/personalizing-content.html) [personalize-middleware.ts – JSS]
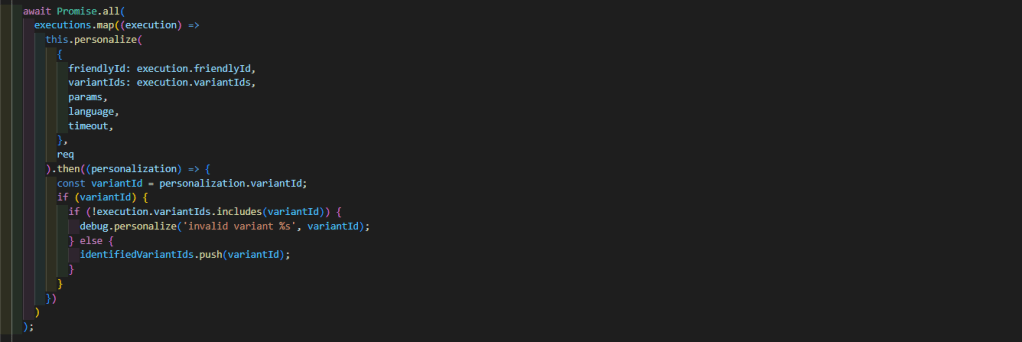
- Execute a rewrite including the ID of the variant, which matches the personalization call (in case any variant matches) [personalize-middleware.ts – JSS]

The rewrite path then is in the format similar to this one “/_variantId_<variantId>/<path>”.
Now from that point on the getStaticProps function sitecorePagePropsFactory.create(context) takes places and has a Personalize Plugin itself as well. [personalize.ts – Foundation.Head]
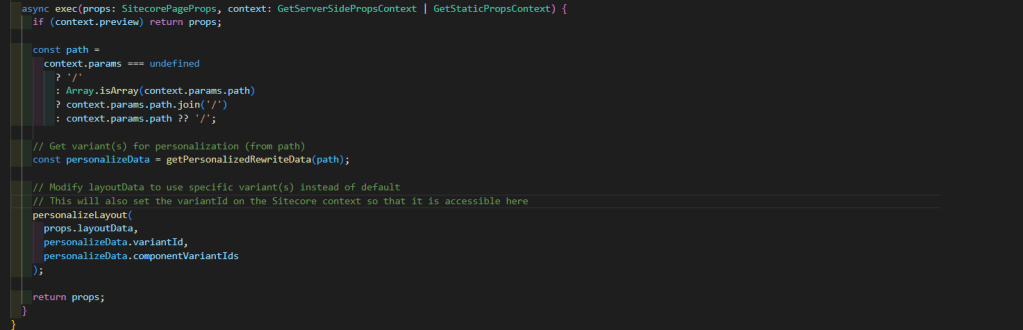
This plugin simple extracts the variant ID from the new path (if it exists) and executes the actual personalization. That personalization then is simply done by running through the whole layout response including placeholder, rendering etc. till it finds components with the following structure. (Its to much code to simply show screenshots. [layout-personalizer.ts – JSS]
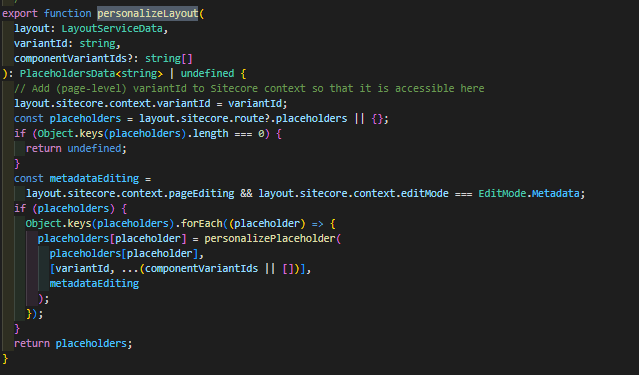

Each and every component, which has a personalization rule applied via an Audience has such a piece of content. Basically its a field called “experiences” as a list. And each entry has the key of an audience. Underneath is the new component, which should be rendered instead (or simply lots of null values if it should be hidden). So the Personalization Plugin within the getStaticProps is responsible for determining if a component has such an experience field with a matching ID, and if yes, replace the actual component response with that one. (Or set it to null or empty in case it should be hidden). Finally the modified response is then processed by the further logic, which uses the existing components to actually render the given components.
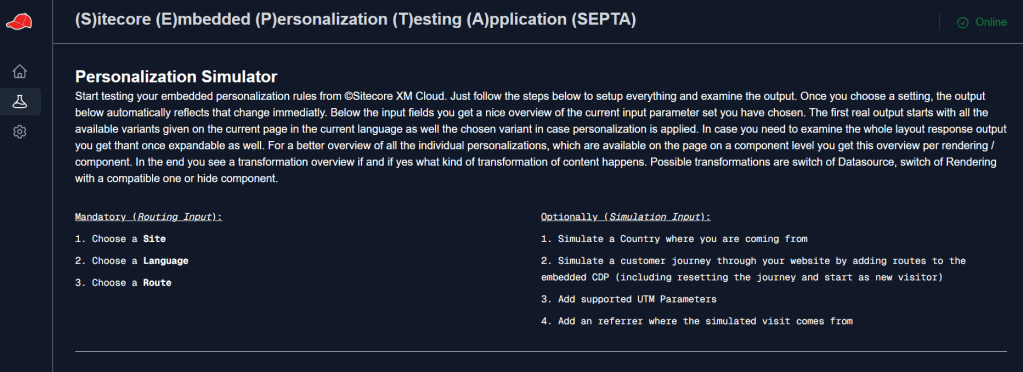
Welcome SEPTA – Your best friend when it comes to Embedded Personalization and A/B/n Testing
So you might ask yourself why did I have a look into all of that and why did I summarized all of that? Thats a very good question. During my role as Sales Engineer I encountered some situations where I was asked
- How Personalization actually works and
- Why Personalization is not working in a specific instance / environment
To be honest I was not able to fully answer either of the questions without having a look by myself. And exactly this was the moment where SEPTA was born.
Septa or better Sitecore Embedded Personalization Testing Application is a tool which extracts all the personalization logic from foundation.head and JSS and puts it into a stand alone application.
The major purposes of having an application like that were
- Better understanding embedded Personalization as well A/B/n Testing
- Test, if Personalization works at all
- Simulate circumstances to test if specific audiences work as expected
With having that in mind, let us now have a look into a newly developed application to match all those purposes.
The Application
Note: I am still no full frontend developer nor a Designer so be forgiving when it comes to the layout / design aspect of the application.
Now that you have an idea of what the application should be about you should now the the application in action. But before you see that, you will see how it is structured and how it is working. In general this application should be able to
- Connect to a GraphQL Endpoint (And indicate if that is ok or not)
- Grab basic personalization data based on your routing input (Site / Route / Language)
- Identify if a specific personalization is applied based on given Simulation parameters (Country / Browsing History / Referrer / UTM Params)
A detailed view on the structure
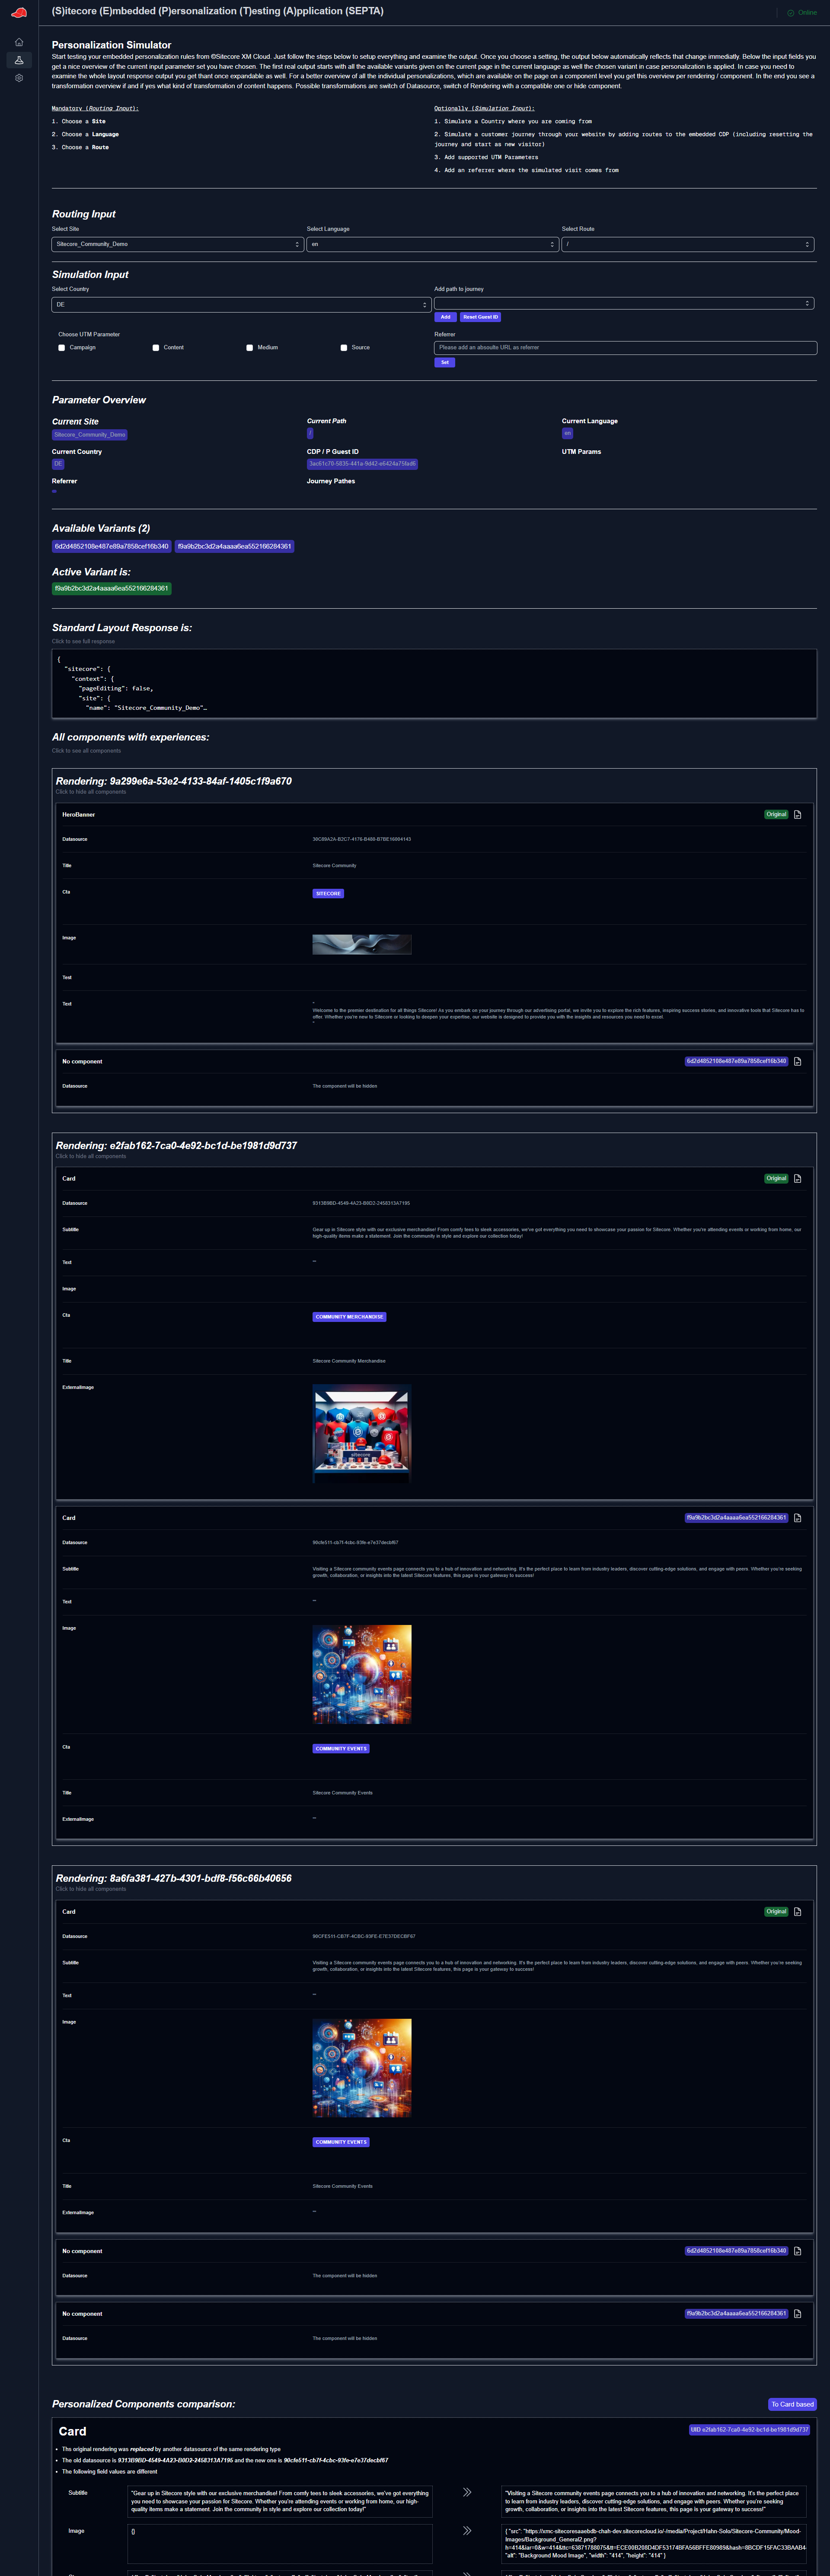
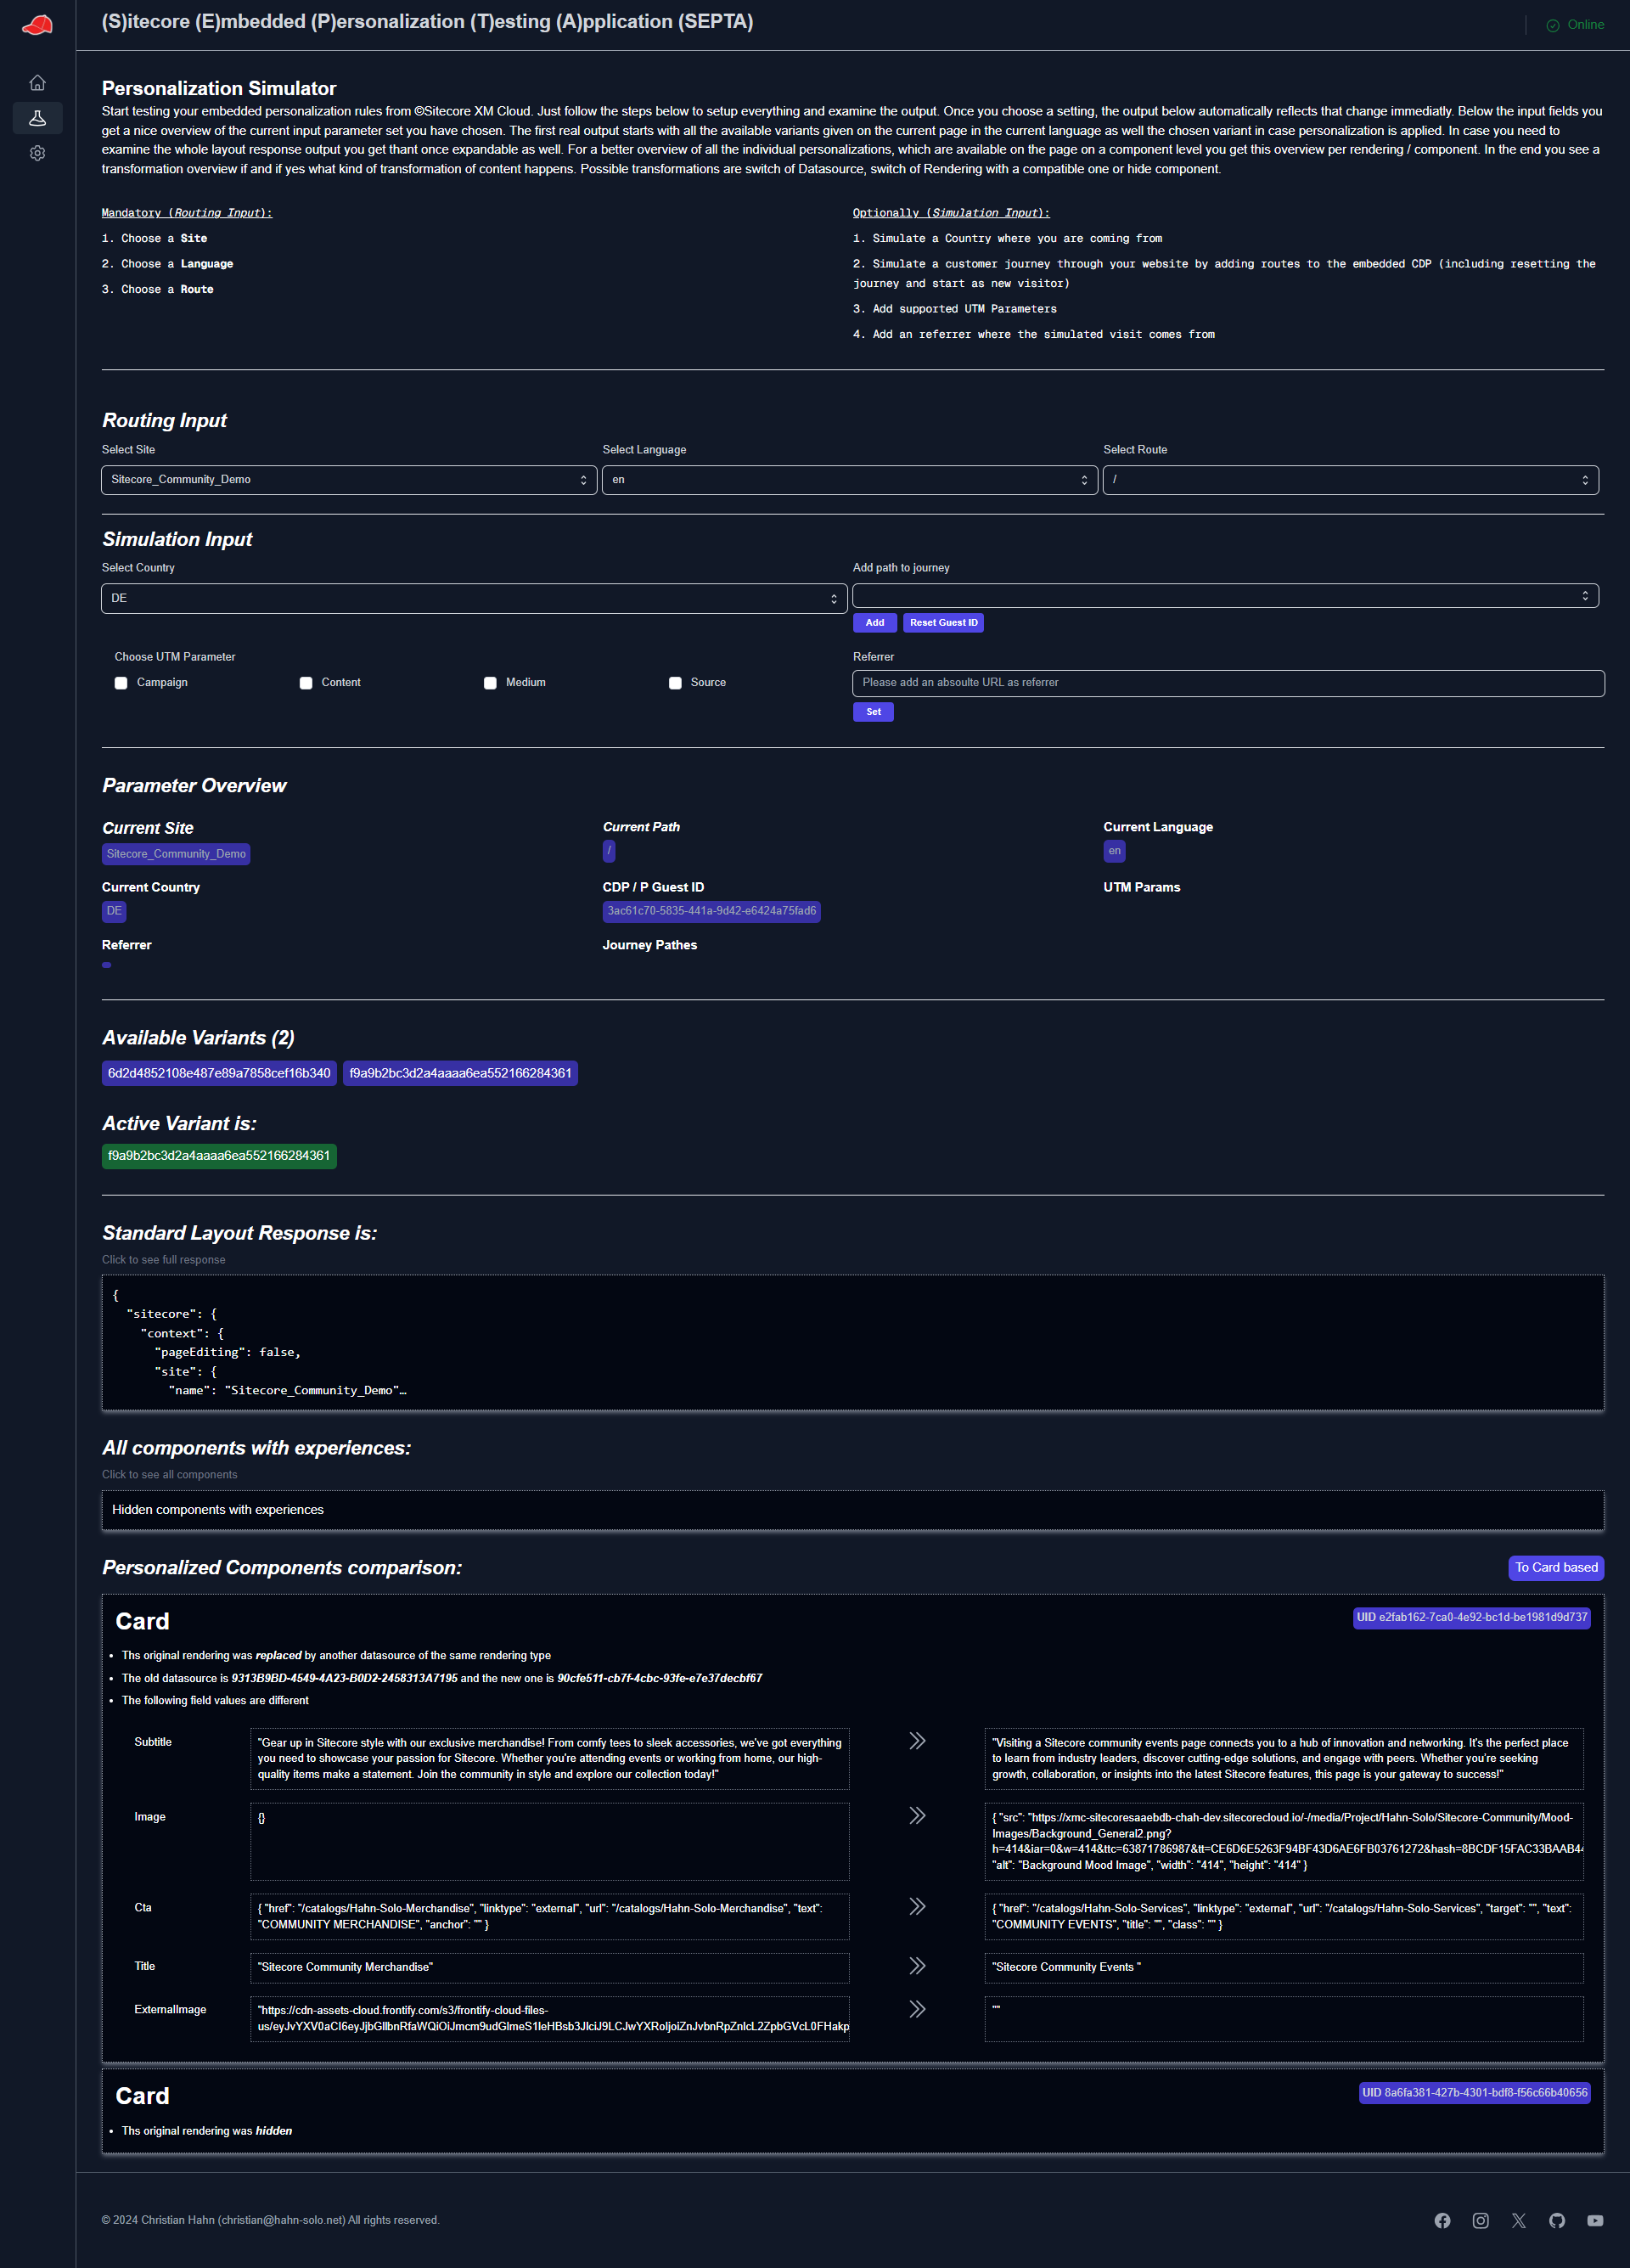
Based on the given functionality let us deep dive into the structure of the application itself. Let us focus on the simulation page and what you can do / see there.
Let us start with the sidebar navigation, which lets you move between Home / Simulate and Settings pages and a header part with the name and the current status of the connection to GraphQL Endpoint. (In case there is nothing behind a given context Id [Preview|Live] it displays “Offline”)
Now there is a little introduction in verbal form what this application does and how to use the input fields. (For all of you who read more posts from me already know I am a backend developer. So don’t blame me for any design issues :-D)
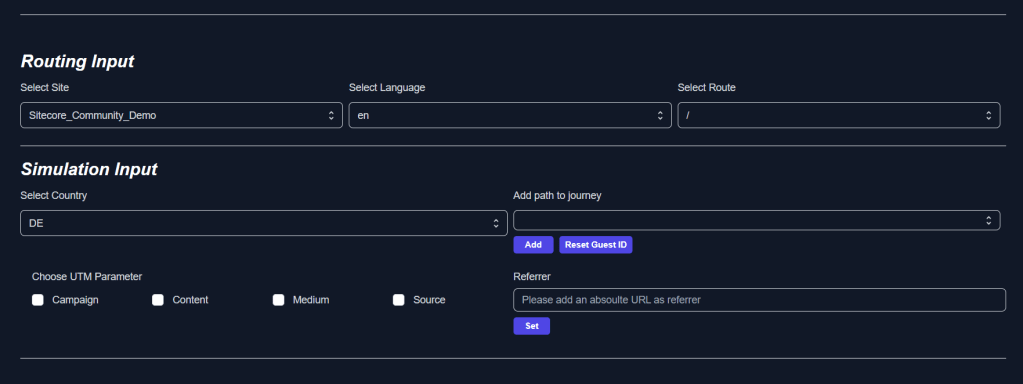
Next part is the input, divided into “Routing” and “Simulation”.
Routing input is needed to simply determine, which page should be rendered at all.
Simulation input then is needed to apply any kind of overall parameters to determine if a personalization should be applied. Such parameters are “Country”, “Customer Journey”, “UTM Params” and “Referrer”. (More to come if possible).

The next part is a little overview of all the applied parameters, which end up in the result you see next. Just to see and confirm all the currently set params, which end up in a specific result.
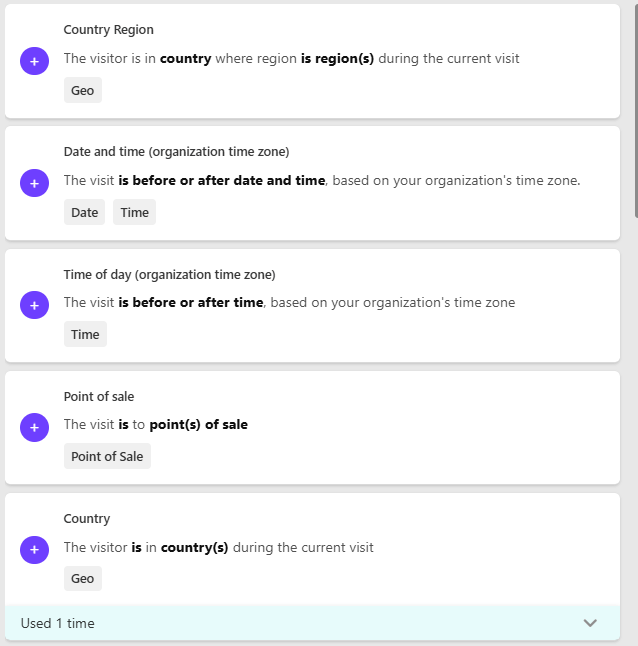
Then we have an overview of all the given audiences on a page, including the fact if an audience has been applied actively or not.

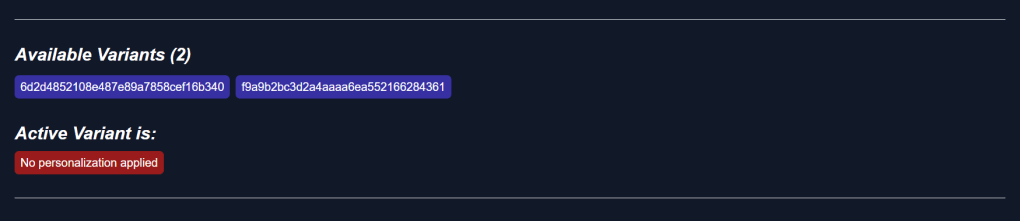
All this based on the overall logic described above. So based on the current page we determine via Delivery API if there are personalization’s. And based on the result of the Personalize call we determine if one of these personalization’s are applied on our current page under the current circumstances.
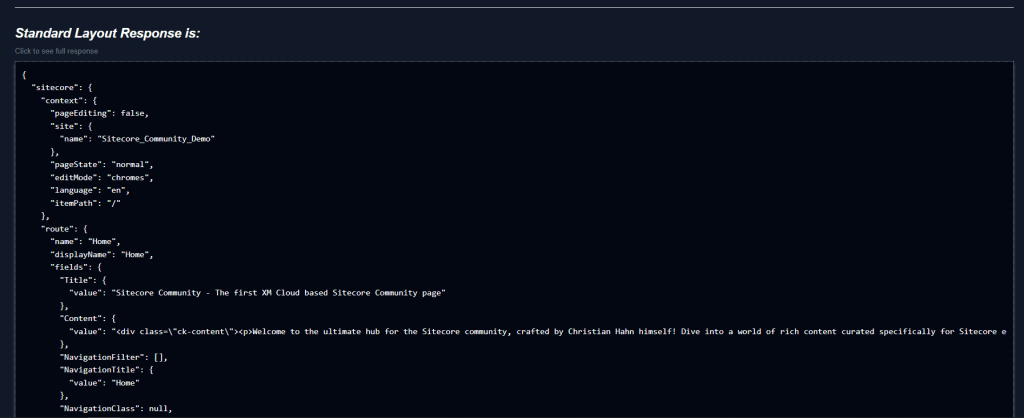
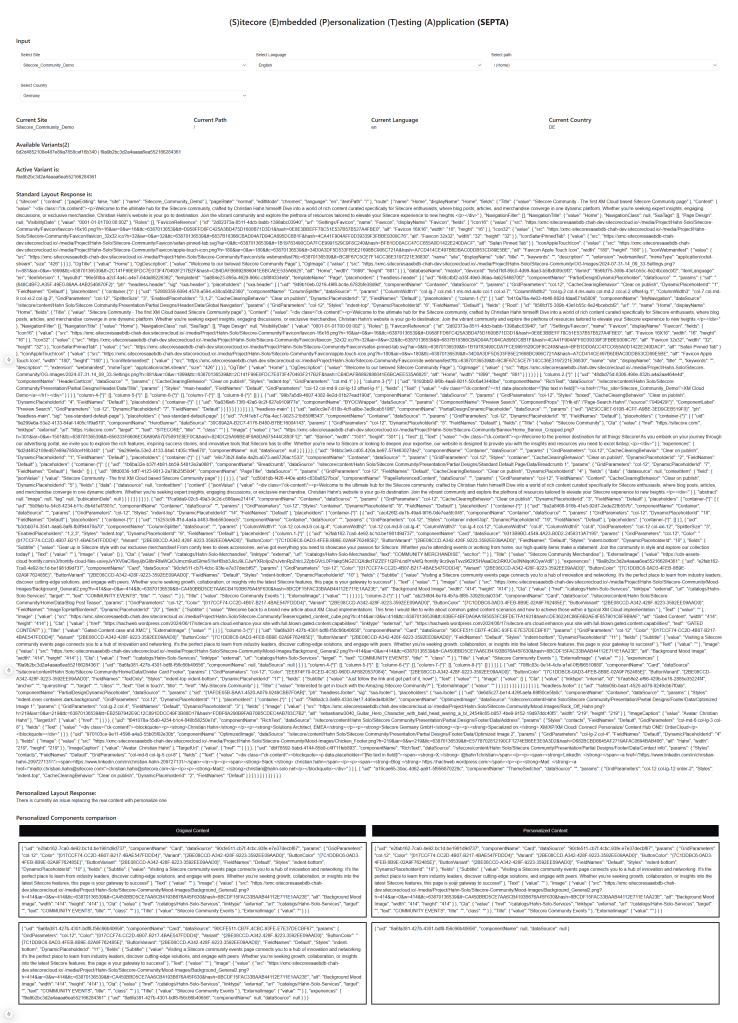
The next area of output is simply the unchanged but formatted layout response.

For better readability and because the layout response can be quit big, it is collapsed initially and can be extended by click.
In case you see available variants to will also see an area, which highlights all the components with experiences and how those exactly look like. Initially this one is “collapsed” until you click on it

Once you click on it, it expands and shows all the components with experiences. The original and all the personalized variants. All the individual cards can be viewed as some kind of preview where things like links and images are tried to be rendered; or as a raw value output, where you simply see the json output.
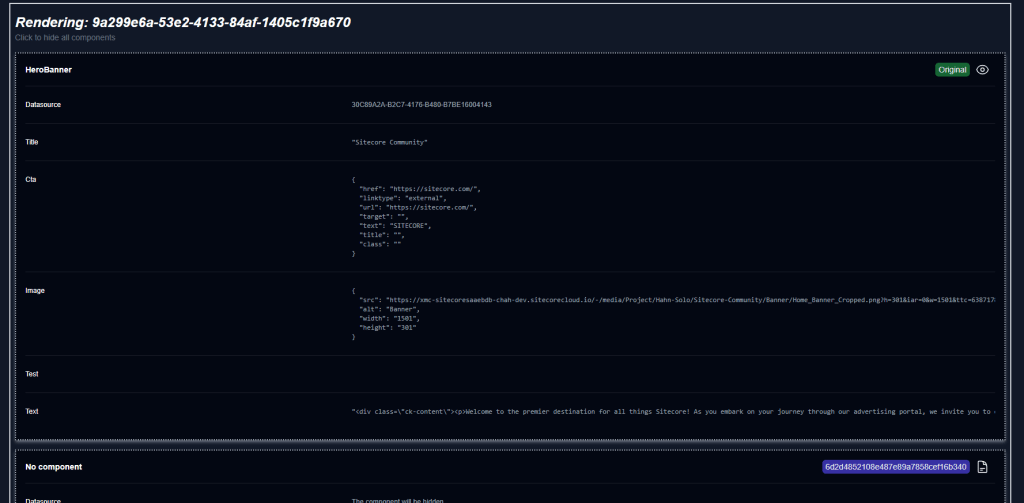
In the given example you can see the original rendering and its data and one of its variant with its audience ID and how this component would specifically look like. In this example the option hide has been chosen, so the rendering would just disappear.
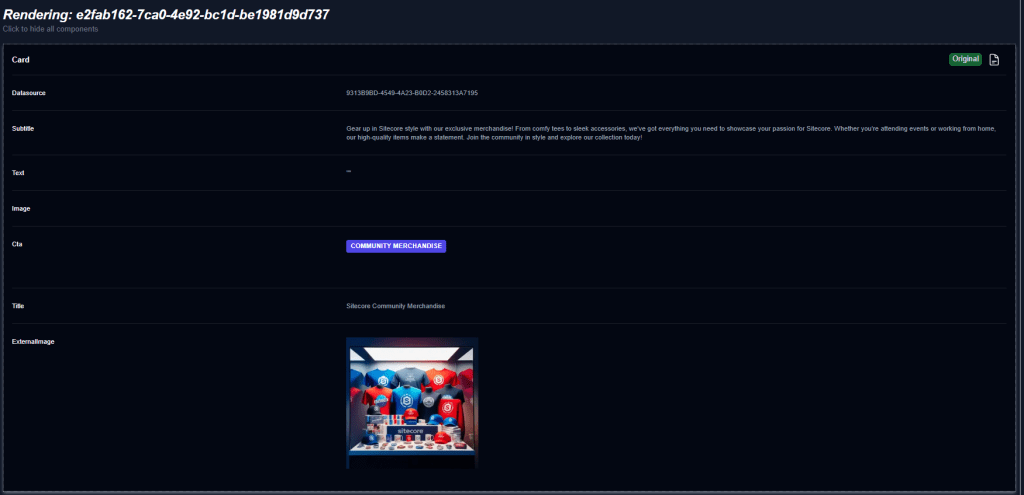
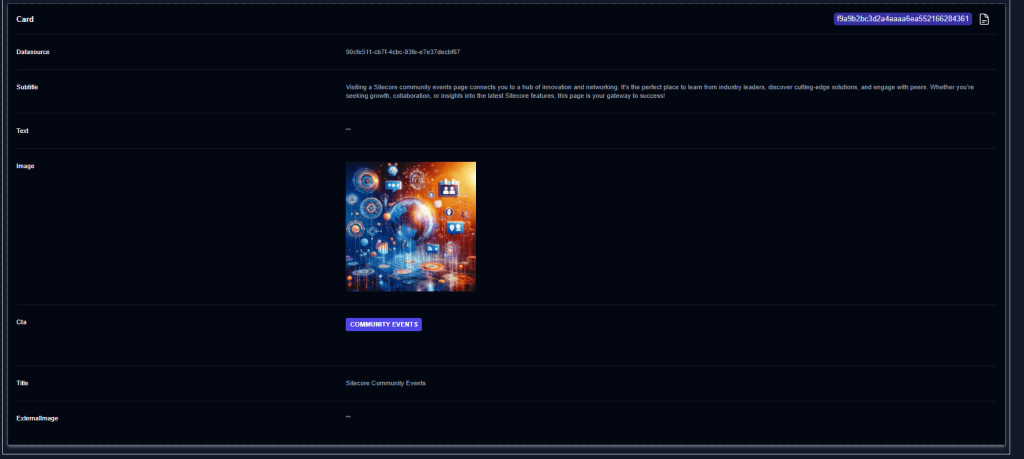
Here is another example, where the original rendering and its Datasource would be replaced with another Datasource of the same rendering type.
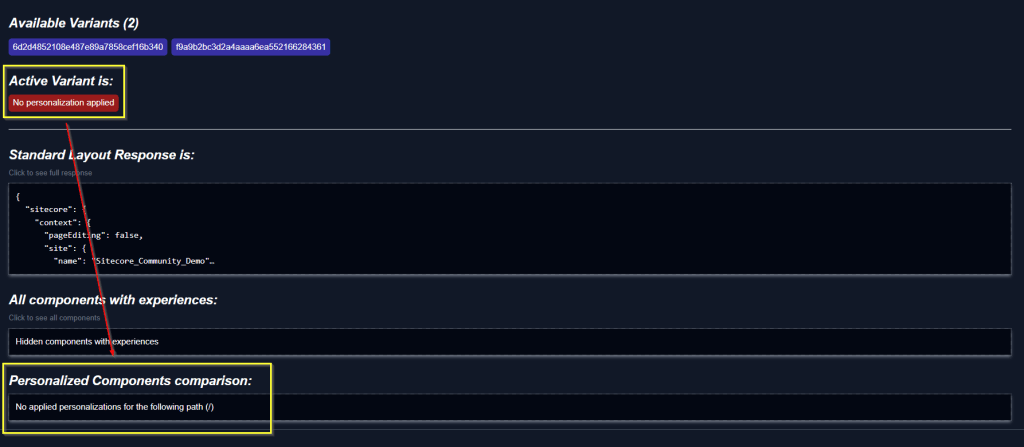
Now we come to the most interesting part. In case a specific personalization is applied on the given page, we will also see some data in the last part of the page
First let us start with the variant, that there is no personalization applied. In such a case the UI will mention it specifically.
At this point you can now start adjusting the Simulation parameter to see if a personalization is applied as you expect it or not.
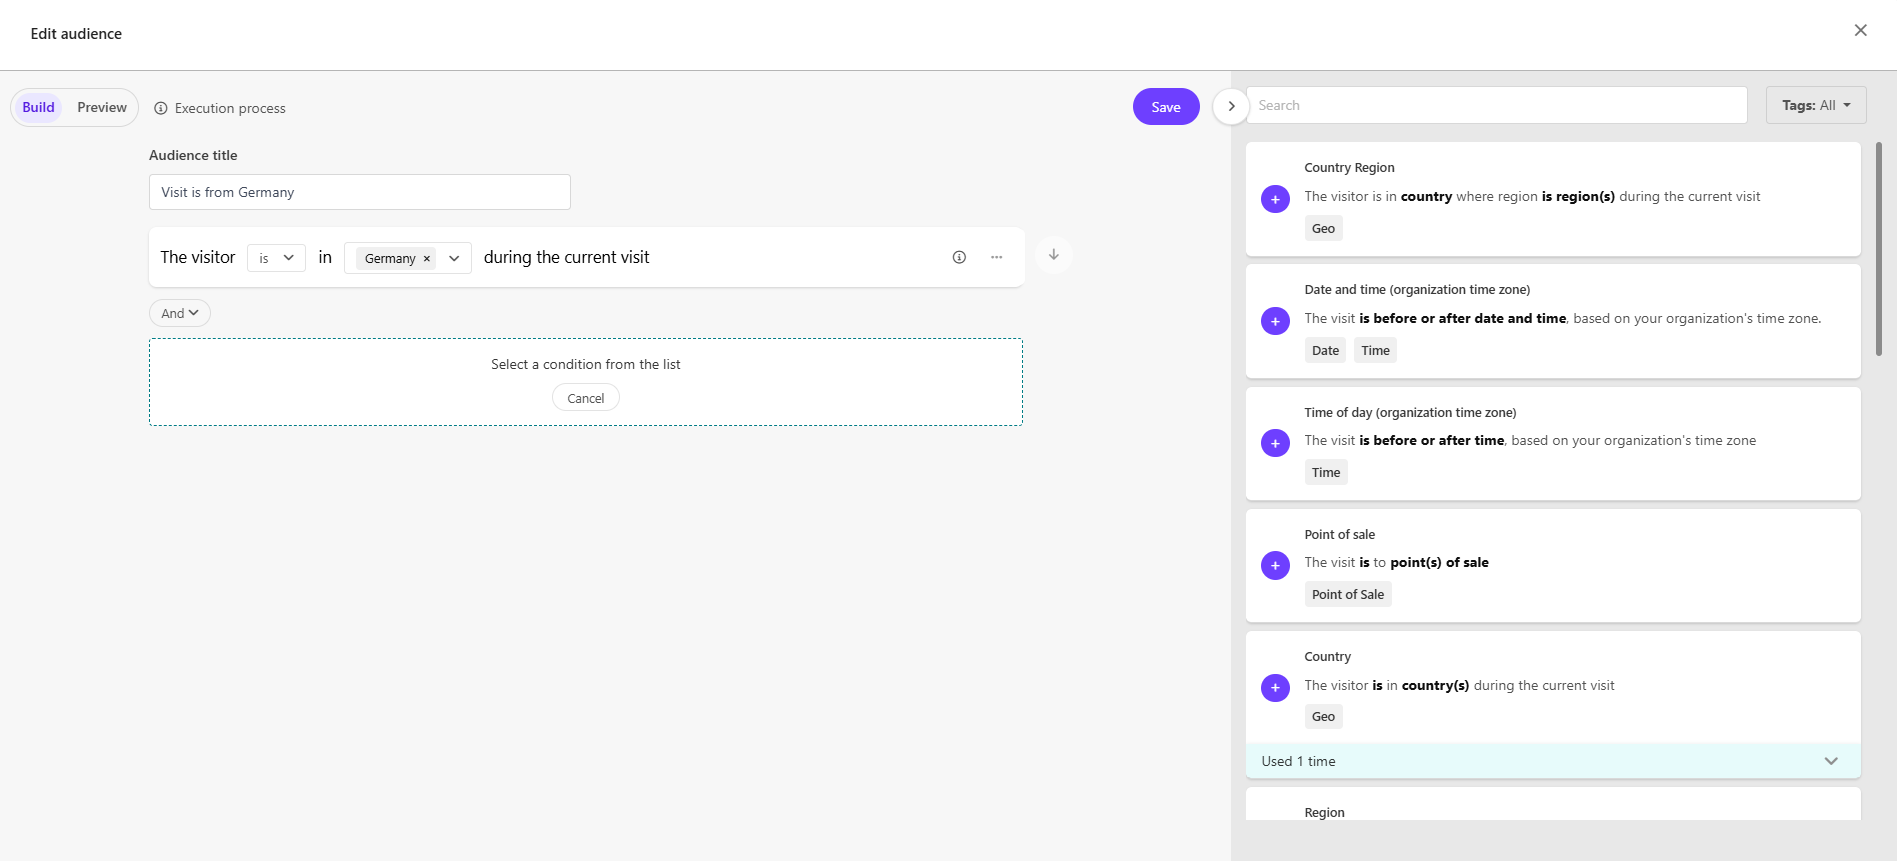
Assuming you applied them properly and get a personalization applied (In my case I just tell the system, that my visit is from germany)

Now we see the applied personalization at the top as well a detailed view on what exactly changes at the bottom. Having a closer look at that one we see, that we have two modes to display the personalization changes. The card view and the textual view.
Let us start with the textual view. Within this view we see a list of all the components, where personalizations are applied together with a textual output of what exactly has changed (or would change)
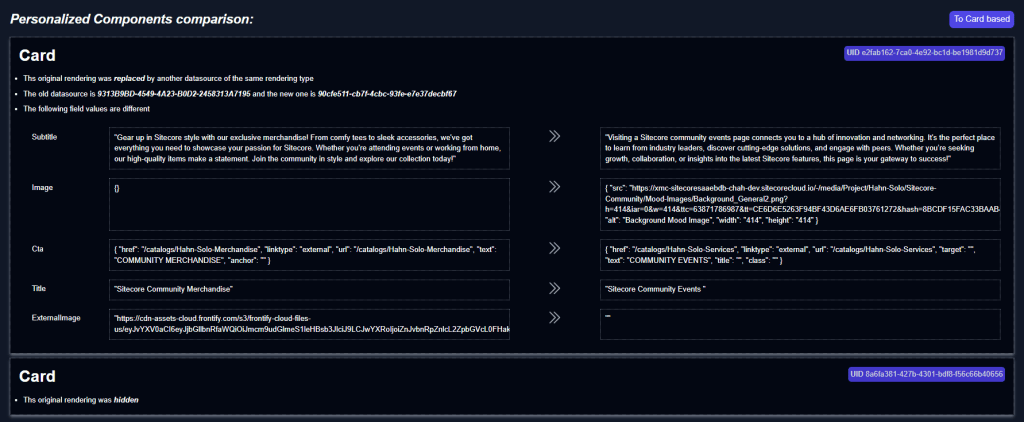
In this very specific example we see that the original rendering will be replaced by a rendering of the same type but with another Datasource. We get both Datasources (Original and personalized one) as well all the individual changes on field level. We also see that in case the rendering is just hidden, we simply get that information without comparison.
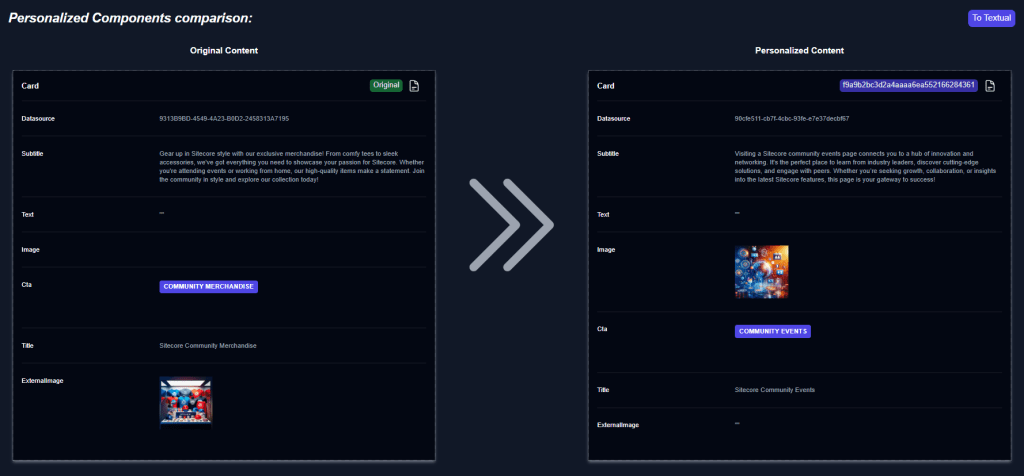
For more visual people there is also the Card-Mode, where we get a visual representation side by side, similar to the card like view above.
Let us finally bring everything together in one screen for a nice overall overview and to get the look and feel.
See everything in action
After we saw each and every part of the application together with a short explanations let us now see everything in action with some small animations.
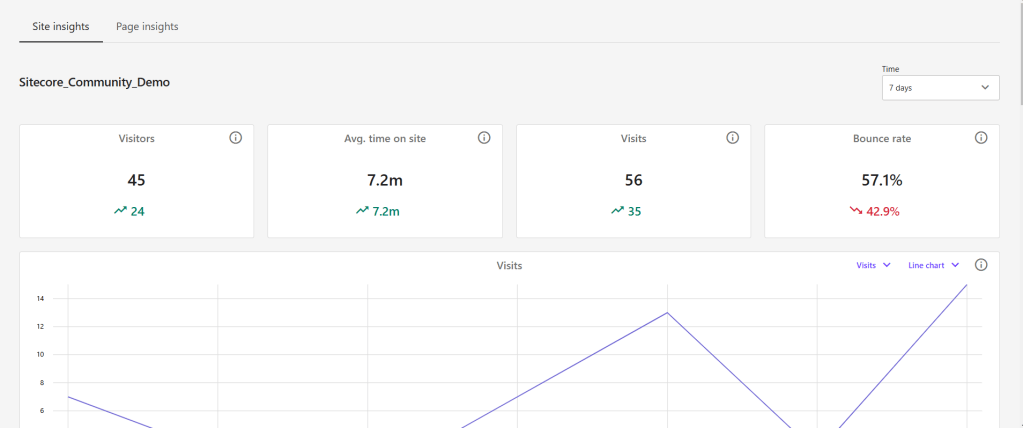
The first animation is just an overview of the simulation page its in- and outputs when nothing is set. You can see in the beginning that the little indicator at the top right switched from offline to online. Behind the scenes there is a little check if there is actually anything available for the given XM Cloud Context ID. In case there is content available the indicator switches to online as it does in the animation.
The next animation shows, what happens when we set the routing parameter correctly. In this case I am using my Community Demo Site (A list of all available sites is automatically grabbed by a piece of logic in the background). Based on the site I get a proper list of available routes and languages (Again based on a little piece of logic which fills those dropdowns properly). Once these three parameters are set, we see a change in the output as it starts to displaying the available variants on all the renderings as well the standard layout response output. Because no variant is matching at this moment, no personalization is applied.
Next we will see, how it looks like if we add a simulation parameter to actually trigger an experience. We set the country to DE to match the following audience.

As soon as the parameter fits, we see that the output changes and shows us the applied audience. In addition we now get the detailed personalization view, which specifically shows what would change.
Next let us trigger another experience. We can see, that on the same page there is another audience, which reacts on the actual visits and visited pages.

So in the next animation we will use our simulation parameter to simulate the visit of the news page during the journey. (Simulation is done by using the events part of the Cloud SDK). So you will see, that once we add that page to the journey the other personalization is immediately applied with all its changes.
Those are just some cases you can cover with the given application at this time. This should just give you an idea, of what you can or maybe can’t. Next step is of course to also include recently released A/B/n testing as this is technically just an extension of personalization.
Limitations
As you have seen in the detailed description and animations above you can already do quite a lot with the given state of the application. But you should be aware, that you are not able to test all the standard conditions Embedded Personalization offers you. From the currently given 17 conditions you can simulate nowadays 10 of them. For the rest, conditions like operating system or date and time rules I cannot see any setting or parameter to tell the system what I want to have. I will definitely follow up on those limitations the next time to see if it is in general not possible or maybe with some teaks here and there 😉
The journey of the app from the beginning to today
To close this blog post with a little smile on your face I would like to show you how the app started just a short time ago and the current state. In between there is literally just a few days of working from simply proving and testing that something is working from a coding point of view to make it look prettier and more user friendly.
Conclusion
From this blog post you should now better understand what Embedded Analytics and Personalization is and how it works from high level down to the coding. You should have learned how exactly you can reproduce personalization e.g. in stand alone applications (or similar). This is especially helpful if you need to reproduce that e.g. if you rebuild all of that for another framework, which is currently not officially supported. Finally you saw how an external Testing Application might look like and which benefits it brings to have something like that up your sleeve.
Update #1
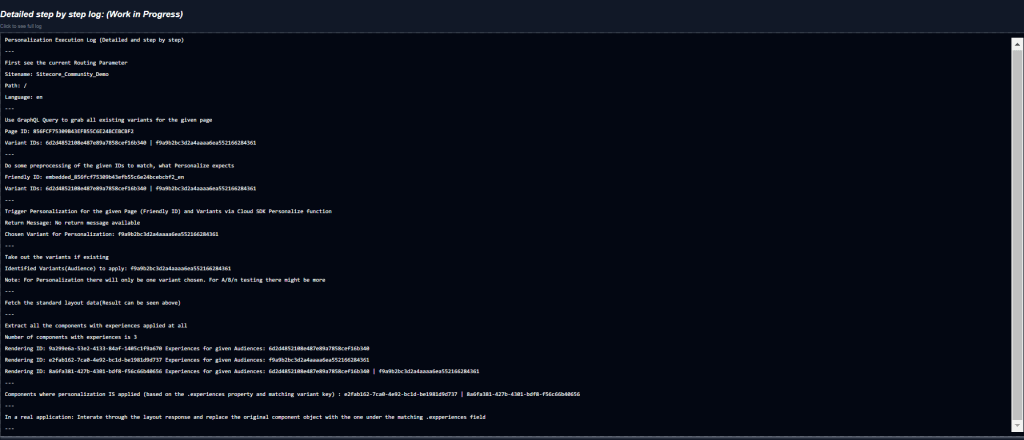
Happy to already give one update to the original blog post. One purpose of the application was to better understand what is happening behind the scenes so that personalization is actually working.
Here is a very first version of a step by step log, which illustrates what is happening in each step, which outcome we have and what we are doing next. Till we reach the point, where we would have personalized the layout response based on the given results. (In case a personalization is applied)
- frontend
- nextjs
- react
- sitecore-personalize
- sitecore-platform
- xm-cloud