
XM Cloud – From Data to Display: Mastering Field Types for Seamless Backend-to-Frontend Integration – Part 1
Welcome back to another little post. This time I would like to come back to XM Cloud. More specifically I would like to talk a bit more in detail about Field types. Pretty sure everyone will be faced
Welcome back to another little post. This time I would like to come back to XM Cloud. More specifically I would like to talk a bit more in detail about Field types.
Pretty sure everyone will be faced to create templates with fields. Therefore I think it really makes sense to know
What Field types are available and officially supported and how do I leverage them correctly?
So this post can be seen as a little walkthrough through all of those field types. I will take the role of a developer and will show the process of
- adding a new field
- choosing the right type,
- configuring the field properly (if needed)
- examining how this field is represented as JSON
- enabling WYSIWYG or context view editing capabilities (if needed)
- managing dedicated live/preview/editing views (if needed)
And of course I will do all of this for all the currently officially supported field types. But I would say, let us start with some recent release within Pages, which massively supports this post by adding more enhanced editing capabilities.
Context View
As you might have seen with the latest releases Page Builder got some really nice additional editing capabilities. (Release Notes: https://developers.sitecore.com/changelog/xm-cloud/19022025/edit-page-and-content-item-fields-within-the-page-builder)
We all know we were able to already do many cool things in Page Builder like mentioned here https://doc.sitecore.com/xmc/en/users/xm-cloud/pages.html

I will not mention all of these capabilities in detail as they are pretty well described on the doc page. But what I will do is to highlight the latest and greatest extensions. Specifically the new context views.
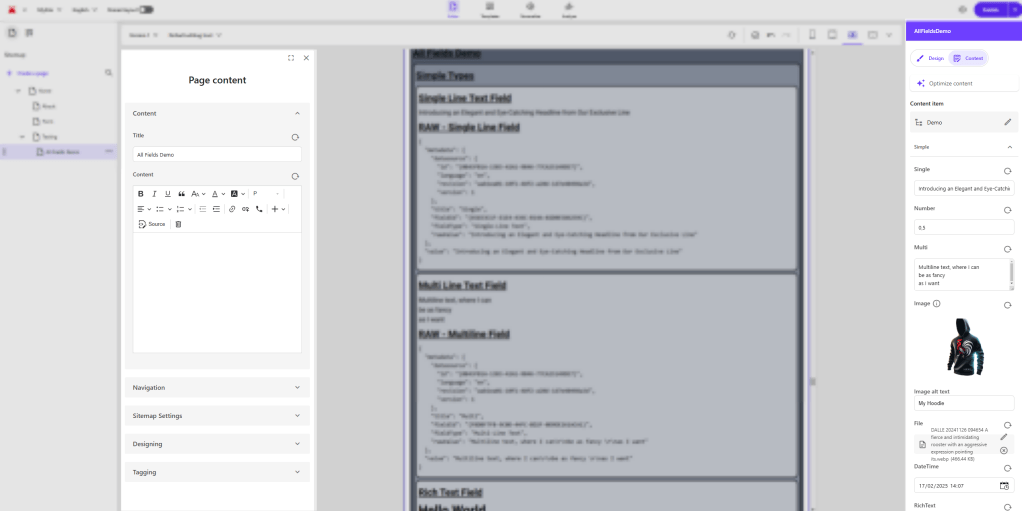
On the left hand site you can now expand a view of the current page. This is massively helpful to manage all the non visible metadata of a page for instance SEO related fields like Open Graph or similar. A pretty cool feature, where we do not have to leave the editor anymore to manage.
On the right hand side we now have a new context view when we click on a component. This gives us not only layout capabilities, like it did before, it also gives us now the possibility to manage content directly. We get a list of all the available fields from our component and get a possibility to manage them properly with a nice UI. You can already see a bit of that as some kind of sneak preview in the screenshot above. More to come in the next post. But you might ask yourself now:
Why do I need a context view to manage my component content?
The answer to that is simply, because we have field types, which do not offer WYSIWYG inline editing capabilities by nature, cause they are non-visible component level fields. Prominent examples of those fields are Checkbox, all kind of List Fields etc. Usually you don’t render the values of those fields directly in your component, but use the values to change what is rendered in the end. Therefore it was pretty challenging in the past to manage such kind of fields without inline editing. With the latest release of this special context view on component level we are now able to manage all of that within Page Builder.
A look behind the scenes from Data to Display
Let us start with a very detailed look at the process overall by the example of a very simple Single Line Text Field. I will cover most of the little details an Admin, a Marketer and a Developer should know.
Template: The starting point is the template. Let us assume you already created a template and now you need to add some fields to that one. You just add a proper and meaningful name of that field and then choose the type of field. (In this example Single Line Text Field) The third column is only relevant for some special field where you could add some additional information or limitations. For instance you could define the root item of a list based field to define from where references could be chosen.

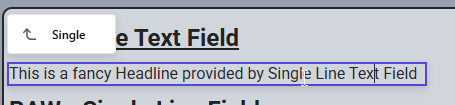
WYSIWYG Inline Editing: In Page Builder you can simply click on the displayed text. In case there is no text it displays [No text in field], which indicates you can start writing content here. In case you click into it, it gets highlighted and you can start writing new text / adapting the existing one etc. The result will be immediately saved to the component. Note: You need to use Sitecore JSS or .NET Core Rendering SDK and the corresponding field helpers to have a functionality like this enabled. We see more of that in the next sub chapters.
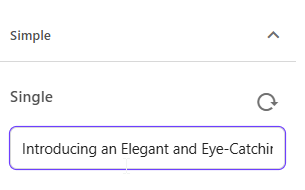
Context View Editing: This one is the new context view editing capability. Below you see a maximal zoomed in view, how the field looks like and what it offers. With our Single Line Text field example it looks pretty simple it offers also a single line field to enter content as well a “Revert to Standard Values” Button. Other field types offer more advanced editing capabilities, which you will see in the next post. Note: To be able to edit those fields within the Context View you DO NOT need to implement anything in the head with JSS or .NET Core Render Helper or similar like it is with inline editing WYSIWYG editing from the sub chapter before.
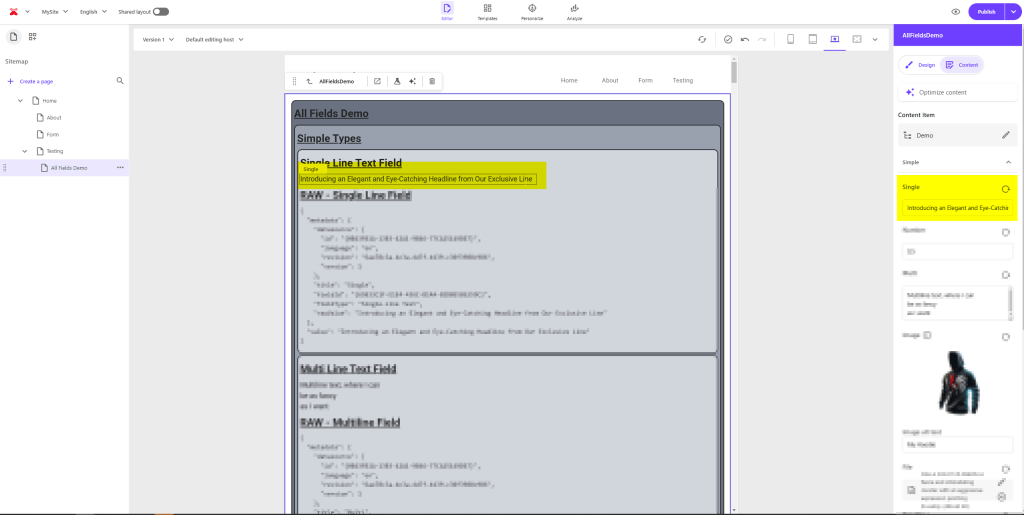
See below a more overall view of those both editing capabilities how they appear in Page Builder.
Raw Data: As all of the above is more the Admin or Marketer point of view and how they interact with the field, we will also have a deep dive into the raw value of the fields. This is pretty interesting for a head application developer, who consumes those fields in the frontend.
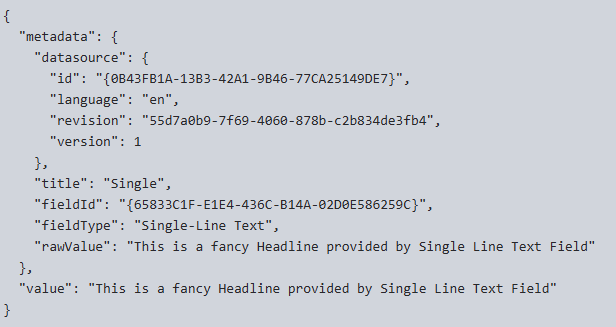
The structure is pretty common these days and represents the Metadata editing mode. Within this mode we have a property called Metadata, where all the metadata are stored, so that the WYSIWYG editing works. If you want to learn more about Metadata Mode I can highly recommend to read my series about this (Metadata Editing Mode: Part 1, Part2, Part3). Beside this metadata property we have the actually rendered field called value, which is used to display the field and is usually consumed by the head. You will see that in more detail in the next subchapter.
Model Mapping: Now we start with the very interesting part of model mapping. Here an example with next.js. To best understand why and how we do that, I guess it makes sense to see also at least ones the raw output of a whole component.
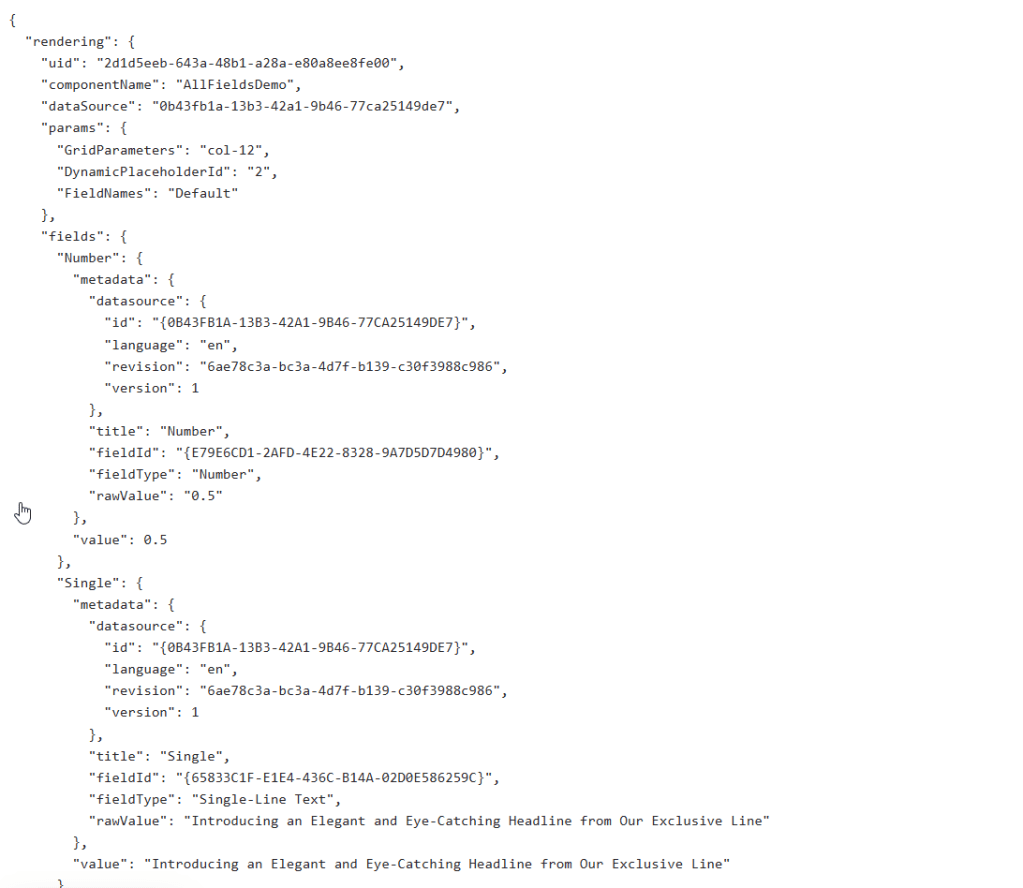
This is obviously an extraction, but nicely shows how a component is usually structured. If you want to consume those data in your component you have to “rebuild” this structure. Thats why you see properties like params and fields in the root Props object for instance. This pretty much matches what is on the root level of our component. Of course you can also consume more data, if available and needed. You can always check by examining the raw output of your component.
But let us come back to our case. Our fields object contains a lot of fields as it demonstrates ALL SUPPORTED field types. So in the end you just need a matching property naming wise as you can see below.
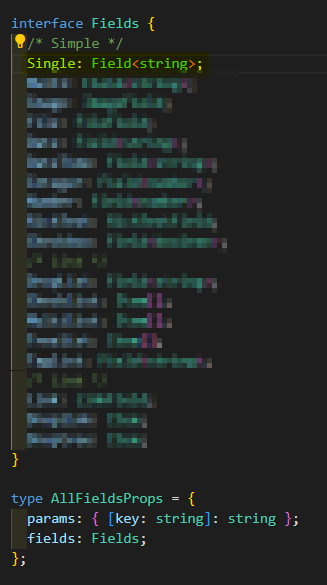
The property type might be a bit more complicated. But not that much. You just need to know, that Sitecore JSS for examples offers field helpers, which already do a lot for you. For the Single Line Field we simply use the Field helper and give it the generic type of string. There are some more generic as well as more specific field helper available. Below you see a screenshot of this generic helper.
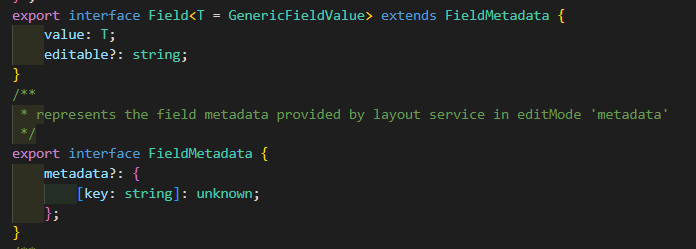
By seing this you should now understand that it matches the field structure in a way that it offers the needed value and metadata property OOTB for you. You can ignore editable property for now as it belongs to the older chromes based editing approach.
Render Field: So by following this pattern you can then render the field at any place in your markup by using a rendering helper. In this case we use the Text rendering helper and give it the Single Line Text Field. But you will see, that there are more render helper available. And you will see, that not all field types have their own Render Helper, or are simply not inline editable. This approach is needed for inline editing WYSIWYG, but NOT for new Context View editing experience.

JSS (.NET Core SDK with its own helper) is doing all the magic in the background to then enable WYSIWYG editing by adding some <code> blocks around the actual diff (Together with some other stuff)
No panic, I will not explain in such a detailed way all the rest of the fields. It will be more like a “what is different to the ones before” like way. This way you get the essence of all the information and differences.
Conclusion
Within this post you learned that Sitecore recently released some Page Builder features massively enhancing the editing capabilities. We saw, that we now have the possibility to manage Page specific metadata as well as component specific field data (mostly used for non inline editable data) in new context views. All this leads to the fact, that a Marketer does not have to leave the Page Builder anymore to fully manage a page.
We also had a more deep dive into the flow “From Data to Display” where we deep dived into field creation and management, how you can edit a field in Page Builder nowadays and went really deep down the developer road to have a look at the data model and the head application model mapping and how all this WYSIWYG inline editing actually happens.
Stay tuned for Part 2 of this blog post series, where I start running over the various supported field types to highlight their differences to the simple flow we saw here and how Marketers interact with those.
- ai
- architecture
- dotnet
- frontend
- nextjs
- sitecore-platform
- typescript
- xm-cloud